Hollow Knight 112% Checklist Overview
The checklist is located below this introductory text.
This is the interactive checklist for 112% Completion in Hollow Knight. Track your completion progress using this auto-save checklist.
This 112% Hollow Knight checklist is in optimal progression order - locations are ordered to be as convenient as possible, with the exception of the Charms table, which is in the exact order of in-game inventory for better orientation. Every item required for 112% features a screenshot of its location.
112% Completion Key Information
Very Important! Note that "112% Completion" is a specific arbitrary list of requirements you must match to get the pure completion-related achievement. It DOES NOT contain a large portion of things to collect or beat in the game, but it is relevant for the trophy Pure Completion. The trophies "Completion", "Speed Completion" and "Steel Heart" only require 100% of items, which means you don't have to acquire any 12 of the items of this checklist to obtain them.
The game contains much more than the items in this list, which is specifically relevant to 100% and 112% achievements. We strongly recommend visiting our Hollow Knight 100% Completion Hub to see everything you can complete for true 100% Completion.
As an example, the game has 35+ unique Bosses, but only 24 of them are required for 112%. 112% also doesn't require any collectibles, beating end-game challenges or completing the Hunter's Journal, which should be done for true Hollow Knight 100% Completion.
How is 112% counted?
It is pretty complicated. Some items count for 1%, some items count for 2%. The Mask Shards and Vessel Fragments are not needed, but full Masks and Soul Vessels count for 1% each. But, for convenience, we list everything you need to actually collect.
This is why the Progress number you see below can only reach 100%. If you have all items in the checklist and the progress is displaying 100%, you have successfully attained 112% Completion.
Related Checklists for 112%
Some of the requirements for 112% are complicated. You will also need to:
- save all Grubs for the Grubberfly's Elegy Charm - Use All Grubs Checklist
- find all Pale Ores for all Nail Upgrades - Use All Pale Ores Checklist
For true completion of the game, take a look at also collecting All Bosses, All Charm Notches, All Wanderer's Journals, All Hallownest Seals, All Arcane Eggs, All King's Idols, All Keys and All Hunter's Journal entries.
Mask Shards
These are all Mask Shards in the game. Collect 4 Mask Shards to assemble 1 Mask, which amounts to an extra life point. The maximum amount of Masks is 9.
| ✓ | Mask Shard | Location | |
|---|---|---|---|
|
Mask Shard #1
Area: Dirtmouth
Mask Shard
|
Location: Sold by Sly for 150 Geo. 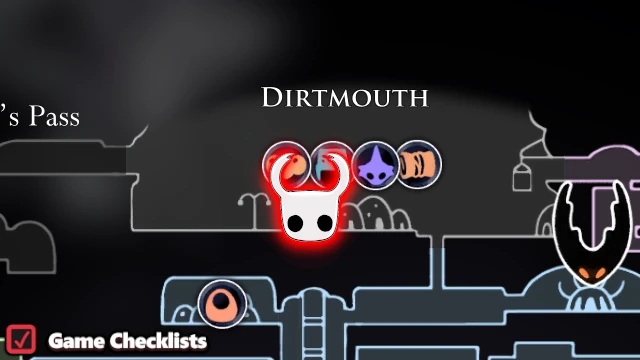 |
||
|
Mask Shard #2
Area: Dirtmouth
Mask Shard
|
Location: Sold by Sly for 500 Geo after buying Mask Shard #1. |
||
|
Mask Shard #3
Area: Dirtmouth
Mask Shard
|
Location: Sold by Sly for 800 Geo after bringing him the Shopkeeper's Key from Crystal Peak. |
||
|
Mask Shard #4
Area: Dirtmouth
Mask Shard
|
Location: Sold by Sly for 1500 Geo after bringing him the Shopkeeper's Key from Crystal Peak and buying Mask Shard #3. |
||
|
Mask Shard #5
Area: Dirtmouth
Mask Shard
|
Location: Found in Bretta's house after rescuing her in Fungal Wastes (near Bretta Bench)  |
||
|
Mask Shard #8
Area: Forgotten Crossroads
Mask Shard
|
Location: Reward from Grubfather for saving 5 Grubs. 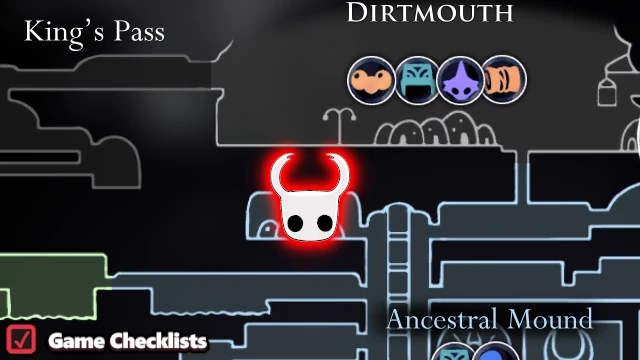 |
||
|
Mask Shard #7
Area: Forgotten Crossroads
Mask Shard
|
Location: Defeat Brooding Mawlek Boss. 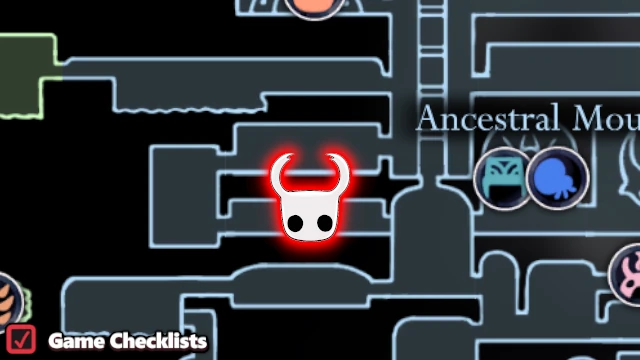 |
||
|
Mask Shard #6
Area: Forgotten Crossroads
Mask Shard
|
Location: Located in a room directly below Forgotten Crossroads Hot Springs Bench. Requires a Mantis Claw (wall jump) to reach. 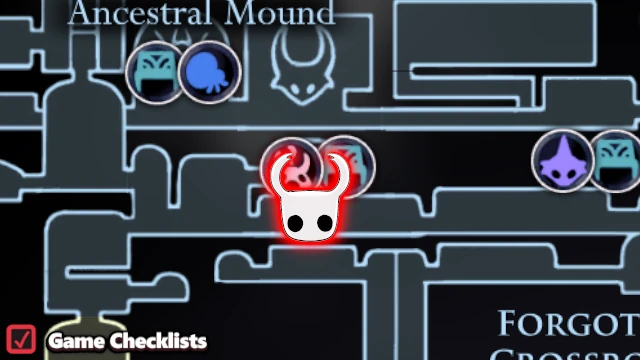 |
||
|
Mask Shard #9
Area: Greenpath
Mask Shard
|
Location: Defeat No Eyes Boss and find it in the right edge of Stone Sanctuary. 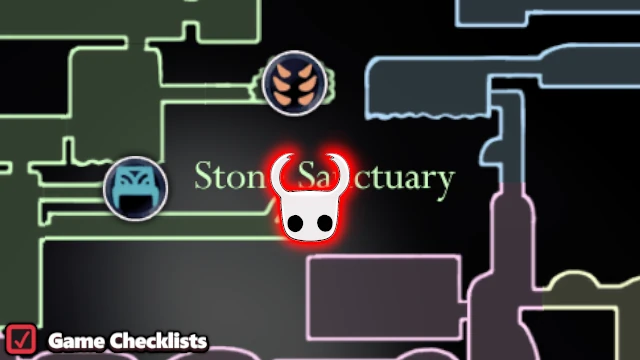 |
||
|
Mask Shard #10
Area: Fungal Wastes
Mask Shard
|
Location: Located in Queen's Station. Requires Mantis Claw (wall jump) to reach it from the bottom - the door on the top is a fake. 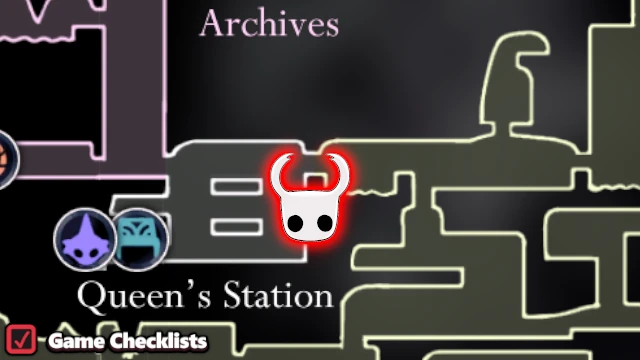 |
||
|
Mask Shard #11
Area: Royal Waterways
Mask Shard
|
Location: Located in the left edge of Royal Waterways, close to Cornifer's location. 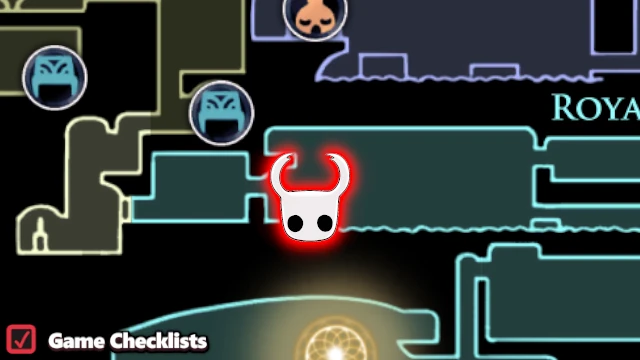 |
||
|
Mask Shard #12
Area: Crystal Peak
Mask Shard
|
Location: Defeat Enraged Guardian Boss, the Dream version of Crystal Guardian. Requires Monarch Wings (double jump). 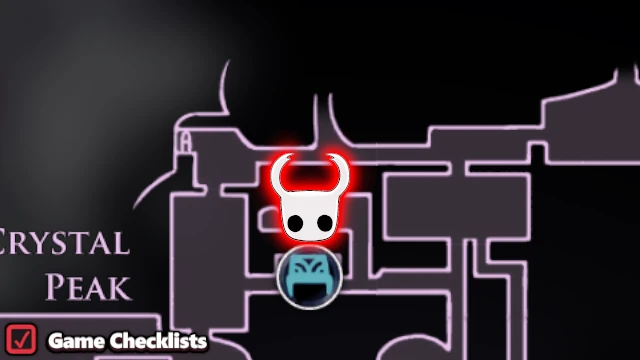 |
||
|
Mask Shard #13
Area: Resting Grounds
Mask Shard
|
Location: Reward from Seer for collecting 1500 Essence. 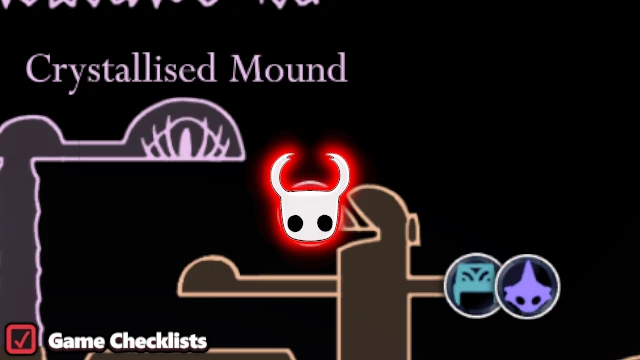 |
||
|
Mask Shard #14
Area: Resting Grounds
Mask Shard
|
Location: Reward from Grey Mourner for delivering the Delicate Flower.  |
||
|
Mask Shard #15
Area: Deepnest
Mask Shard
|
Location: Right above the main entrance to Deepnest from Mantis Lords. Needs to be accessed via the Fungal Core, subarea of Fungal Wastes.  |
||
|
Mask Shard #16
Area: The Hive
Mask Shard
|
Location: Bait the Hive Guardian enemy (large slow bee) to crash into the honey wall and break it.  |
Vessel Fragments
These are all Vessel Fragments in the game. Collect 4 Vessel Fragments to assemble 1 Soul Vessel, which gives extra Soul capacity, exactly one third of the starting amount, enough for exactly one heal or one spell cast. The maximum amount of Soul Vessels is 3, which in capacity together equal to one starting Soul Vessel.
| ✓ | Vessel Fragment | Location | |
|---|---|---|---|
|
Vessel Fragment #1
Area: Dirtmouth
Vessel Fragment
|
Location: Sold by Sly for 550 Geo. 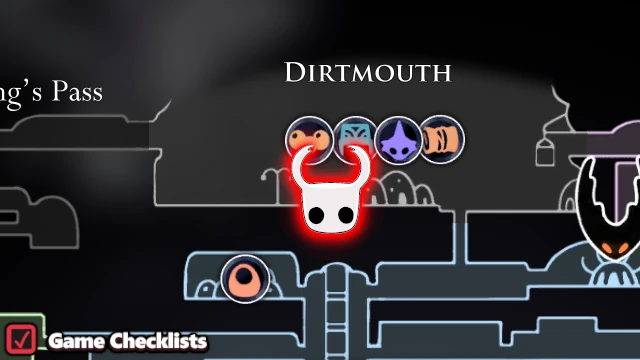 |
||
|
Vessel Fragment #2
Area: Dirtmouth
Vessel Fragment
|
Location: Sold by Sly for 900 Geo after bringing him the Shopkeeper's Key from Crystal Peak and buying Vessel Fragment #1. |
||
|
Vessel Fragment #3
Area: Forgotten Crossroads
Vessel Fragment
|
Location: Located left of the elevator from City of Tears. Needs to be accessed from City Storerooms. 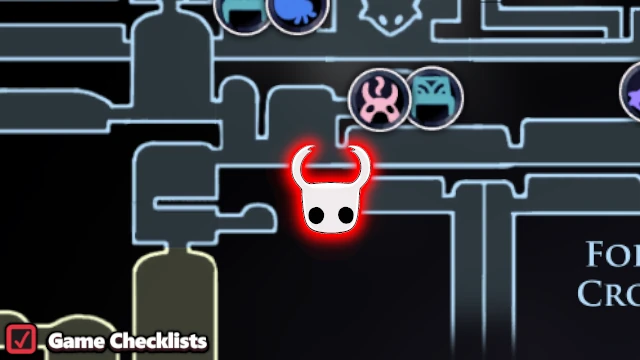 |
||
|
Vessel Fragment #4
Area: Greenpath
Vessel Fragment
|
Location: Located in the path towards Queen's Gardens.  |
||
|
Vessel Fragment #5
Area: City of Tears
Vessel Fragment
|
Location: Located in a tower right above King's Station. 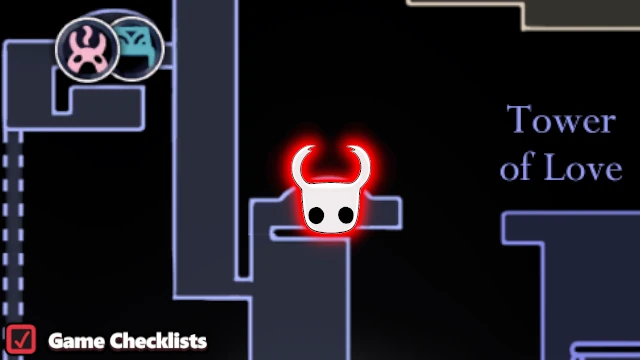 |
||
|
Vessel Fragment #6
Area: Ancient Basin
Vessel Fragment
|
Location: Reward for dropping 3000 Geo to the fountain with the Pale King statue.  |
||
|
Vessel Fragment #7
Area: Resting Grounds
Vessel Fragment
|
Location: Reward from Seer for collecting 700 Essence.  |
||
|
Vessel Fragment #8
Area: Howling Cliffs
Vessel Fragment
|
Location: Located in Stag Nest, which is only accessible after unlocking all other Stag Stations.  |
||
|
Vessel Fragment #9
Area: Deepnest
Vessel Fragment
|
Location: Located right of the Deepnest Hot Springs Bench, in the Garpede parkour room.  |
Charms
These are all Charms in the game. This table is ordered like in the game's inventory for clarity.
Use the All Charm Notches Checklist to discover all possible notches you can have to equip your Charms.
Collect at least 40 Charms and visit Salubra to buy the Salubra's Blessing for 800 Geo. This will refill your Soul at every Bench.
| ✓ | Charm | Location | |
|---|---|---|---|
|
Wayward Compass
Area: Dirtmouth
Charm
|
Location: Sold by Iselda for 220 Geo.  |
||
|
Gathering Swarm
Area: Dirtmouth
Charm
|
Location: Sold by Sly for 300 Geo.  |
||
|
Stalwart Shell
Area: Dirtmouth
Charm
|
Location: Sold by Sly for 200 Geo. |
||
|
Soul Catcher
Area: Forgotten Crossroads
Charm
|
Location: Found within the Ancestral Mound.  |
||
|
Shaman Stone
Area: Forgotten Crossroads
Charm
|
Location: Sold by Salubra for 220 Geo.  |
||
|
Soul Eater
Area: Resting Grounds
Charm
|
Location: Located in the Resting Grounds tunnel sections behind a breakable floor. Desolate Dive is required.  |
||
|
Dashmaster
Area: Fungal Wastes
Charm
|
Location: Found near Bretta Bench.  |
||
|
Sprintmaster
Area: Dirtmouth
Charm
|
Location: Sold by Sly for 400 Geo after bringing him the Shopkeeper's Key from Crystal Peak. |
||
|
Grubsong
Area: Forgotten Crossroads
Charm
|
Location: Reward from Grubfather after saving 10 Grubs. 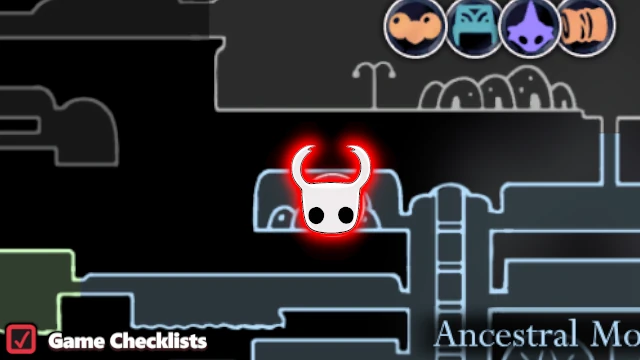 |
||
|
Grubberfly's Elegy
Area: Forgotten Crossroads
Charm
|
Location: Reward from Grubfather after saving all 46 Grubs. |
||
|
Fragile Heart / Unbreakable Heart
Area: Fungal Wastes
Charm
|
Location: Sold by Leg Eater for 350 Geo. Can be upgraded to Unbreakable Heart at Divine for 12000 Geo. 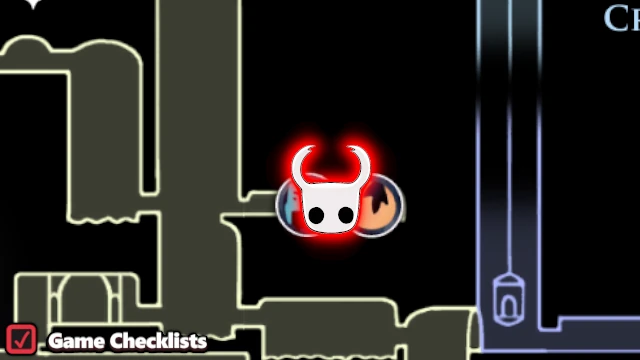 |
||
|
Fragile Greed / Unbreakable Greed
Area: Fungal Wastes
Charm
|
Location: Sold by Leg Eater for 250 Geo. Can be upgraded to Unbreakable Greed at Divine for 9000 Geo. |
||
|
Fragile Strength / Unbreakable Strength
Area: Fungal Wastes
Charm
|
Location: Sold by Leg Eater for 600 Geo. Can be upgraded to Unbreakable Strength at Divine for 15000 Geo. |
||
|
Spell Twister
Area: City of Tears
Charm
|
Location: Found on top of the Soul Sanctum in a room full of Mistakes. 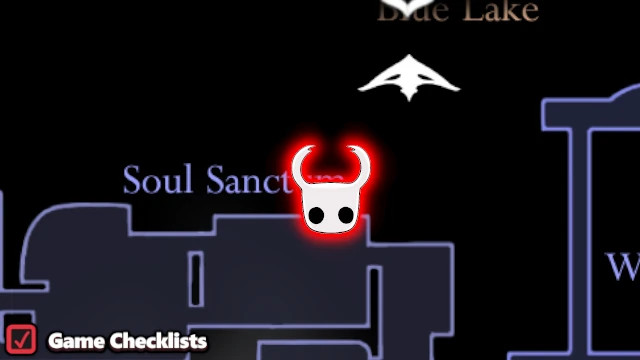 |
||
|
Steady Body
Area: Forgotten Crossroads
Charm
|
Location: Sold by Salubra for 120 Geo. |
||
|
Heavy Blow
Area: Dirtmouth
Charm
|
Location: Sold by Sly for 350 Geo after bringing him the Shopkeeper's Key from Crystal Peak. |
||
|
Quick Slash
Area: Kingdom's Edge
Charm
|
Location: Located below Nailmaster Oro's hut. 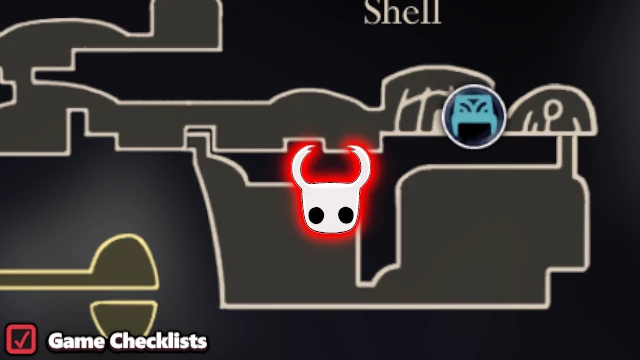 |
||
|
Longnail
Area: Forgotten Crossroads
Charm
|
Location: Sold by Salubra for 300 Geo. |
||
|
Mark of Pride
Area: Fungal Wastes
Charm
|
Location: Found in the reward room for defeating Mantis Lords Boss. 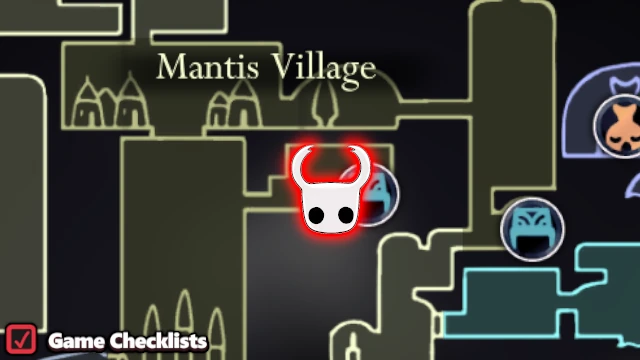 |
||
|
Fury of the Fallen
Area: Howling Cliffs
Charm
|
Location: Found in the tutorial section, King's Pass, after pogo-ing spikes in the section. Later the spikes can be skipped with Mothwing Cloak (dash). 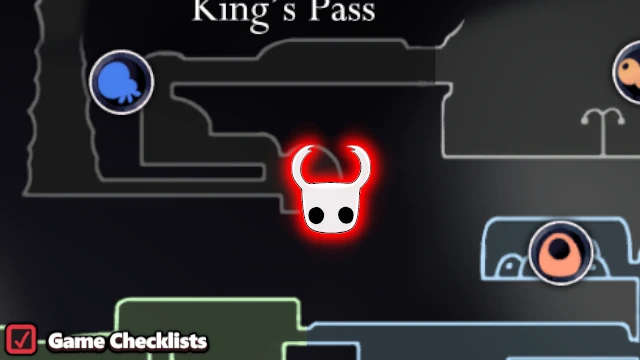 |
||
|
Thorns of Agony
Area: Greenpath
Charm
|
Location: Found in a parkour section with electricity and thorns in the middle of Greenpath.  |
||
|
Baldur Shell
Area: Howling Cliffs
Charm
|
Location: Found in the first room of Howling Cliffs - jump into the suspicious chest to arrive into a trap room with two Elder Baldurs. 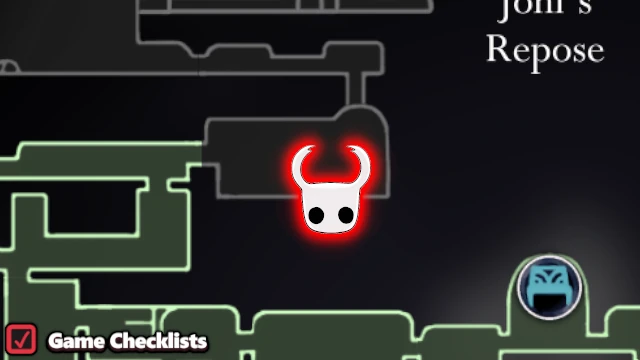 |
||
|
Flukenest
Area: Royal Waterways
Charm
|
Location: Reward for defeating Flukemarm Boss. 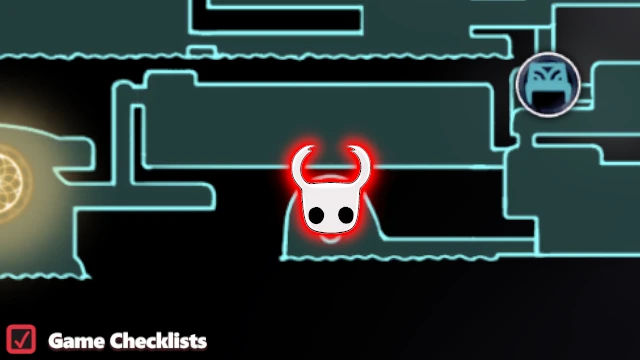 |
||
|
Defender's Crest
Area: Royal Waterways
Charm
|
Location: Reward for defeating Dung Defender Boss.  |
||
|
Glowing Womb
Area: Forgotten Crossroads
Charm
|
Location: Found in an aspid section revealed by a breaking wall (or when a Husk Guards slams its hammer into the wall). 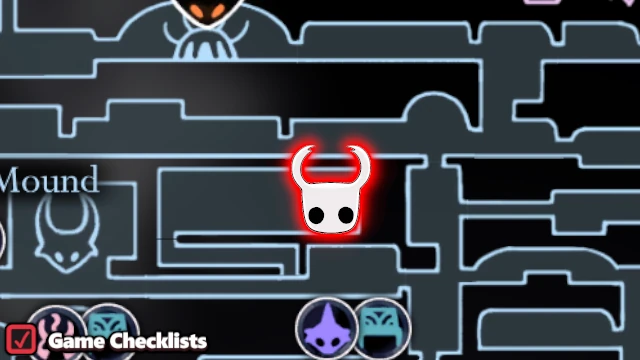 |
||
|
Quick Focus
Area: Forgotten Crossroads
Charm
|
Location: Sold by Salubra for 800 Geo. |
||
|
Deep Focus
Area: Crystal Peak
Charm
|
Location: Found behind a breakable wall where an enemy is using a pickaxe on the wall. 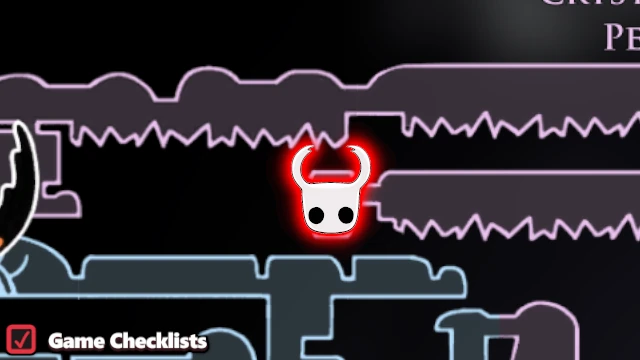 |
||
|
Lifeblood Heart
Area: Forgotten Crossroads
Charm
|
Location: Sold by Salubra for 250 Geo. |
||
|
Lifeblood Core
Area: Ancient Basin
Charm
|
Location: Located in The Abyss - open the lifeblood door by having at least 15 Lifeblood hearts. 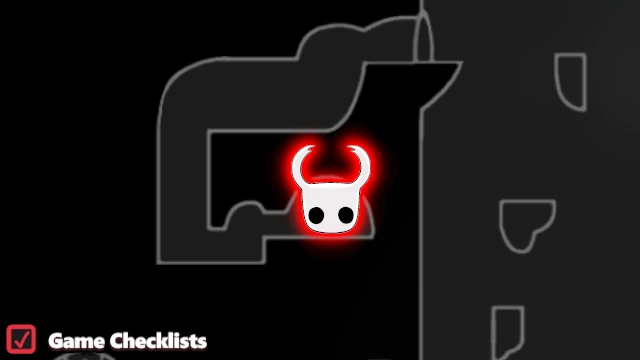 |
||
|
Joni's Blessing
Area: Howling Cliffs
Charm
|
Location: Found in Joni's Repose subarea.  |
||
|
Hiveblood
Area: The Hive
Charm
|
Location: Reward for defeating The Hive Knight. 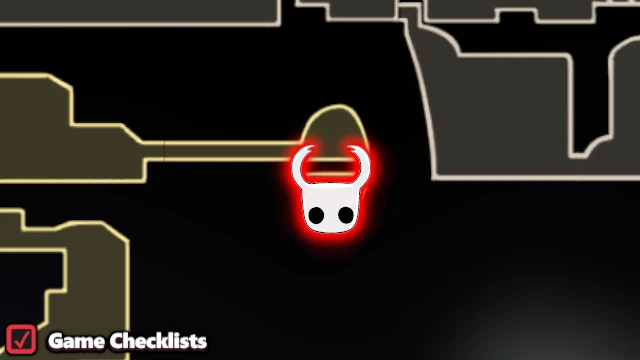 |
||
|
Spore Shroom
Area: Fungal Wastes
Charm
|
Location: Found in a room directly below Queen's Station, close to the path towards Deepnest.  |
||
|
Sharp Shadow
Area: Deepnest
Charm
|
Location: Located near the Deepnest Hot Springs Bench, to the right. Shade Cloak ability required.  |
||
|
Shape of Unn
Area: Greenpath
Charm
|
Location: Found behind the Lake of Unn, Crystal Dash is required. 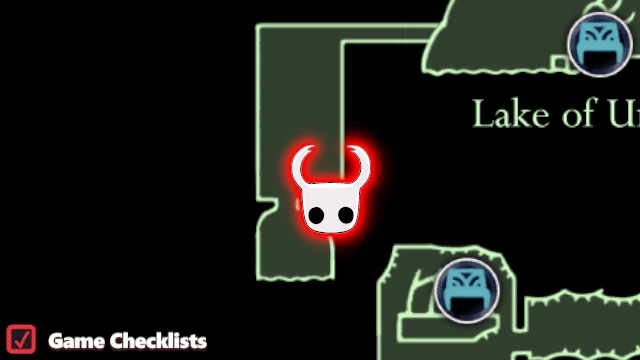 |
||
|
Nailmaster's Glory
Area: Dirtmouth
Charm
|
Location: Reward from Sly after obtaining all 3 Nail Arts - Cyclone Slash, Dash Slash and Great Slash. |
||
|
Weaversong
Area: Deepnest
Charm
|
Location: Located in the Weavernest in the middle of Deepnest.  |
||
|
Dream Wielder
Area: Resting Grounds
Charm
|
Location: Reward from Seer for collecting 500 Essence. 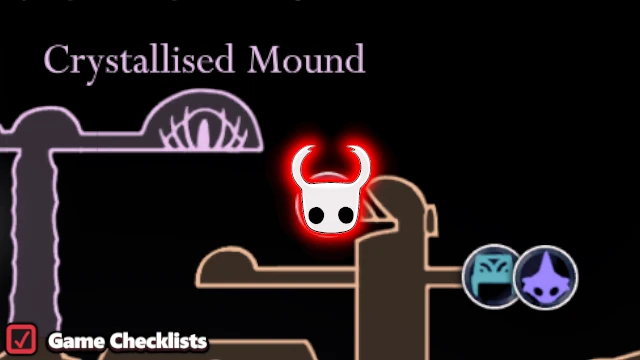 |
||
|
Dreamshield
Area: Resting Grounds
Charm
|
Location: Found behind a breakable wall in the Resting Grounds tall room.  |
||
|
Grimmchild / Carefree Melody
Area: Dirtmouth
Charm
|
Location: These charms are exclusive to each other. Grimmchild is given by Troupe Master Grimm after The Grimm Troupe is summoned to Dirtmouth. Carefree Melody is given by Nymn at Dirtmouth after choosing to banish the Troupe.  |
||
|
Kingsoul / Void Heart
Area: Ancient Basin
Charm
|
Location: You will get Kingsoul by having both White Fragments. White Fragment #1 is given by White Lady behind Traitor Lord Boss in Queen's Gardens. White Fragment #2 is a reward for clearing the White Palace area. Void Heart is obtaining by having Kingsoul equipped and reaching The Abyss's bottom area, The Birthplace. Displayed is the location where you transform the Kingsoul into the Void Heart charm. 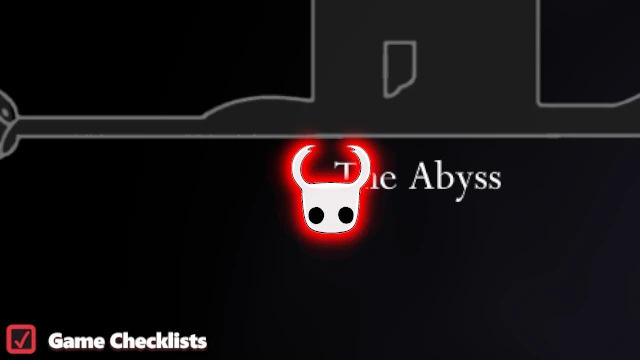 |
Spells
These are all spells in the game. Spells cost 3 Soul, the same amount as one Mask heal. There are three basic spells (Vengeful Spirit, Desolate Dive, Howling Wraiths) and three void-infused upgraded versions (Shade Soul, Descending Dark, Abyss Shriek) which deal more damage.
| ✓ | Spell | Location | |
|---|---|---|---|
|
Vengeful Spirit
Area: Forgotten Crossroads
Spell
|
Location: Defeat the False Knight and progress into the Ancestral Mound.  |
||
|
Shade Soul
Area: City of Tears
Spell
|
Location: Found in Soul Sanctum near the Soul Sanctum Bench Shortcut. Elegant Key is required to open the door. 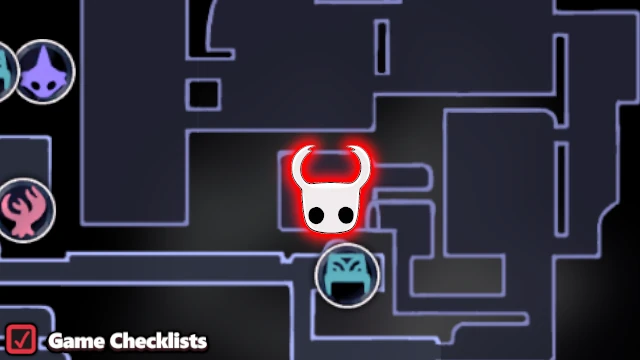 |
||
|
Desolate Dive
Area: City of Tears
Spell
|
Location: Defeat Soul Master Boss. 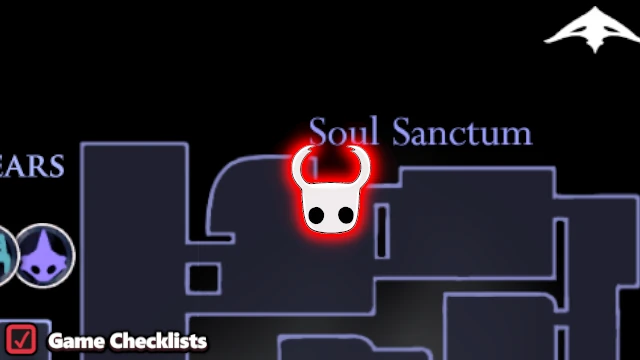 |
||
|
Descending Dark
Area: Crystal Peak
Spell
|
Location: Found in Crystallised Mound, just past the hole leading to Resting Grounds. 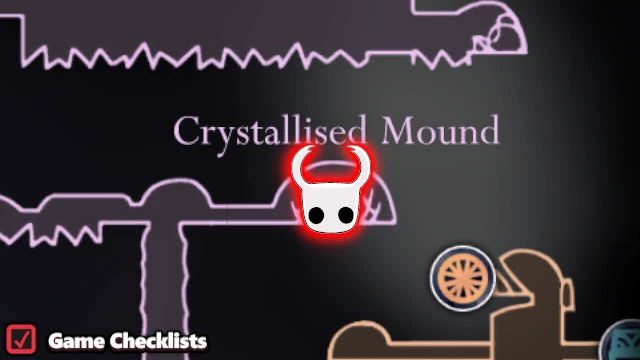 |
||
|
Howling Wraiths
Area: Fog Canyon
Spell
|
Location: Found in the Overgrown Mound. 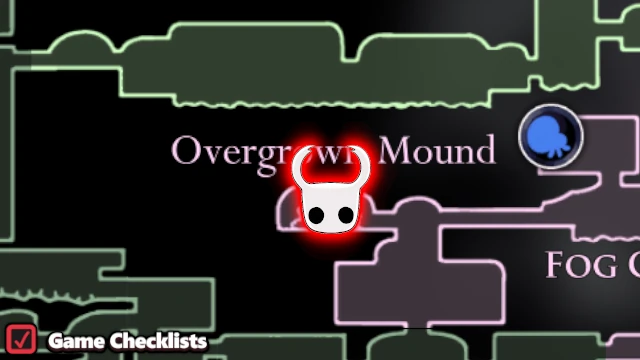 |
||
|
Abyss Shriek
Area: Ancient Basin
Spell
|
Location: In The Abyss, left side. Stand in front of the large face and use Howling Wraiths to obtain. 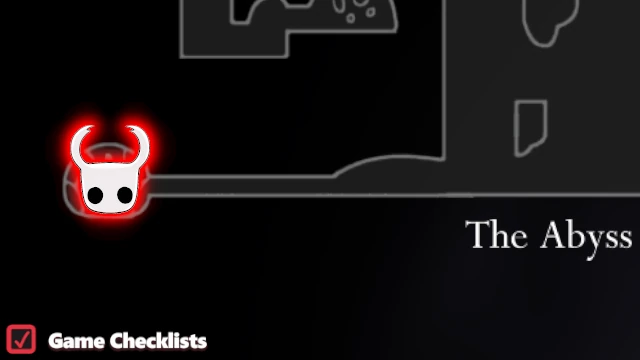 |
Abilities
These are all abilities in the game. Obtaining them is necessary for game progression and they are often guarded by story Bosses.
Abilities give you basic movement abilities, such as the dash, wall jump, super dash, double jump, acid skipping and ghost dashing. The only exception in this list is the King's Brand, which only serves to grant access to The Abyss area.
| ✓ | Ability | Location | |
|---|---|---|---|
|
Mothwing Cloak (Dash)
Area: Greenpath
Ability
|
Location: Defeat Hornet Boss.  |
||
|
Mantis Claw (Wall Jump)
Area: Fungal Wastes
Ability
|
Location: Found at the top of the Mantis Village, after switching on a few levers. 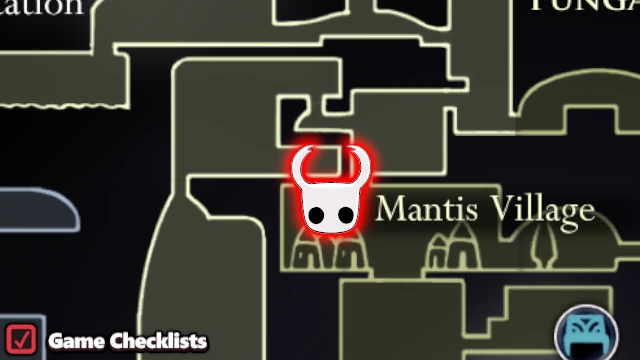 |
||
|
Crystal Heart (Super Dash)
Area: Crystal Peak
Ability
|
Location: Found at the rightmost edge of Crystal Peak.  |
||
|
Isma's Tear (Acid Immunity)
Area: Royal Waterways
Ability
|
Location: Found at the right part of Royal Waterways, accessible by using Crystal Heart through the spiky section crossing the broken elevator pit leading to Ancient Basin. 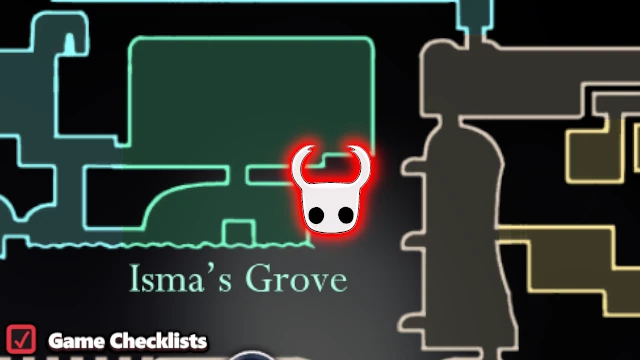 |
||
|
Monarch Wings (Double Jump)
Area: Ancient Basin
Ability
|
Location: Defeat Broken Vessel Boss.  |
||
|
King's Brand (Access to The Abyss)
Area: Kingdom's Edge
Ability
|
Location: Defeat Hornet Sentinel Boss and continue into the Cast-Off Shell 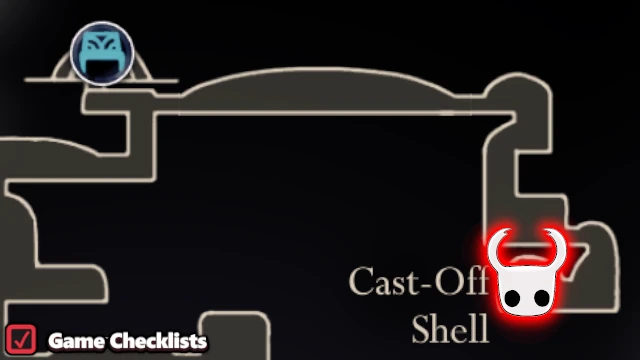 |
||
|
Shade Cloak (Ghost Dash)
Area: Ancient Basin
Ability
|
Location: In The Abyss, in the very right section, accessible after activating the lighthouse.  |
Dream Nail
The Seer rewards you for many different milestones than the ones listed, but these are specifically required for 112%.
Gain Essence by using Dream Nail on Whispering Roots and collect the Essence Orbs. You should also defeat the Warrior's Dream Bosses and Dreamer Bosses - visit the All Bosses Checklist to see them all.
| ✓ | Dream Nail | Location | |
|---|---|---|---|
|
Get the Dream Nail
Area: Resting Grounds
Dream Nail
|
Location: Encounter the Three Watcher Statues in Resting Grounds.  |
||
|
Get Awakened Dream Nail
Area: Resting Grounds
Dream Nail
|
Location: Gather 1800 Essence. 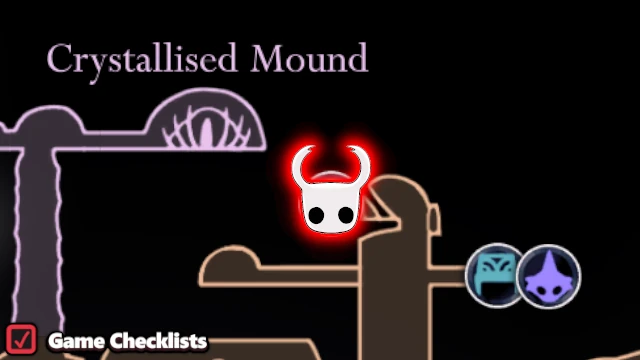 |
||
|
Hear the Seer's Final Words
Area: Resting Grounds
Dream Nail
|
Location: Gather 2400 Essence. |
Nail Upgrades
These are all Nail Upgrades in the game. Use the Pale Ore Checklist to locate all Pale Ores in Hollow Knight.
Nail upgrading is done at the Nailsmith's hut, at the far left edge of City of Tears.
| ✓ | Nail Upgrade | Location | |
|---|---|---|---|
|
Sharpened Nail
Area: City of Tears
Nail Upgrade
|
Location: Costs 250 Geo. 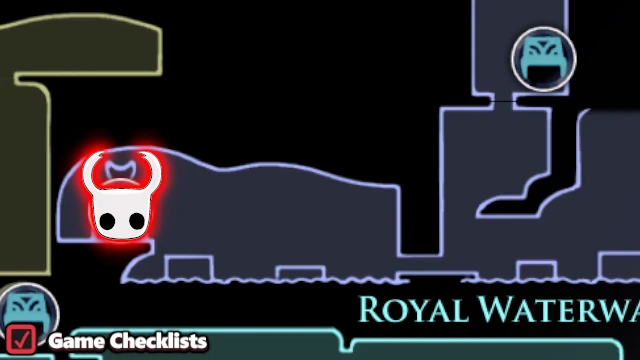 |
||
|
Channeled Nail
Area: City of Tears
Nail Upgrade
|
Location: Costs 800 Geo and 1 Pale Ore. |
||
|
Coiled Nail
Area: City of Tears
Nail Upgrade
|
Location: Costs 2000 Geo and 2 Pale Ores. |
||
|
Pure Nail
Area: City of Tears
Nail Upgrade
|
Location: Costs 4000 Geo and 3 Pale Ores. |
Nail Arts
These are all Nail Arts in the game. They are special moves you can perform with your nail to deal larger and area of effect damage.
All Nail Arts are learnt at the three Nailmasters around the map.
| ✓ | Nail Art | Location | |
|---|---|---|---|
|
Great Slash
Area: Greenpath
Nail Art
|
Location: Visit Nailmaster Sheo and learn the Nail Art. 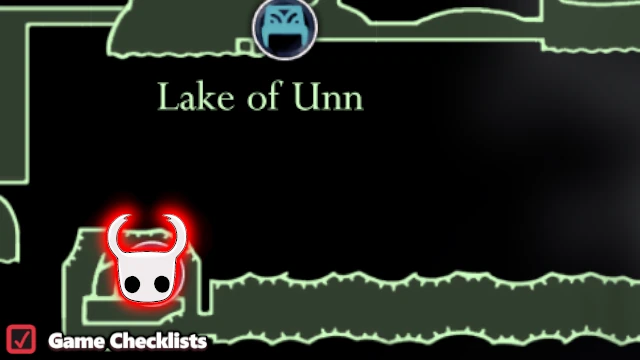 |
||
|
Cyclone Slash
Area: Howling Cliffs
Nail Art
|
Location: Visit Nailmaster Mato and learn the Nail Art. 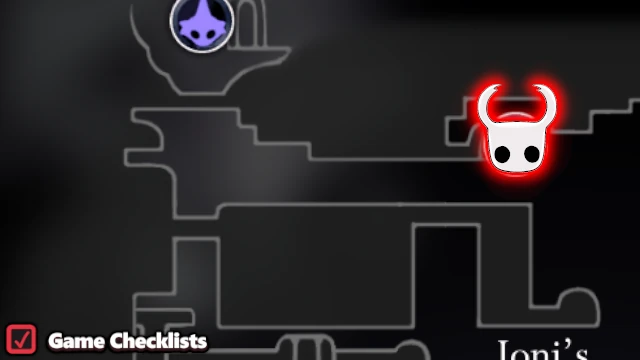 |
||
|
Dash Slash
Area: Kingdom's Edge
Nail Art
|
Location: Visit Nailmaster Oro and pay him 800 Geo to learn the Nail Art.  |
Colosseum of the Fools
These are all Trials in the Colosseum of Fools. Every trial costs 100 Geo to begin.
Note that especially the last challenge is very difficult and they require high skill, especially in aerial combat.
| ✓ | Colosseum Trial | Location | |
|---|---|---|---|
|
Trial of the Warrior
Area: Kingdom's Edge
Colosseum Trial
|
Location: The easiest trial, rewarding 1000 Geo and 1 Charm Notch. 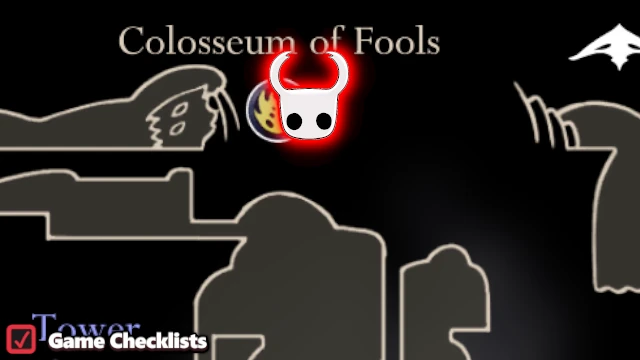 |
||
|
Trial of the Conqueror
Area: Kingdom's Edge
Colosseum Trial
|
Location: The medium trial, rewarding 2000 Geo and 1 Pale Ore. |
||
|
Trial of the Fool
Area: Kingdom's Edge
Colosseum Trial
|
Location: The hardest trial, rewarding 3000 Geo. |
Godhome Pantheon
These are NOT all Godhome challenges, but only these count towards 112%. Godhome also has the most difficult challenge, Pantheon of Hallownest, known also as Pantheon 5, which is NOT required. Beating bosses separately on any difficulty is also not required for 112%.
| ✓ | Godhome Challenge | Location | |
|---|---|---|---|
|
Reach Godhome
Area: Royal Waterways
Godhome Challenge
|
Location: Pick up the Godtuner in the Junk Pit and enter the Godhome. 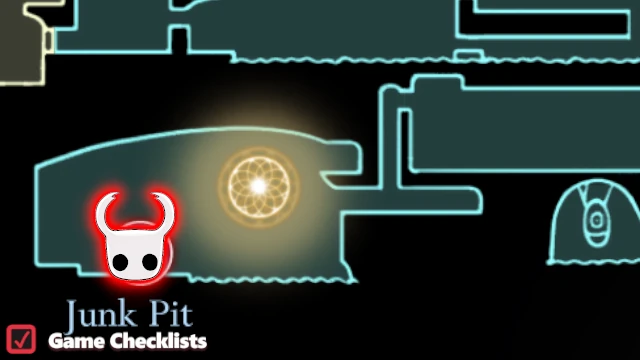 |
||
|
Pantheon of the Master
Area: Godhome
Godhome Challenge
|
Location: The first Pantheon in Godhome. 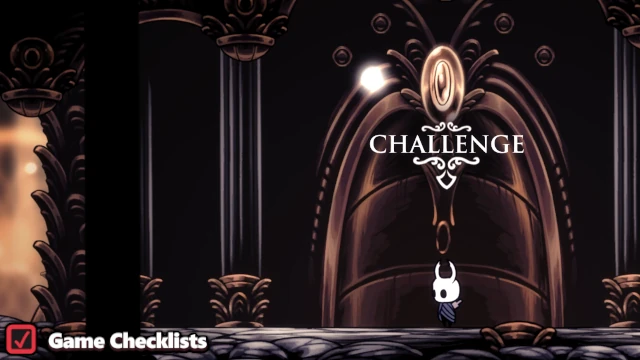 |
||
|
Pantheon of the Artist
Area: Godhome
Godhome Challenge
|
Location: The second Pantheon in Godhome. 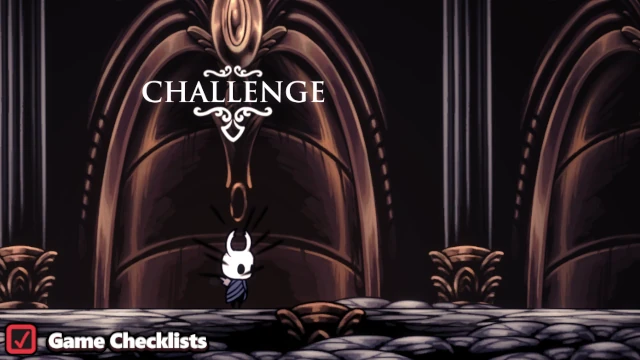 |
||
|
Pantheon of the Sage
Area: Godhome
Godhome Challenge
|
Location: The third Pantheon in Godhome. 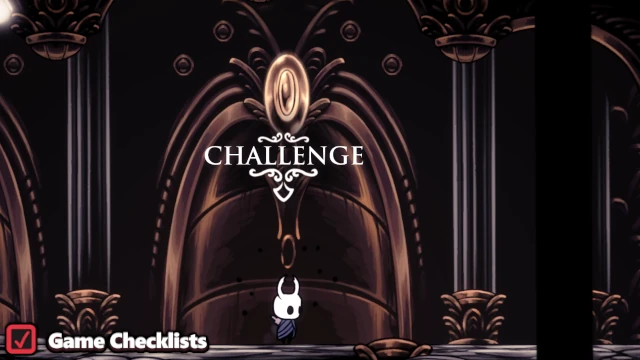 |
||
|
Pantheon of the Knight
Area: Godhome
Godhome Challenge
|
Location: The fourth Pantheon in Godhome. 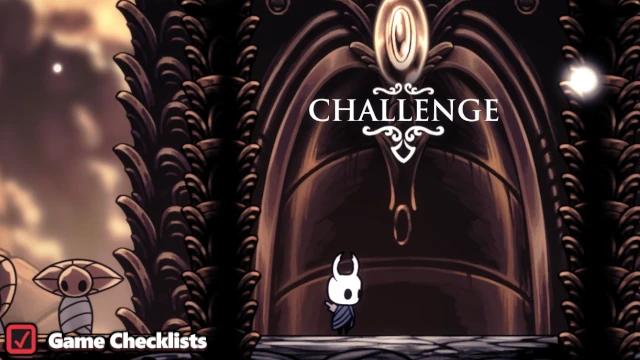 |
Bosses
These are NOT all Bosses in the game, only those that count towards the specific 112% requirements! Visit the All Bosses Checklist if you aim to truly get 100% Completion!
| ✓ | Boss | Location | |
|---|---|---|---|
|
Gruz Mother
Area: Forgotten Crossroads
Boss
|
Location: Encountered to the right and bottom of Forgotten Crossroads Stag station, on the way to Salubra. See Gruz Mother entry in All Bosses checklist. 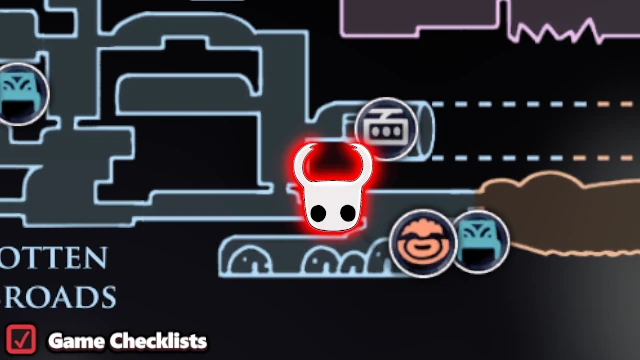 |
||
|
False Knight
Area: Forgotten Crossroads
Boss
|
Location: Encountered above the Forgotten Crossroads Stag station. See False Knight entry in All Bosses checklist. 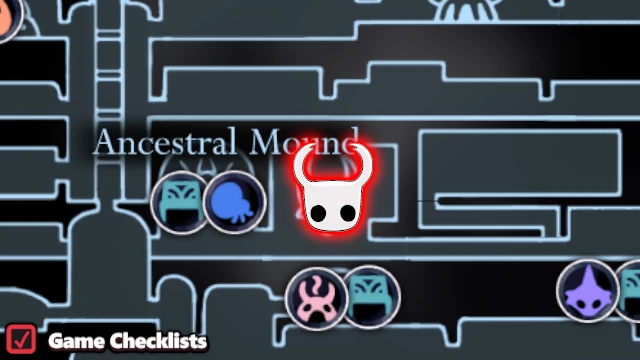 |
||
|
Brooding Mawlek
Area: Forgotten Crossroads
Boss
|
Location: Encountered at Forgotten Crossroads, accessible from the main tall room behind a breakable wall. See Brooding Mawlek entry in All Bosses checklist. 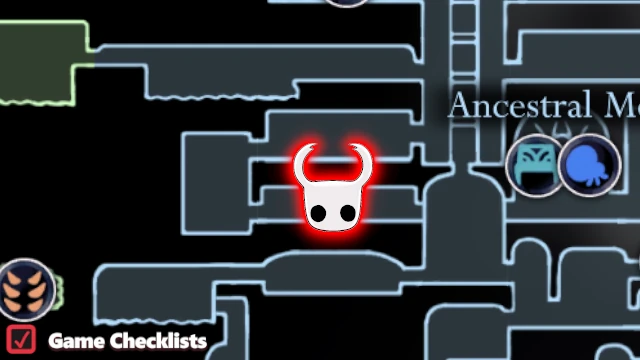 |
||
|
Hornet
Area: Greenpath
Boss
|
Location: Encountered above Greenpath Stag station. See Hornet entry in All Bosses checklist. 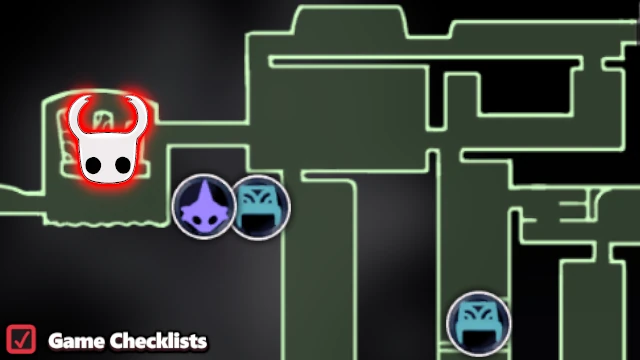 |
||
|
Mantis Lords
Area: Fungal Wastes
Boss
|
Location: Encountered at the bottom of Mantis Village. See Mantis Lords entry in All Bosses checklist. 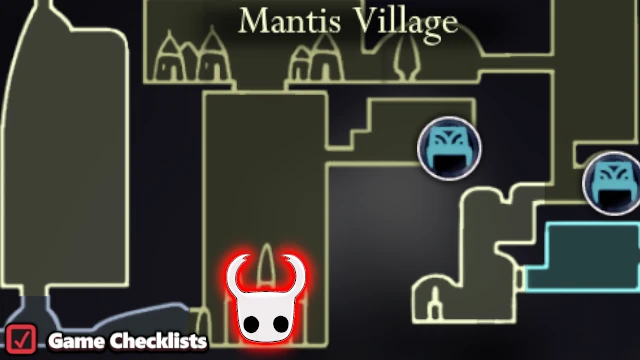 |
||
|
Soul Master
Area: City of Tears
Boss
|
Location: Encountered at the top of Soul Sanctum. See Soul Master entry in All Bosses checklist. 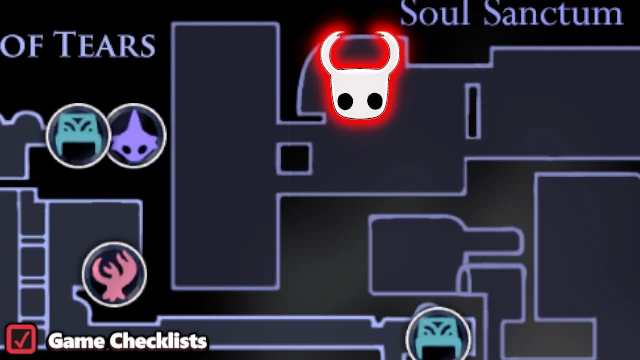 |
||
|
The Collector
Area: City of Tears
Boss
|
Location: Encountered at Tower of Love. See The Collector entry in All Bosses checklist.  |
||
|
Watcher Knights
Area: City of Tears
Boss
|
Location: Encountered at Watcher's Spire, protecting Lurien the Watcher. See Watcher Knights entry in All Bosses checklist.  |
||
|
Dung Defender
Area: Royal Waterways
Boss
|
Location: Encountered at Royal Waterways, grants access to the eastern part of the waterways and City of Tears. See Dung Defender entry in All Bosses checklist.  |
||
|
Broken Vessel
Area: Ancient Basin
Boss
|
Location: Encountered at the end of Ancient Basin. See Broken Vessel entry in All Bosses checklist.  |
||
|
Nosk
Area: Deepnest
Boss
|
Location: Encountered at the bottom of Deepnest, behind breakable walls starting to the left of Deepnest Hot Springs Bench. See Nosk entry in All Bosses checklist.  |
||
|
Hornet Sentinel
Area: Kingdom's Edge
Boss
|
Location: Encountered at the right edge of Kingdom's Edge, on the way to the Cast-Off Shell. See Hornet Sentinel entry in All Bosses checklist. 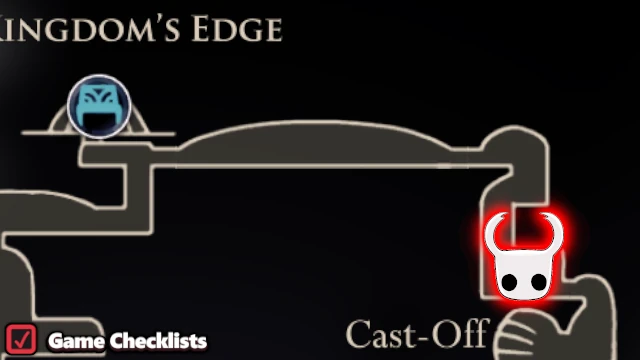 |
||
|
Hive Knight
Area: The Hive
Boss
|
Location: Encountered at the end of The Hive. See Hive Knight entry in All Bosses checklist.  |
||
|
Uumuu
Area: Fog Canyon
Boss
|
Location: Encountered at Teacher's Archives, protecting Monomon the Teacher Dreamer. See Uumuu entry in All Bosses checklist. 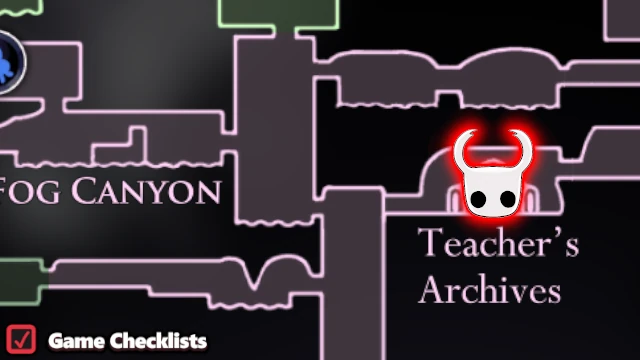 |
||
|
Traitor Lord
Area: Queen's Gardens
Boss
|
Location: Encountered at the end of Queen's Gardens, on the way to The White Lady. See Traitor Lord entry in All Bosses checklist. 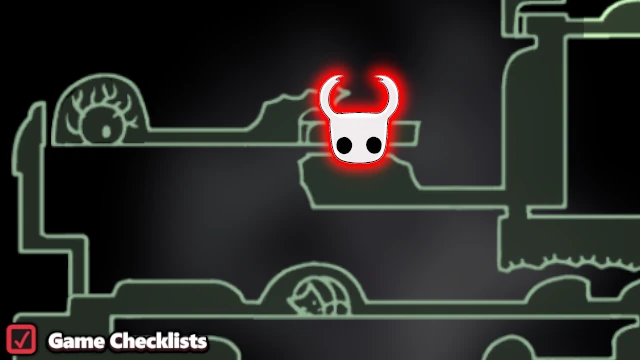 |
||
|
Troupe Master Grimm
Area: Dirtmouth
Boss
|
Location: The first Grimm fight, activated at Dirtmouth after The Grimm Troupe moves there. See Troupe Master Grimm entry in All Bosses checklist. 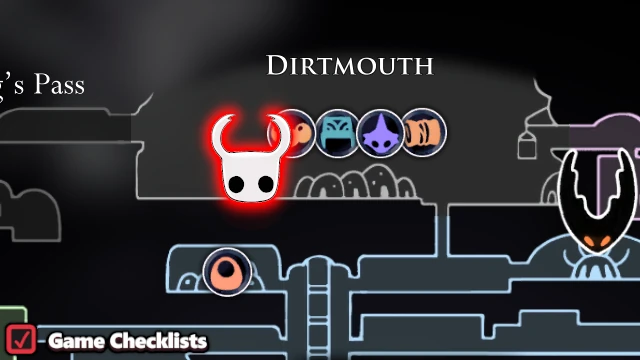 |
Warrior's Dream Bosses
These are all Warrior's Dream Bosses and Dream Bosses required for 112%, but not all Dream related Bosses in the game! Visit the All Bosses Checklist if you aim to truly get 100% Completion!
| ✓ | Warrior's Dream Boss | Location | |
|---|---|---|---|
|
Galien
Area: Deepnest
Warrior's Dream Boss
|
Location: Located in a room directly below where you get the Tramway Pass. See Galien entry in All Bosses checklist. 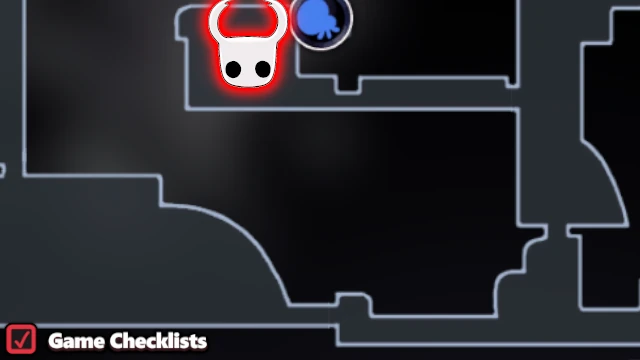 |
||
|
Marmu
Area: Queen's Gardens
Warrior's Dream Boss
|
Location: Located near Marmu's Totem, directly left of the Queen's Gardens Stag Station Bench, but you need to unlock the shortcut first. See Marmu entry in All Bosses checklist. 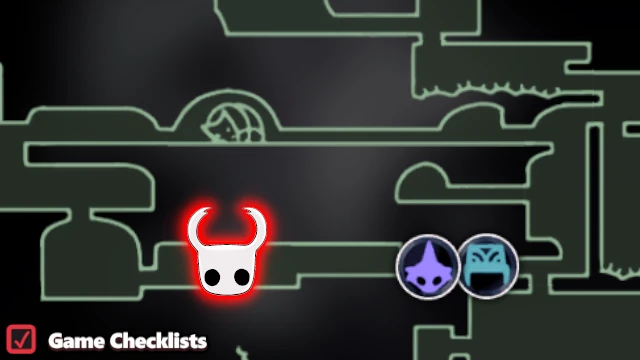 |
||
|
Markoth
Area: Kingdom's Edge
Warrior's Dream Boss
|
Location: Located below the Kingdom's Edge Surface Bench. Shade Cloak is required to reach. See Markoth entry in All Bosses checklist. 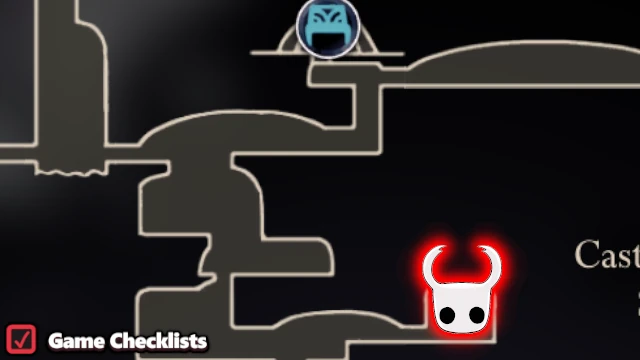 |
||
|
Xero
Area: Resting Grounds
Warrior's Dream Boss
|
Location: Located on the main floor of Resting Grounds. See Xero entry in All Bosses checklist. 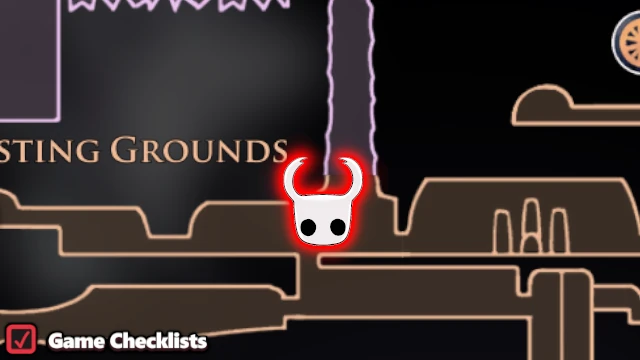 |
||
|
No Eyes
Area: Greenpath
Warrior's Dream Boss
|
Location: Located in the Stone Sanctuary. See No Eyes entry in All Bosses checklist. 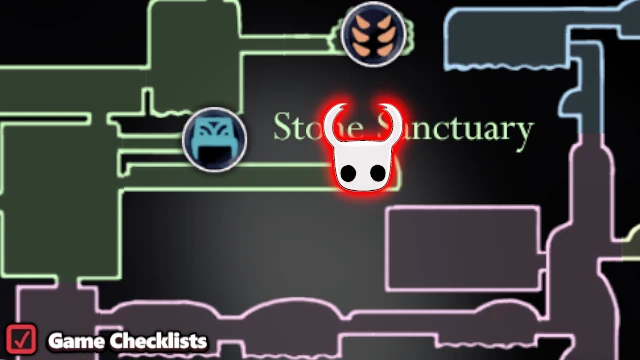 |
||
|
Elder Hu
Area: Fungal Wastes
Warrior's Dream Boss
|
Location: Located in a room directly above the entrance to City of Tears. See Elder Hu entry in All Bosses checklist.  |
||
|
Gorb
Area: Howling Cliffs
Warrior's Dream Boss
|
Location: Located at the very top of Howling Cliffs. See Gorb entry in All Bosses checklist. 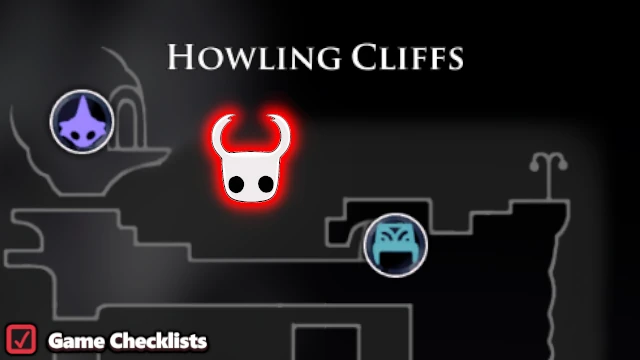 |
||
|
Nightmare King Grimm
Area: Dirtmouth
Dream Boss
|
Location: The second Grimm fight, activated at Dirtmouth after The Grimm Troupe moves there, beating Troupe Master Grimm and finding all required Grimmkin. See Nightmare King Grimm entry in All Bosses checklist. |
Dreamers
These are all 3 Dreamers in the game, necessary to unlock any ending. Lurien and Monomon are guarded by a Boss fight, while Herrah is not.
| ✓ | Dreamer | Location | |
|---|---|---|---|
|
Lurien the Watcher
Area: City of Tears
Dreamer
|
Location: Encountered at Watcher's Spire, protected by Watcher Knights.  |
||
|
Herrah the Beast
Area: Deepnest
Dreamer
|
Location: Encountered at Beast's Den. 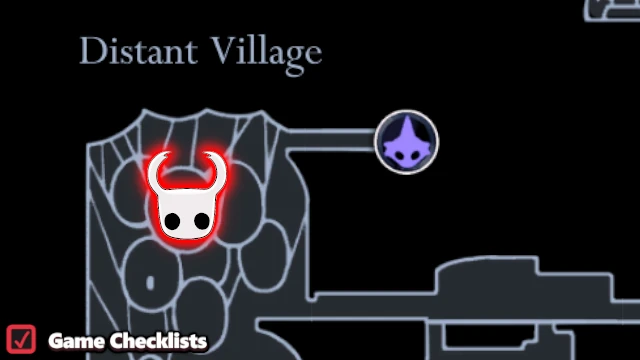 |
||
|
Monomon the Teacher
Area: Fog Canyon
Dreamer
|
Location: Encountered at Teacher's Archives, protected by Uumuu. 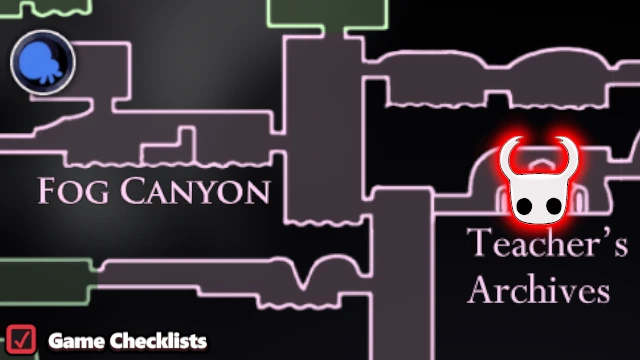 |
Frequently Asked Questions
What is 112% Completion in Hollow Knight?
112% is a specific set of requirements for the Pure Completion achievement. This checklist tracks every item required for 112%, not everything in the game.
How many items are required for 112%?
This checklist tracks 123 requirements across Mask Shards, Charms, Spells, Abilities, Dream Nail milestones, Nail upgrades, Colosseum trials, Godhome Pantheons, Bosses, and Dreamers.
Do I need Hunter's Journal for 112%?
No. Hunter's Journal is not required for 112% or Pure Completion. Use our Hunter's Journal checklist for true 100% completion.
Do boss checkboxes sync with All Bosses?
Yes. Boss rows on this page share the same progress keys as the All Bosses checklist, so checking a boss on either page updates both.
How do I use this checklist?
Check off each requirement when completed. Progress saves automatically in your browser with no account required.
