This checklist has been updated for the Tarnished Update / Tarnished DLC / Tarnished Edition / Tarnished Pack that released on 27/28th August. It contains all items from Elden Ring, Shadow of the Erdtree and the Tarnished update.
All Talismans Checklist Overview
The checklist is located below this introductory text.
This checklist lists every Talisman in Elden Ring and Elden Ring: Shadow of the Erdtree DLC.
This checklist follows the order of the in-game inventory. You can directly compare it to your Elden Ring inventory to see what you're missing. This is the most useful order for any completionist.
Talismans: Key Information
Talismans are passive buffs you can equip into the open Talisman Slots in your Equipment tab. You start with only 1 Talisman Slot and can find 3 Talisman Pouches to gain 3 additional slots. Talisman Pouches: Defeat Margit, the Fell Omen boss; Speak to Enia after having two Great Runes; Defeat Godfrey, First Elden Lord (Golden) boss.
Compared to the Dark Souls series or Lies of P, Elden Ring does not have New Game Plus talismans: all talismans can be acquired in the first playthrough. The +1 versions are generally found in mid-game locations, +2 versions in late-game areas and +3 in the Shadow of the Erdtree DLC.
You cannot equip two of the same talisman, or the talisman with different variants.
Talismans: 100% Completion Information
Several Talismans are missable and tied to NPC quests, especially Gowry and Millicent's questline and Leda's questline in the DLC. Most missable Talismans are also exclusive, meaning you can only get one or another in the same run.
A few Talismans are also exchanged with Finger Reader Enia for Remembrances, meaning they are technically missable, as you can also choose the other option. You can duplicate a limited amount of Remembrances in the Wandering Mausoleums.
Related Checklists
Open the Elden Ring 100% Completion Hub for every checklist. See also All Sorceries, All Incantations, All Ashes of War, All Questlines, and All Sites of Grace.
All Stat Increasing Talismans
The first group of Talismans, in the order as seen in Elden Ring's game inventory. Talismans that increase your stats and attributes (assigned levels).
There are 36 Talismans in All Stat Increasing Talismans.
| ✓ | Talisman | Description | |
|---|---|---|---|
 |
Sold by Nomadic Merchant for 1500 Runes. Location of Crimson Amber Medallion:  |
||
|
Progress normally on the main path going down around the town. Before a bridge, you'll encounter an Imp Seal Gate. Go inside, upstairs and loot the talisman. Location of Crimson Amber Medallion +1: 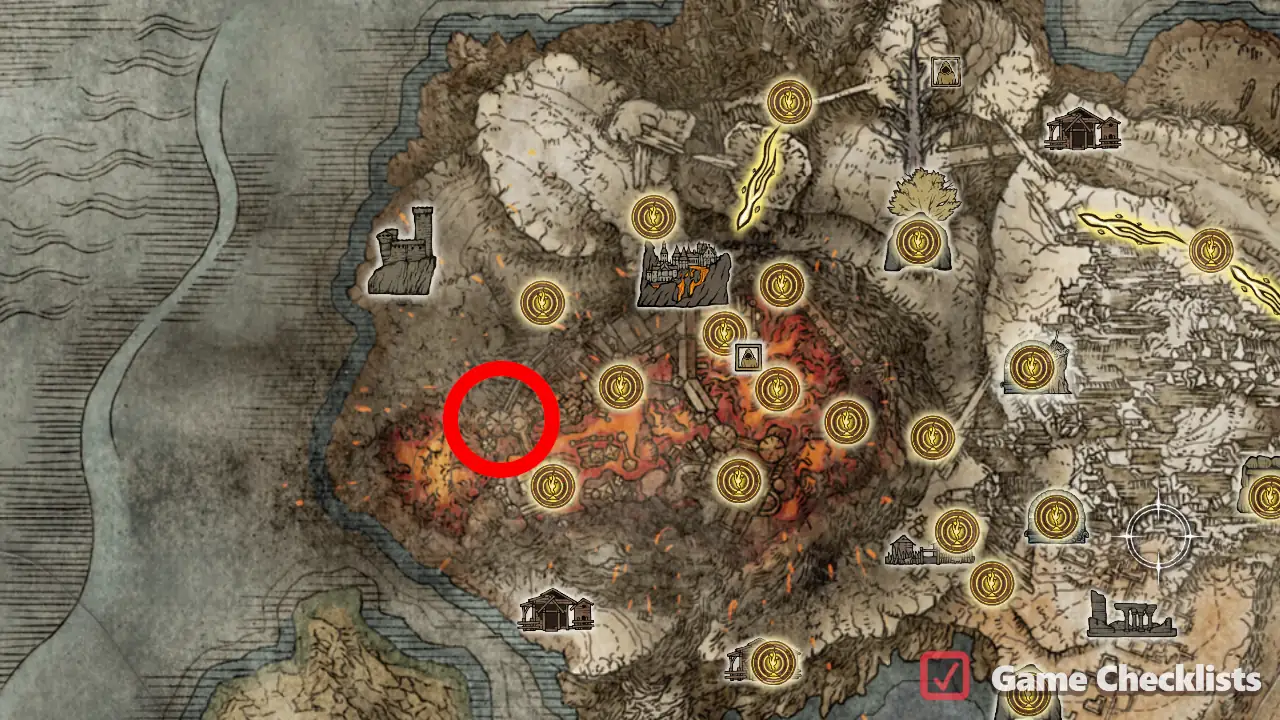 |
||
|
Only in Leyndell, Ashen Capital. From Location of Crimson Amber Medallion +2: 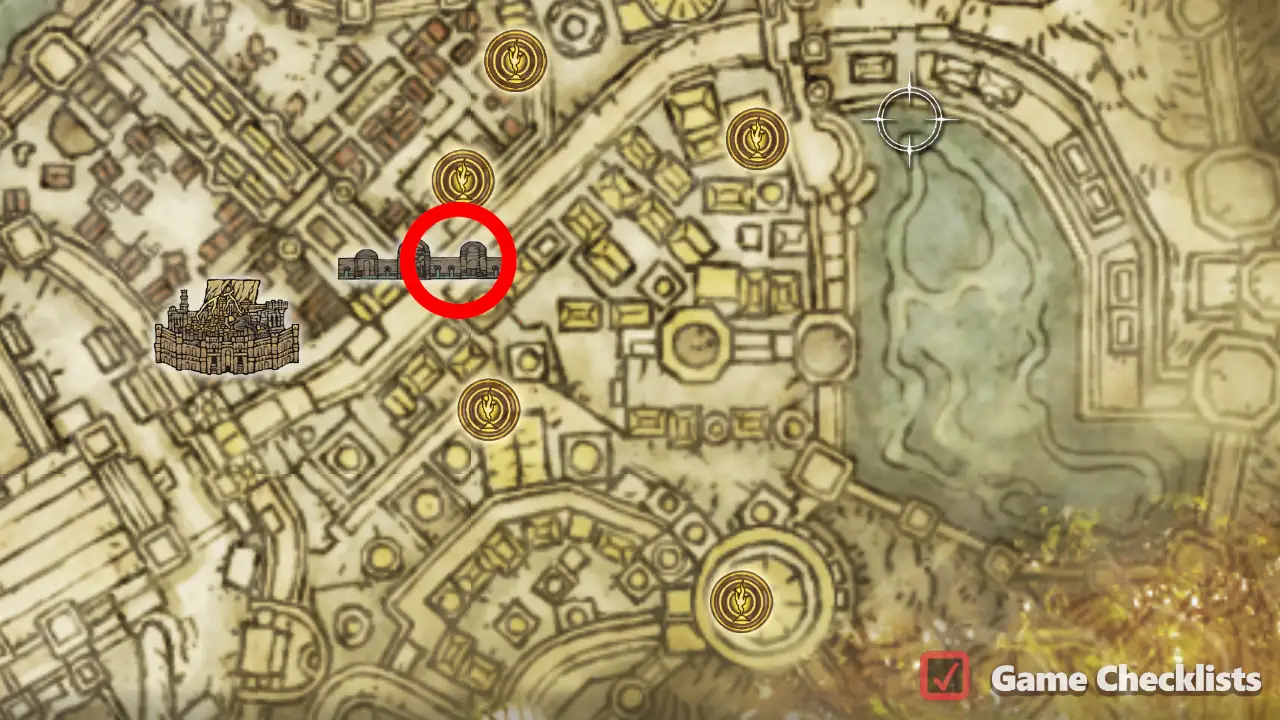 |
||
|
Defeat the Location of Crimson Amber Medallion +3: 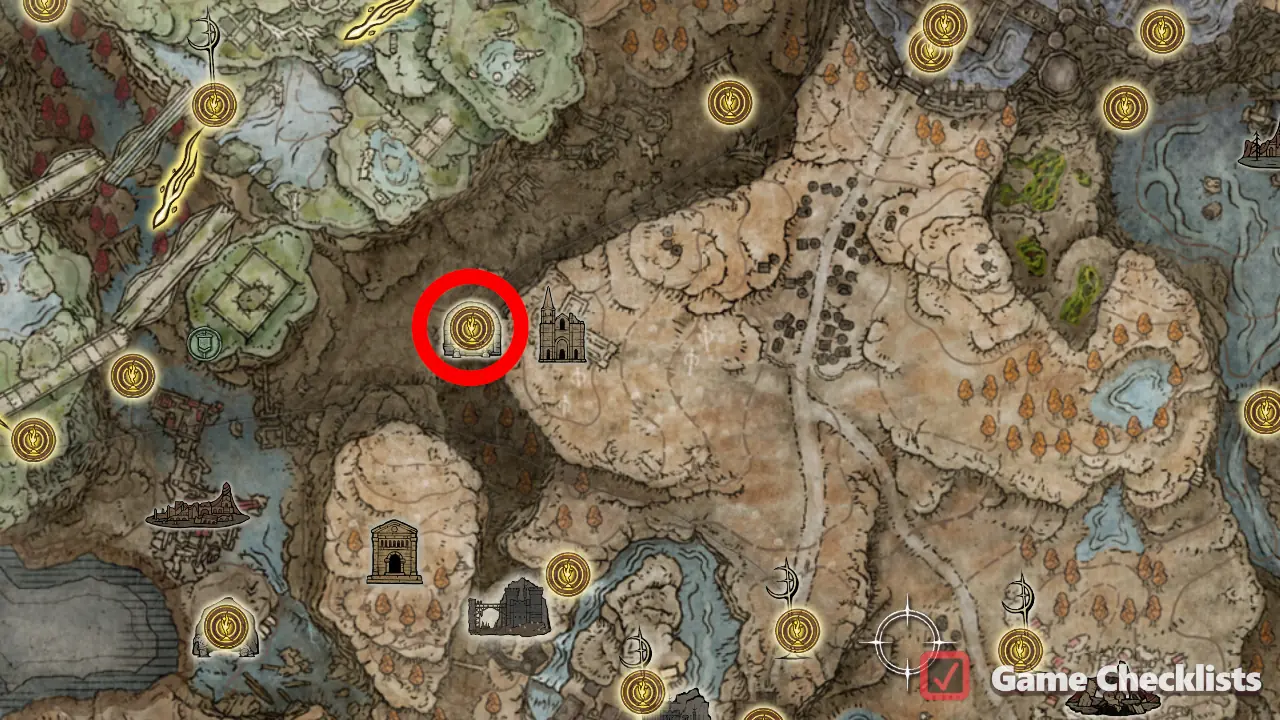 |
||
|
Located behind the first Imp Seal Gate near the site of grace. Location of Crimson Seed Talisman: 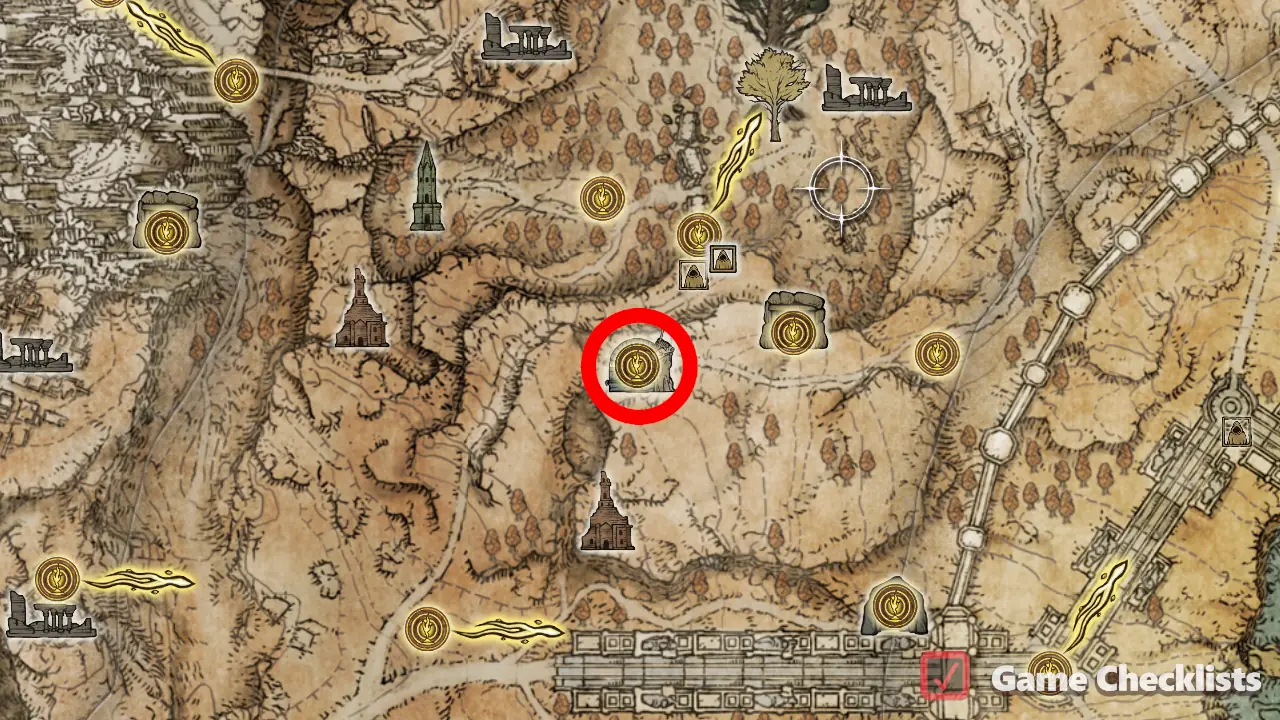 |
||
|
Activate the bell in Finger Ruins of Rhia. Location of Crimson Seed Talisman +1: 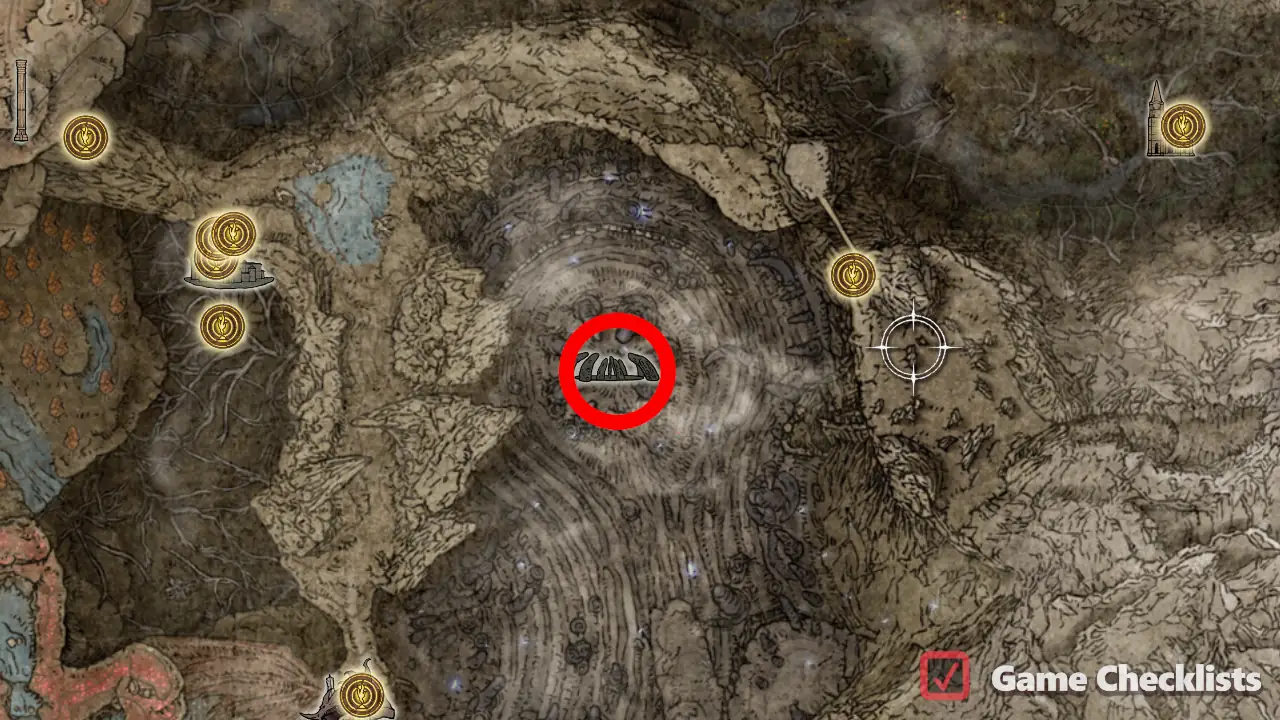 |
||
|
In a chest near the lesser golem. Location of Blessed Dew Talisman:  |
||
|
Defeat the Location of Cerulean Amber Medallion: 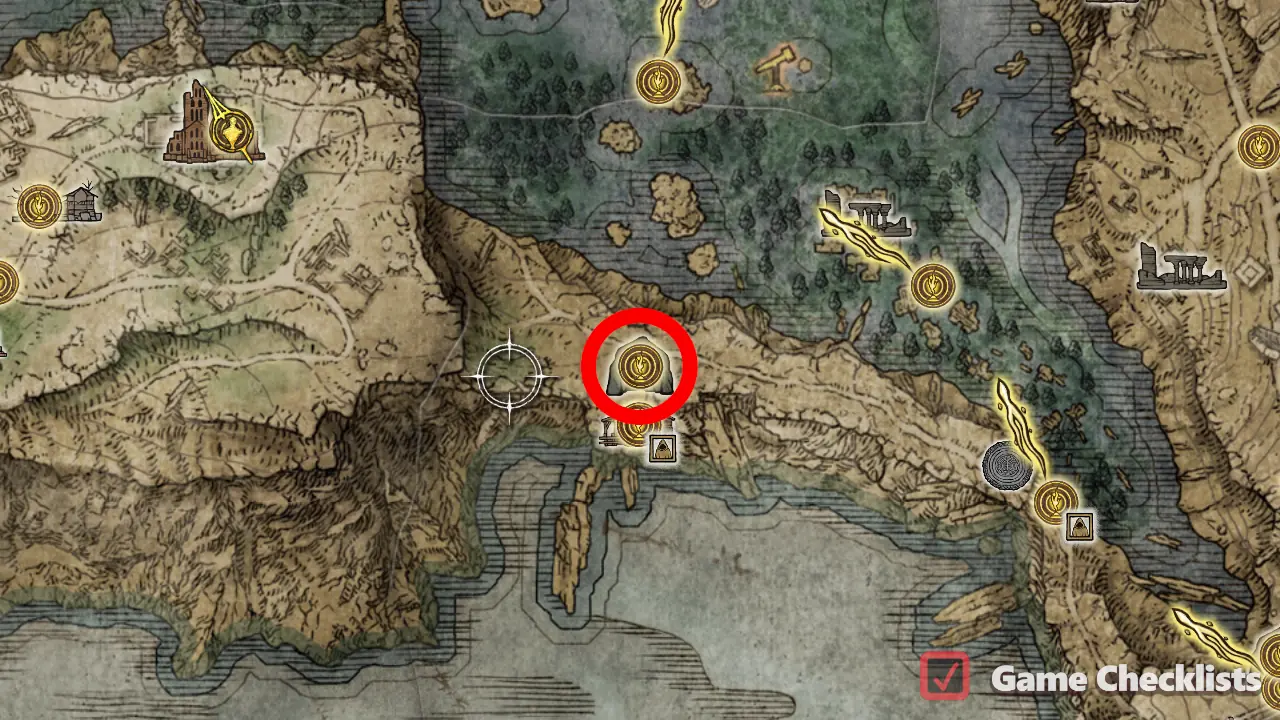 |
||
|
Spot a ladder outside of the church. Climb it, then follow the path straight and around a tower to find another ladder. Go down, defeat the dual-wielding teleporting knight and loot the talisman. Location of Cerulean Amber Medallion +1:  |
||
|
Inside the cellar of Lunar Estate Ruins. Location of Cerulean Amber Medallion +2: 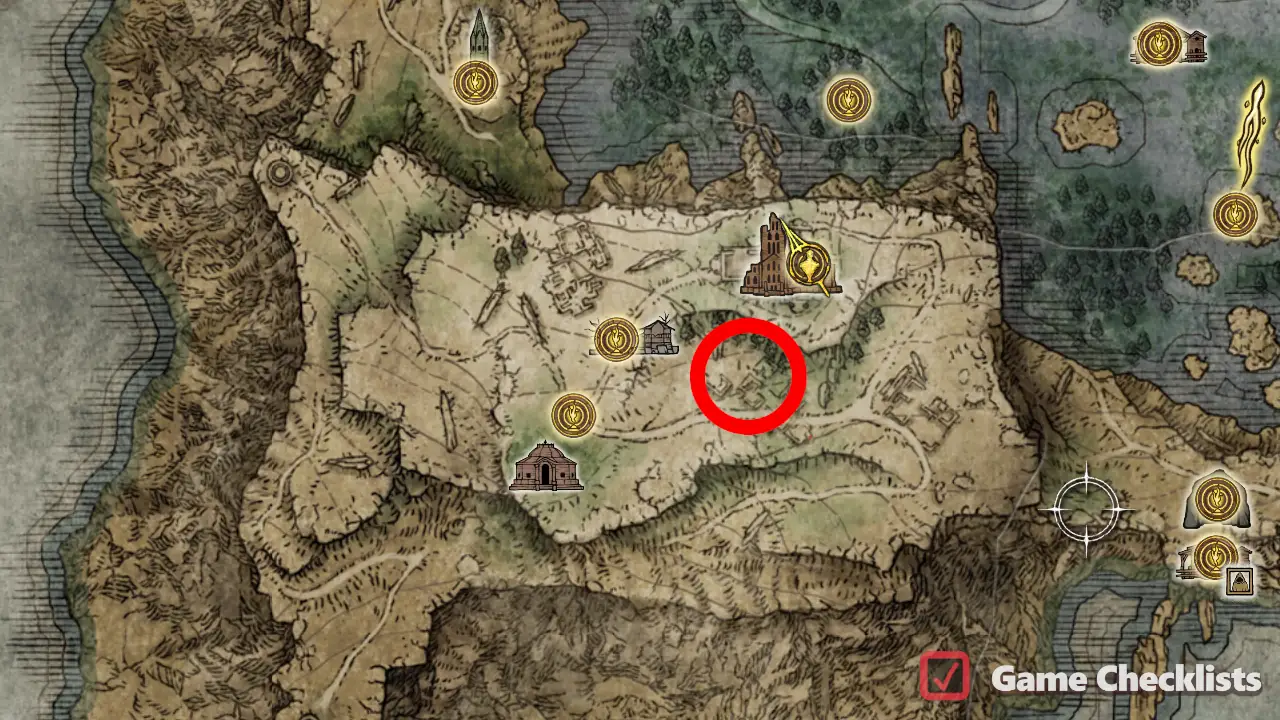 |
||
|
Defeat the Location of Cerulean Amber Medallion +3: 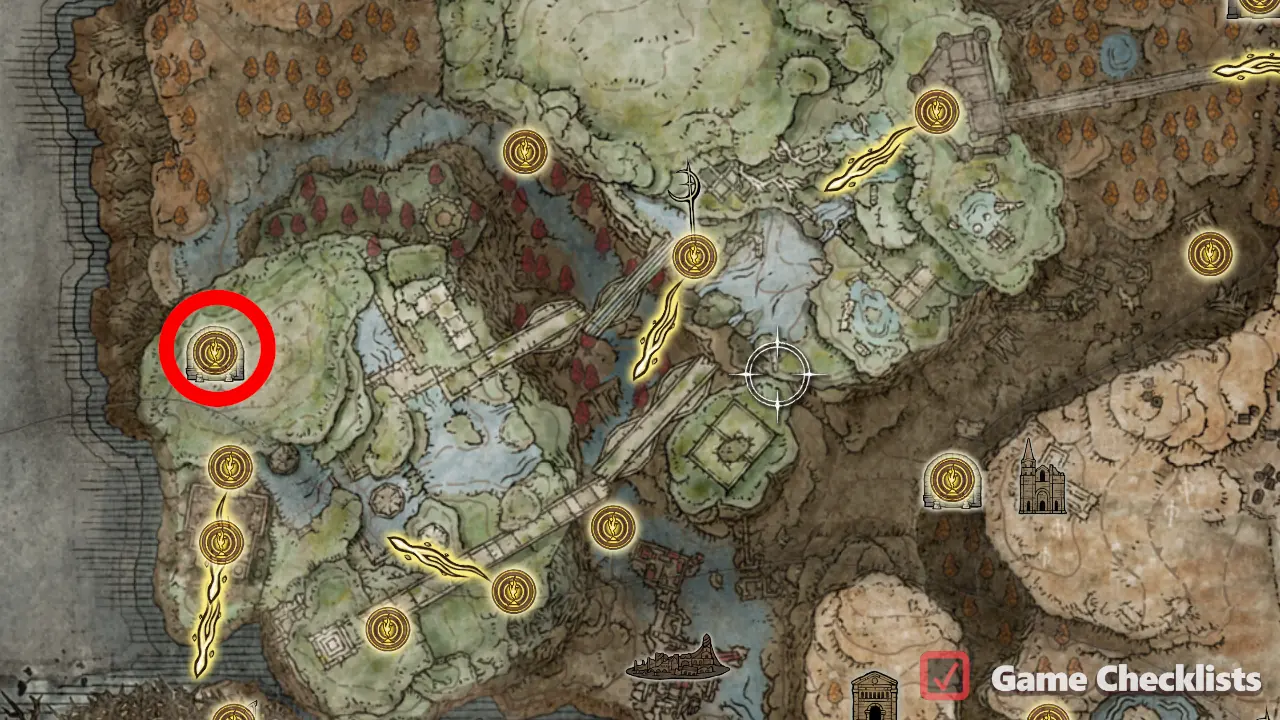 |
||
|
At the very top of the tower (without using Ranni's statue), on the rafters. Location of Cerulean Seed Talisman:  |
||
|
Activate the bell in Finger Ruins of Dheo. Location of Cerulean Seed Talisman +1: 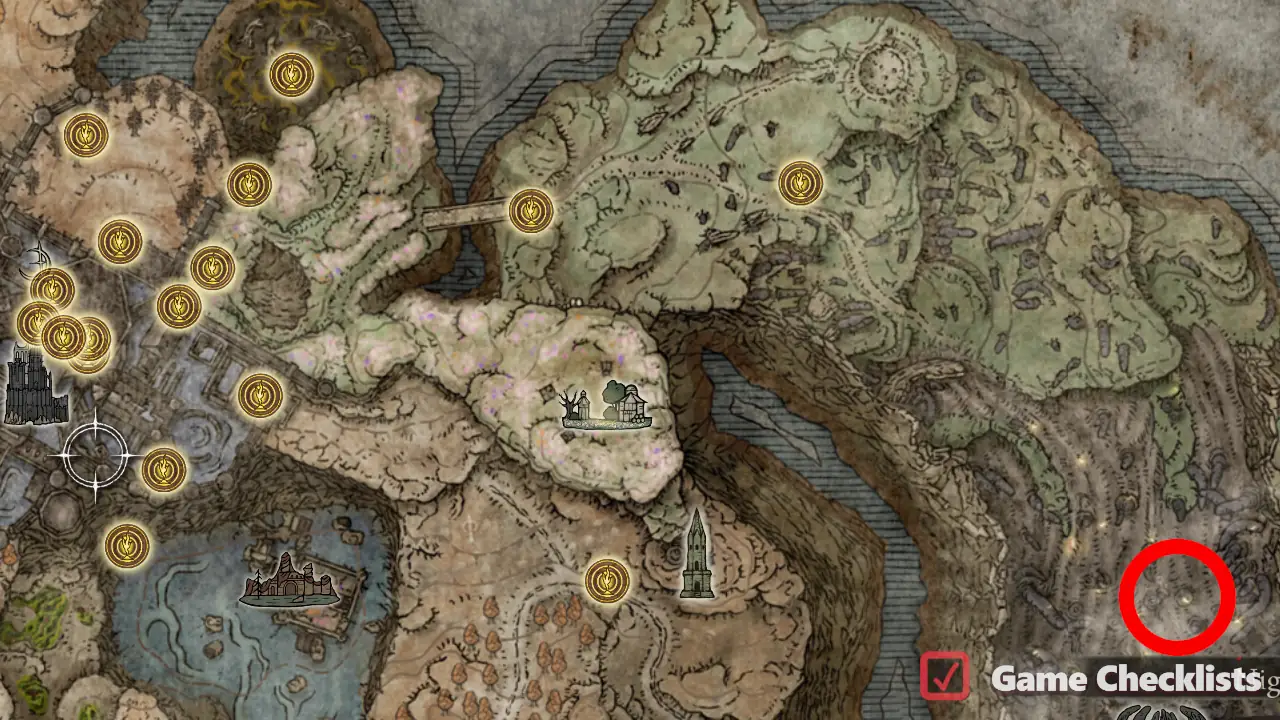 |
||
|
Inside the Church of Benediction, far south of the Location of Blessed Blue Dew Talisman: 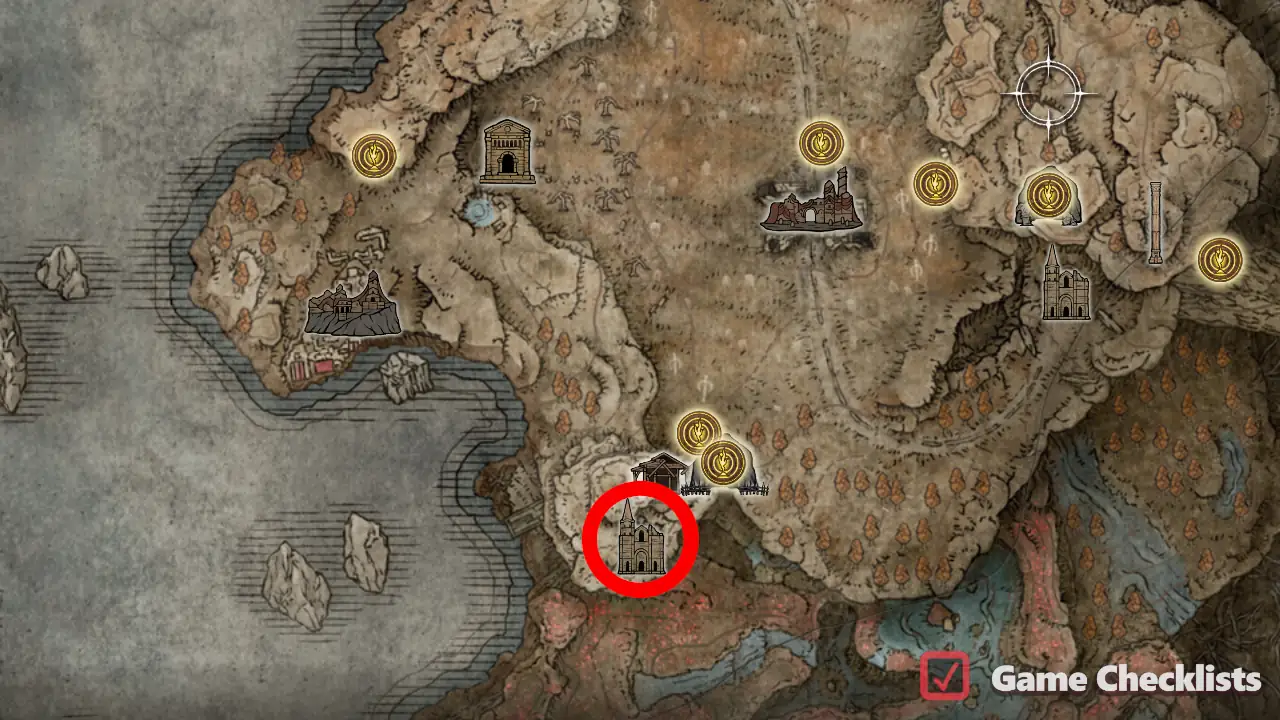 |
||
|
From Location of Talisman of Lord's Bestowal: 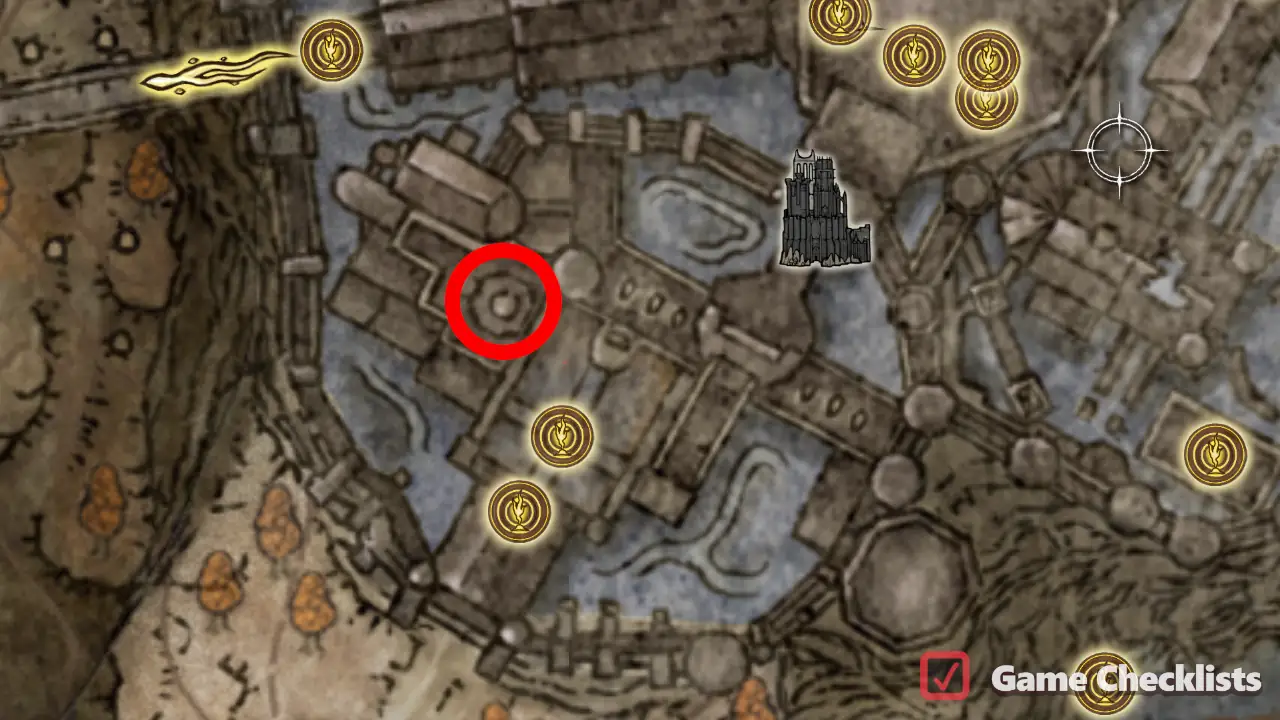 |
||
|
Defeat the Location of Viridian Amber Medallion: 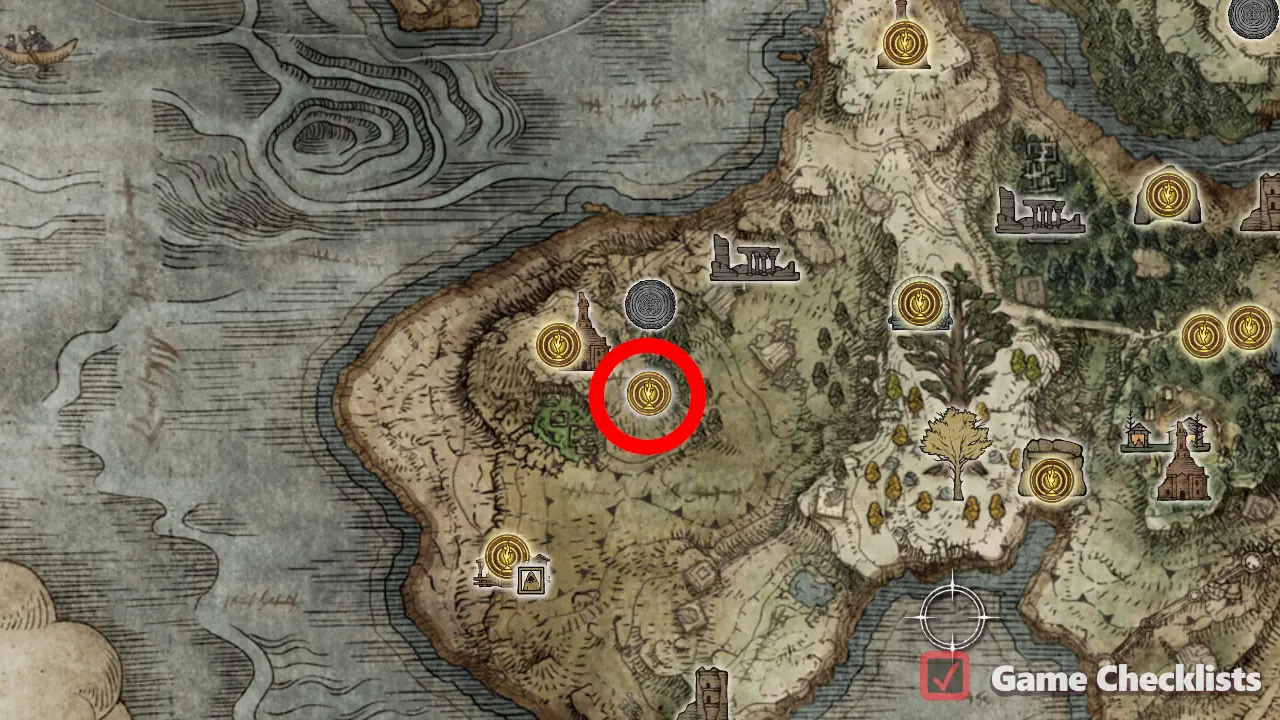 |
||
|
Missable - collect before burning the Erdtree! Defeat the Margit phantom. Location of Viridian Amber Medallion +1: 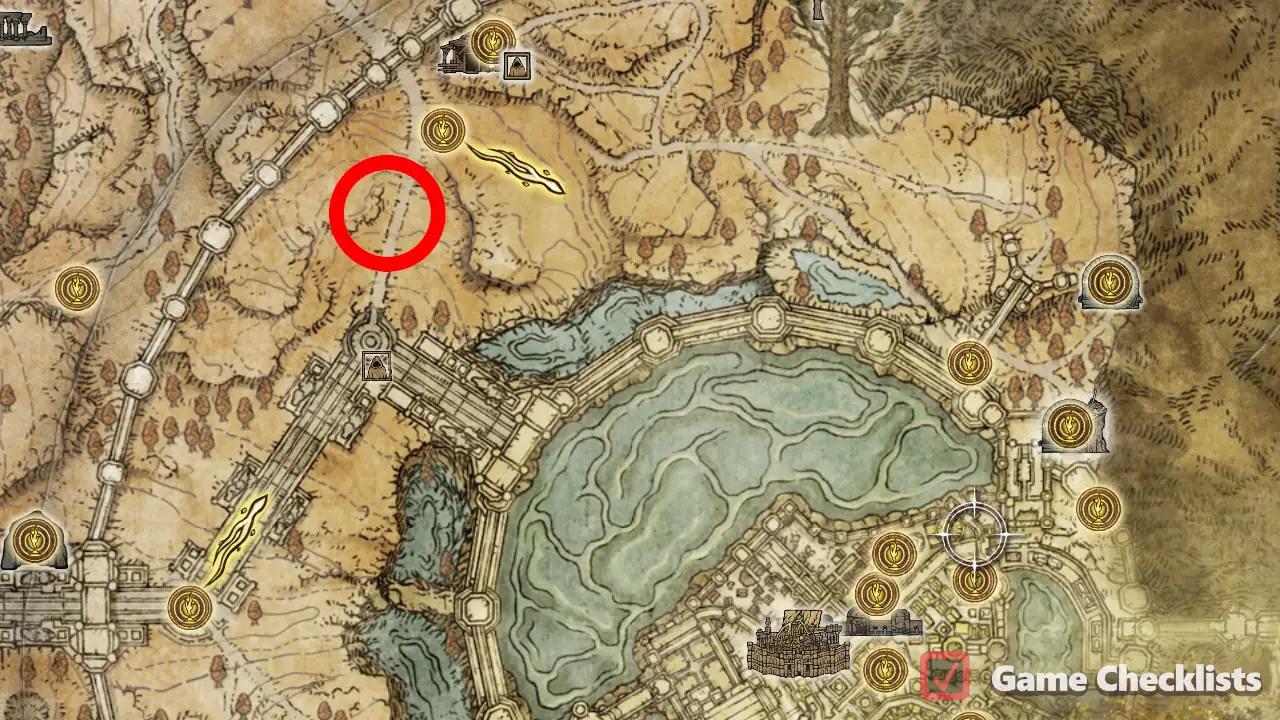 |
||
|
From Location of Viridian Amber Medallion +2: 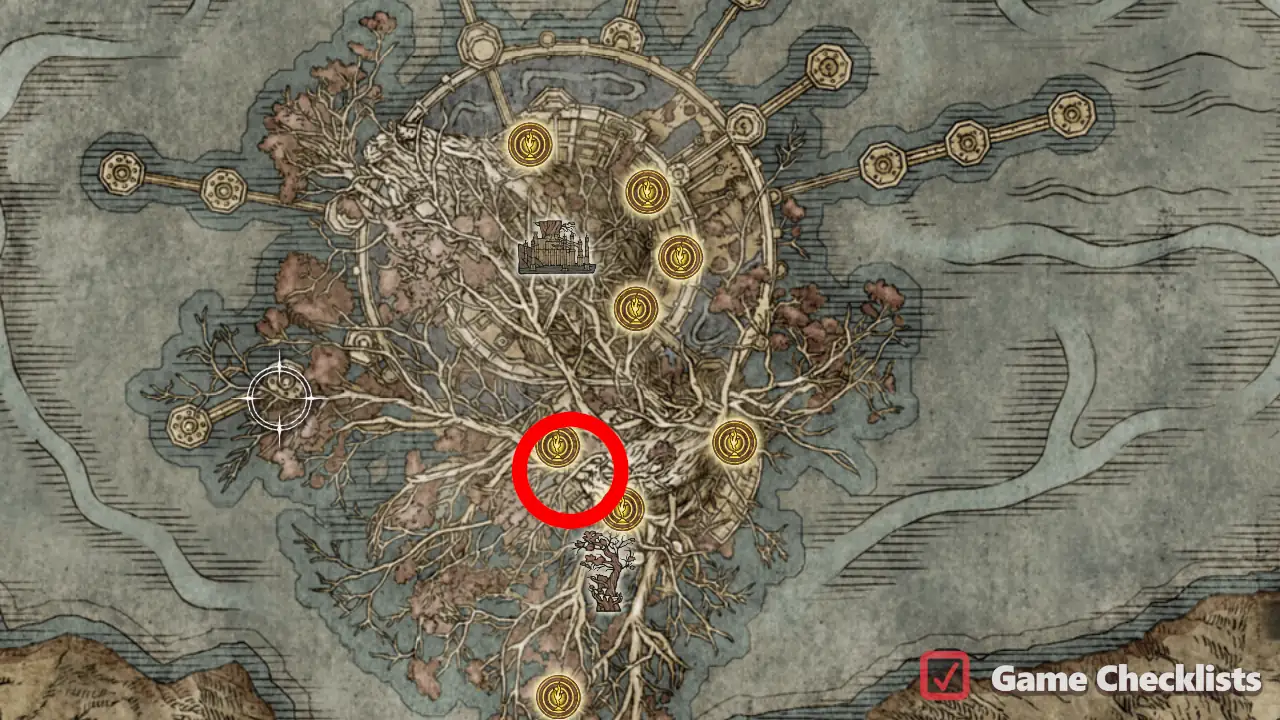 |
||
|
From the Location of Viridian Amber Medallion +3: 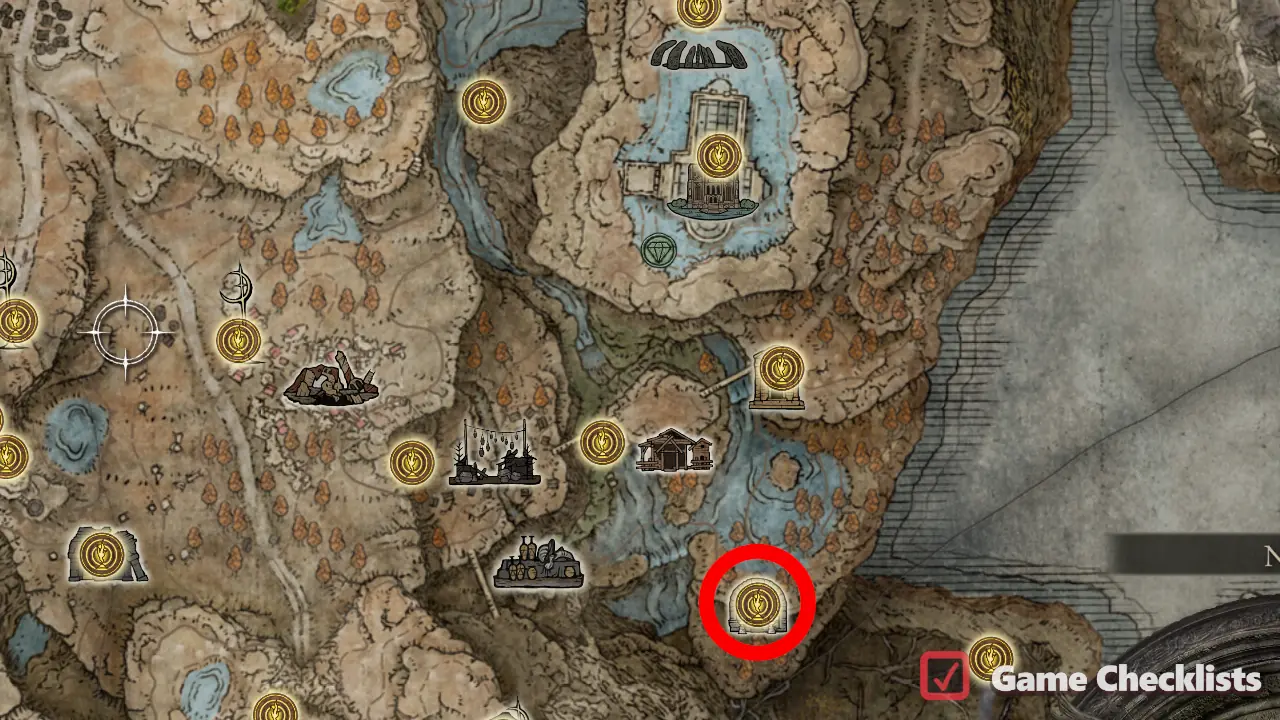 |
||
|
Inside the cellar of Summonwatter Village (in the eastern part, behind Imp Seal Gate) Location of Green Turtle Talisman:  |
||
|
Not inside Location of Two-Headed Turtle Talisman: 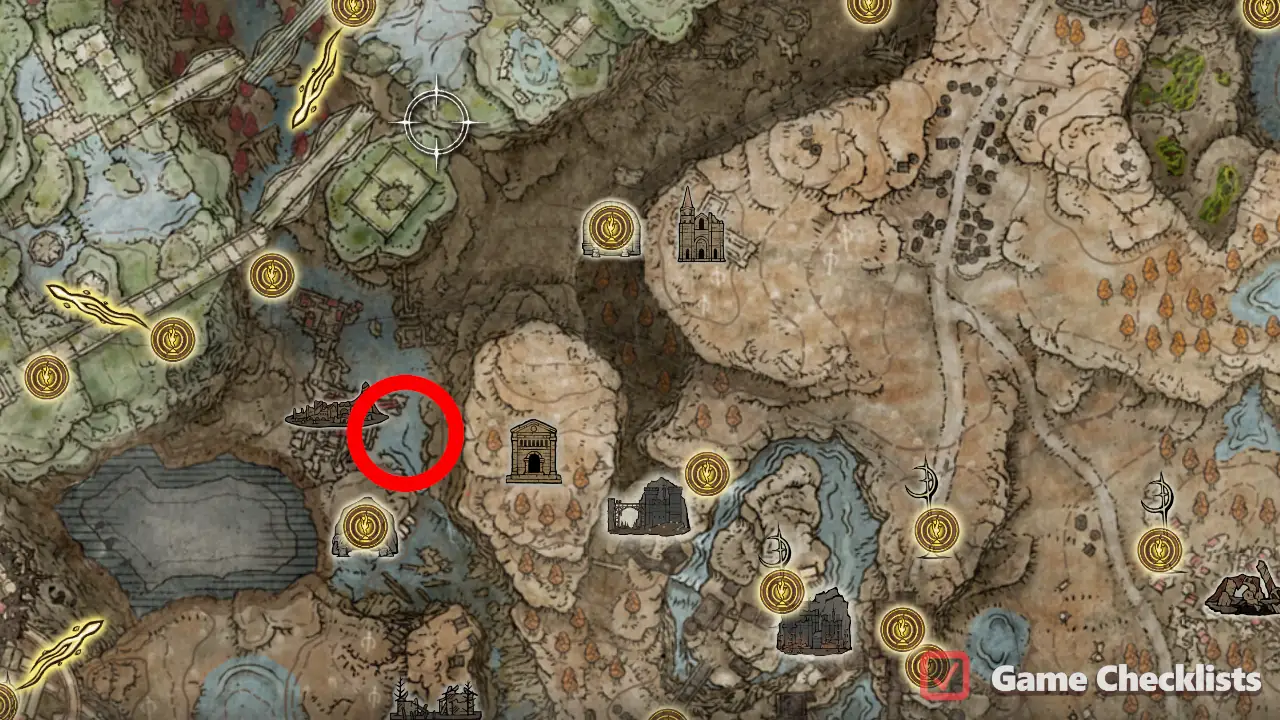 |
||
|
Progress |
||
|
Inside the side path with Malformed Star enemy. Go up the branch to the highest wooden platform. Location of Arsenal Charm +1: 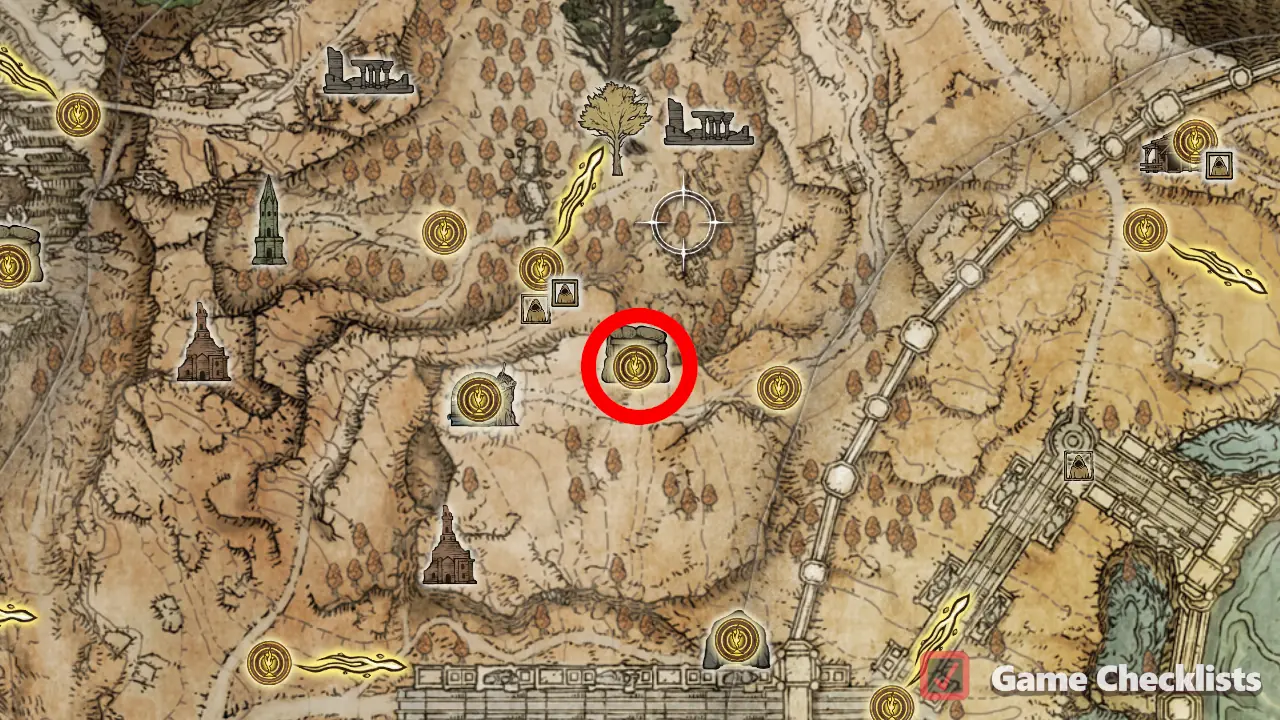 |
||
|
Complete Location of Great-Jar's Arsenal: 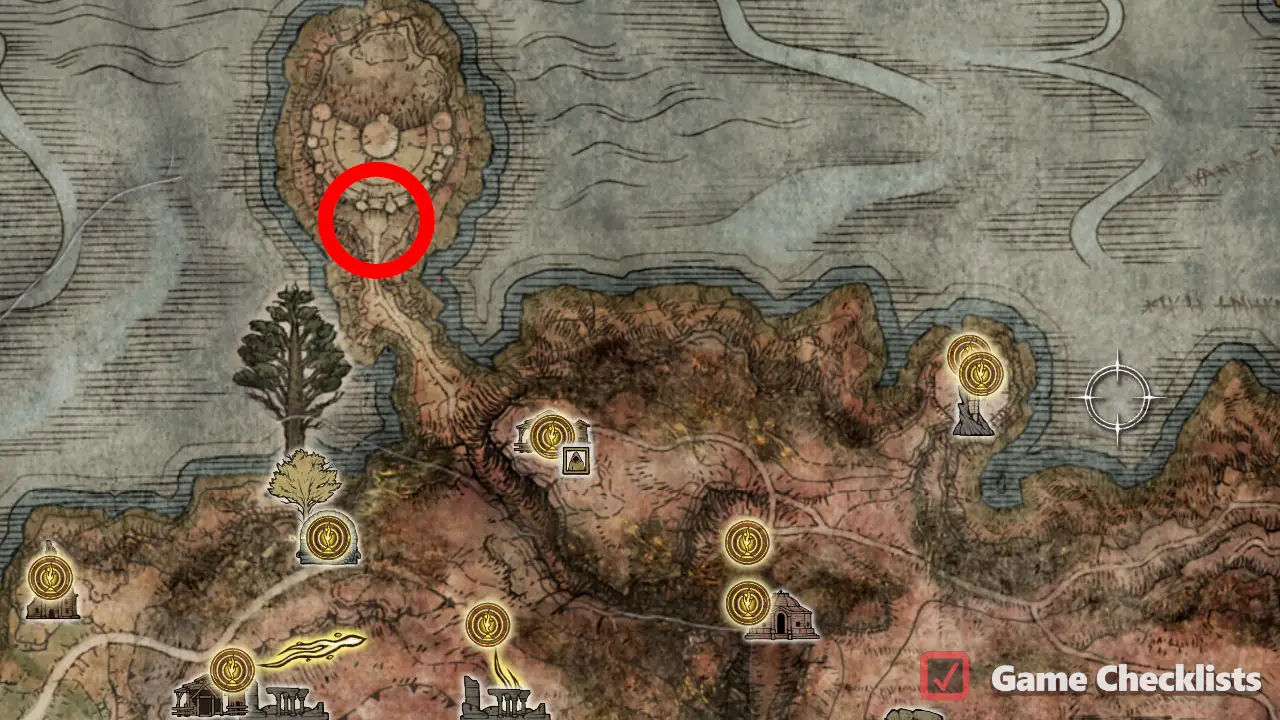 |
||
|
Inside Fringefolk Hero's Grave - go along the main chariot path. After the U-turn, continue going down. When the path narrows, drop down then continue east. At the flame pillar, continue going east, then through a bridge. Talisman is lying on the ground below a statue, guarded by lesser scions. Location of Erdtree's Favor: 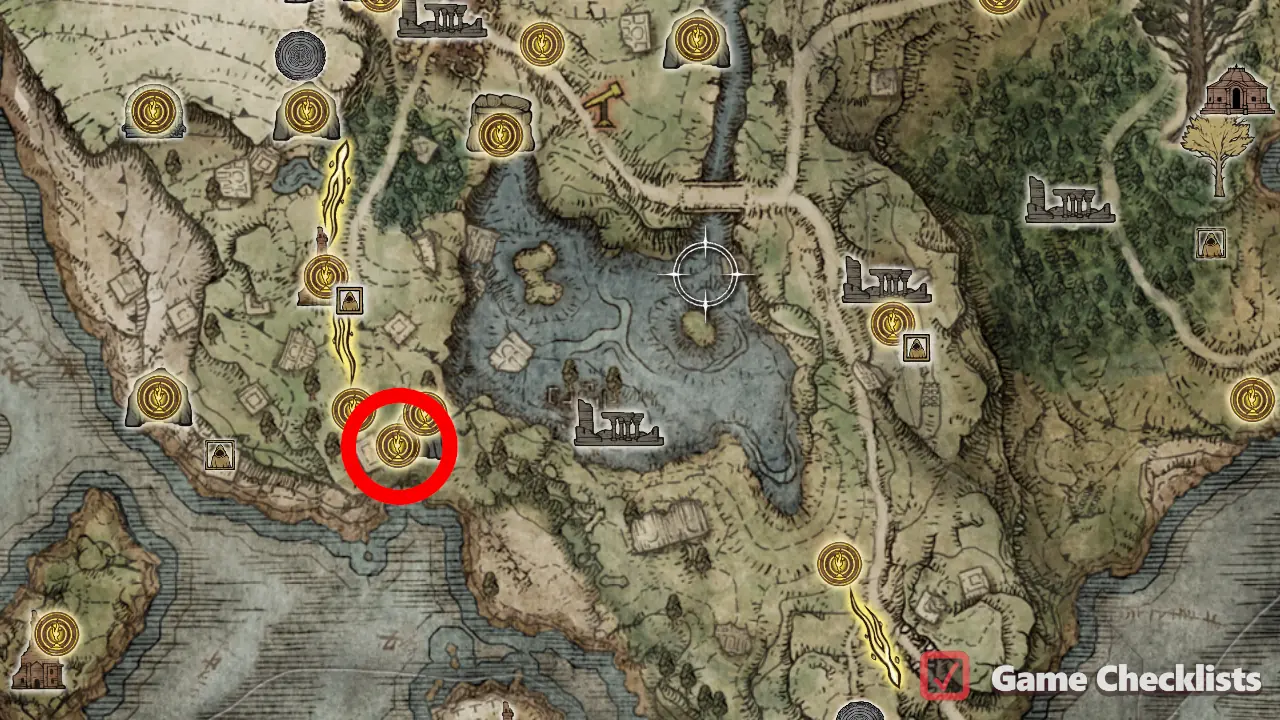 |
||
|
Defeat the Location of Erdtree's Favor +1: 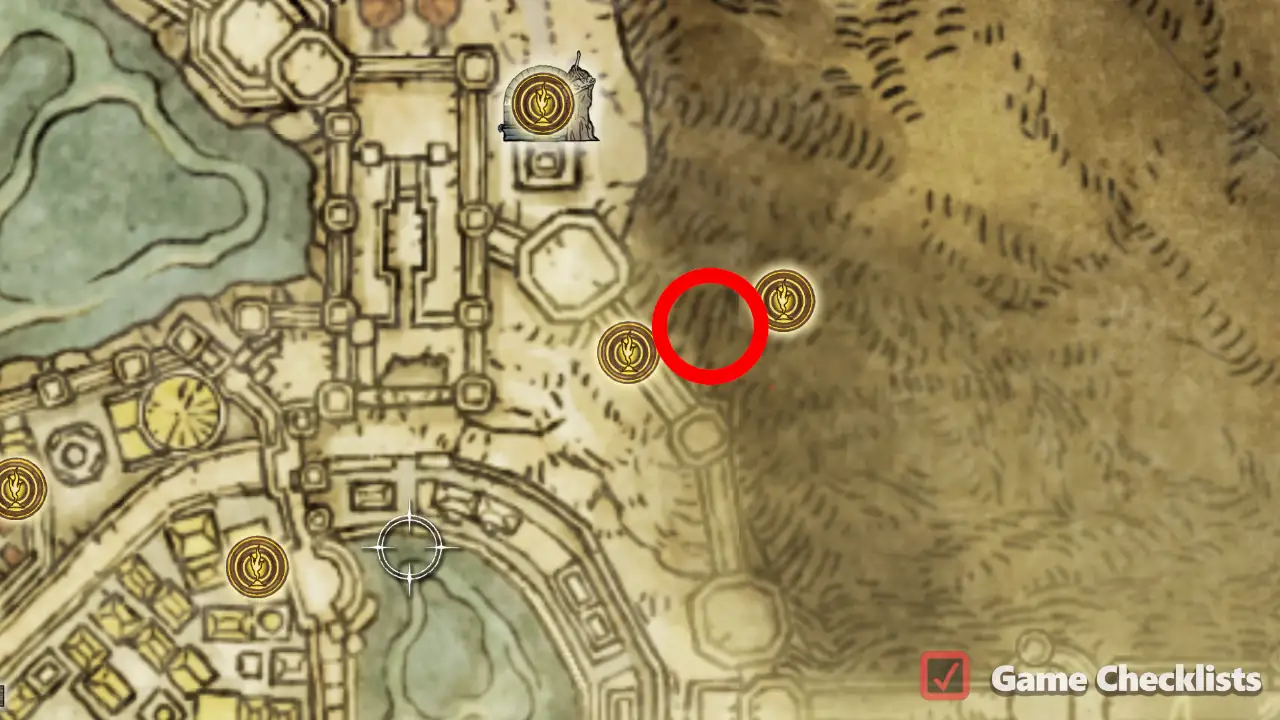 |
||
|
Only in Leyndell, Ashen Capital. You must start at the Location of Erdtree's Favor +2: 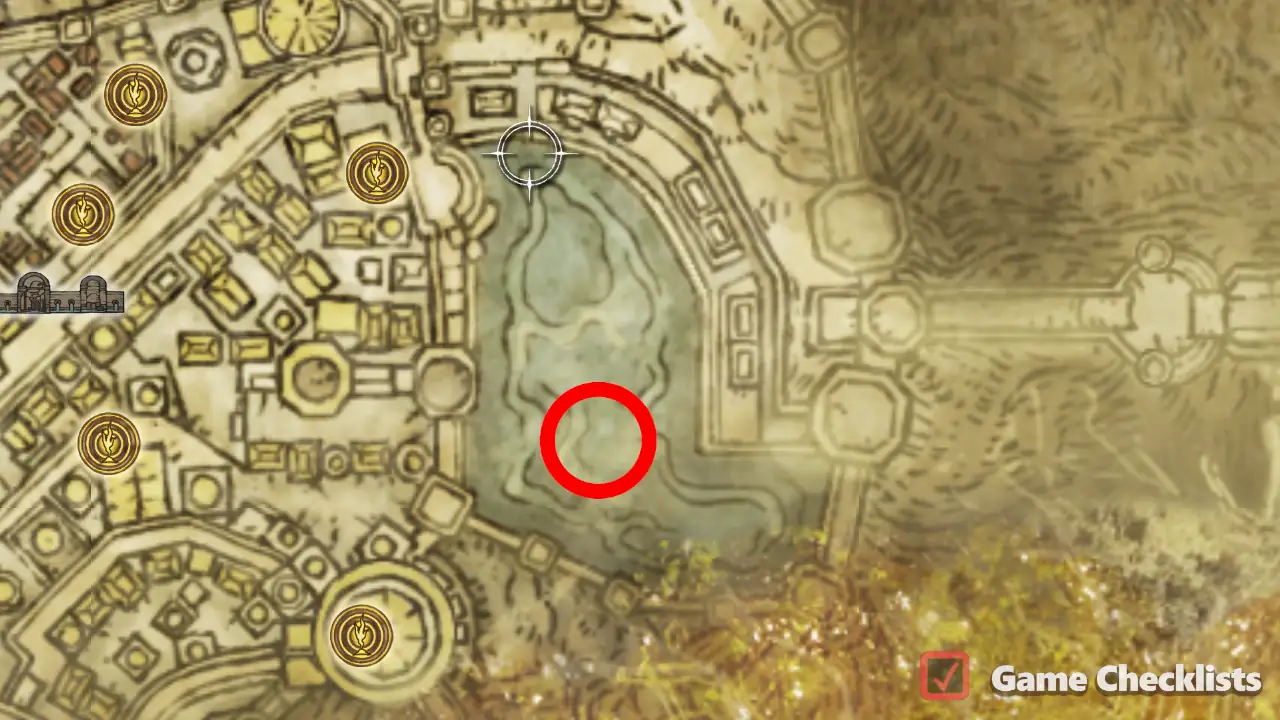 |
||
|
Defeat the Location of Radagon's Scarseal:  |
||
|
Go up the ladder, then drop down on the right. Go inside the hole with the rats, then do a corner jump to access a path leading to another ladder going down to a dead-end with Radagon's Soreseal. Location of Radagon's Soreseal: 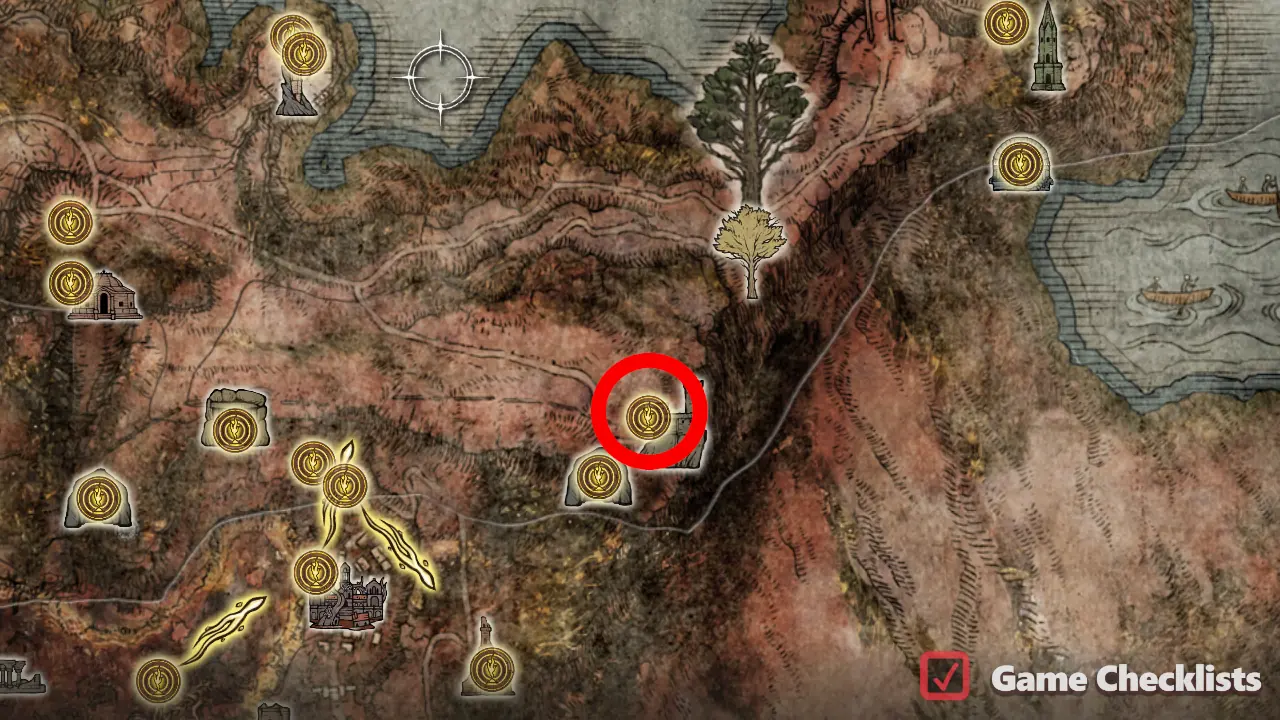 |
||
|
Past the Location of Marika's Scarseal: 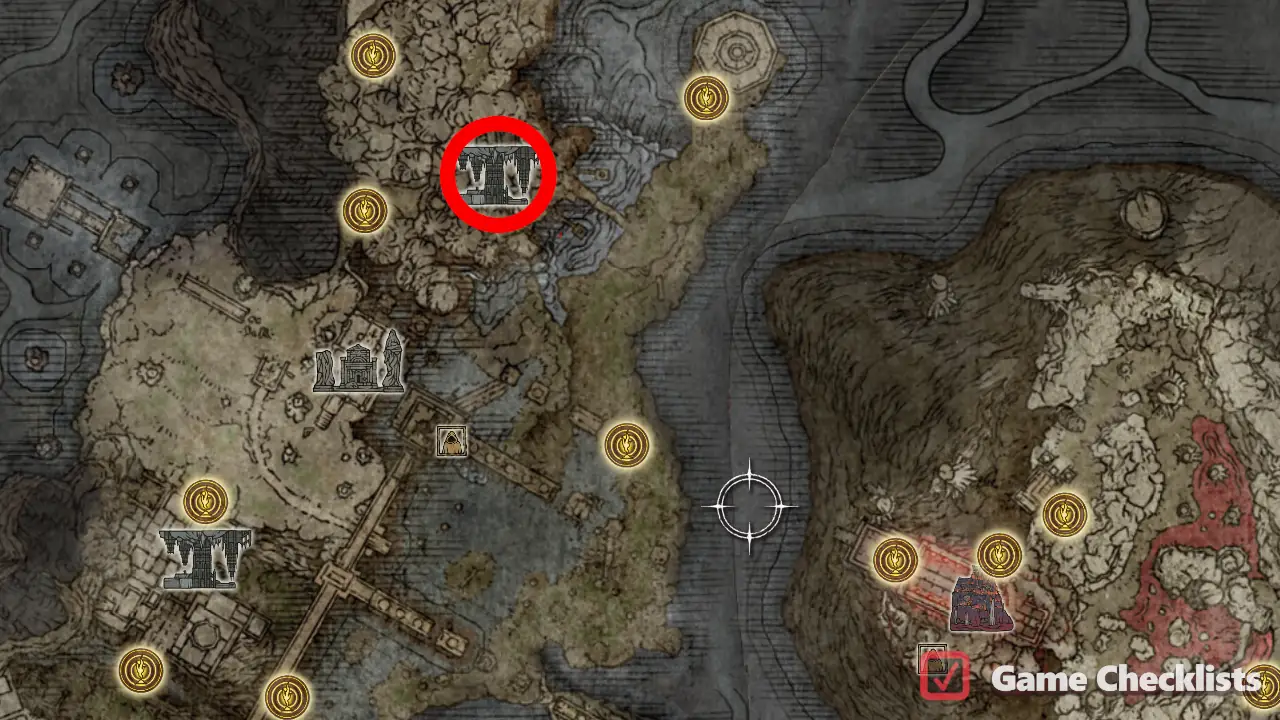 |
||
|
From the Location of Marika's Soreseal:  |
||
|
Inside Fort Gael, at the very top inside a chest. Location of Starscourge Heirloom: 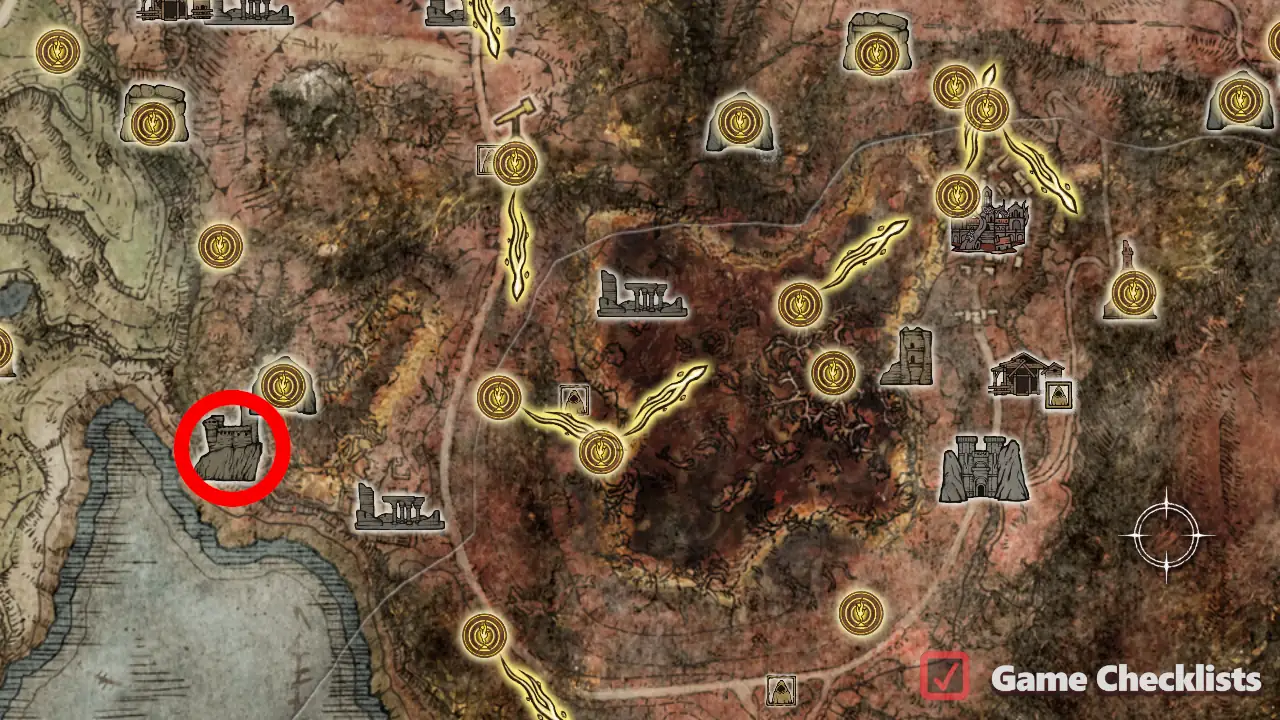 |
||
|
Progress Location of Prosthesis-Wearer Heirloom: 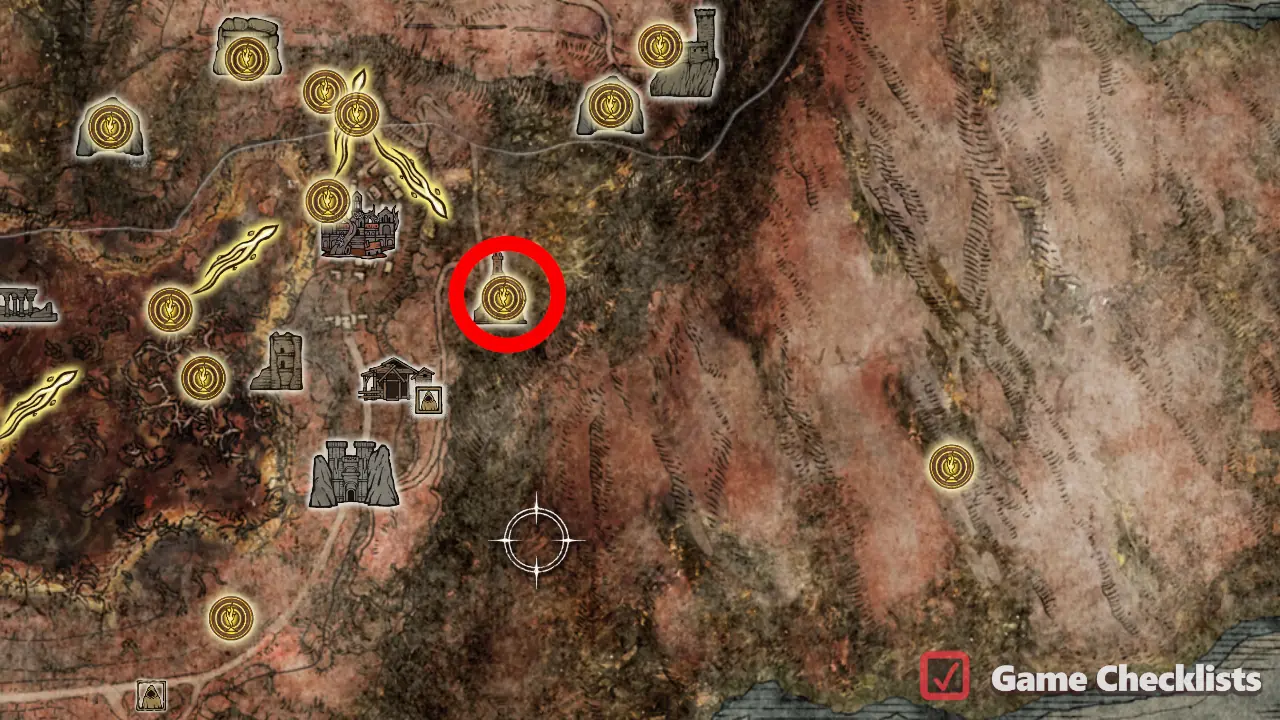 |
||
|
On top of Liurnia Divine Tower. Location of Stargazer Heirloom: 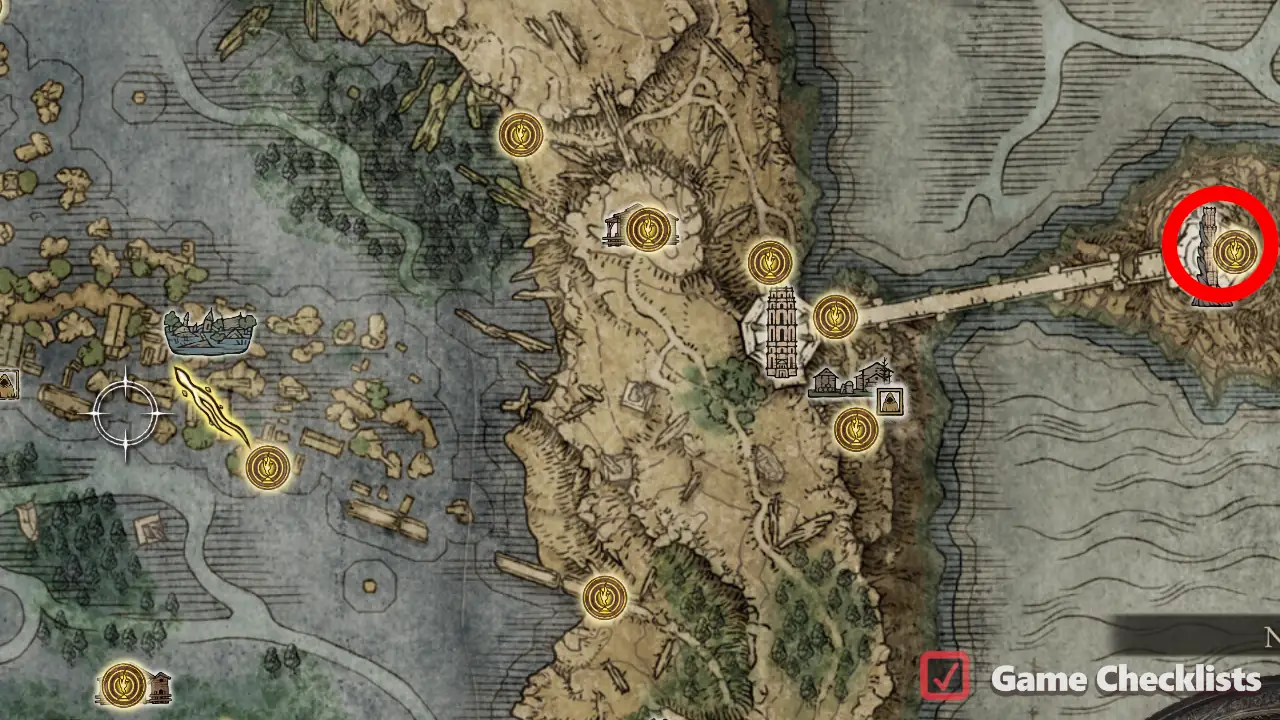 |
||
|
Inside the cellar of Purified Ruins (southeastern building). Location of Two Fingers Heirloom: 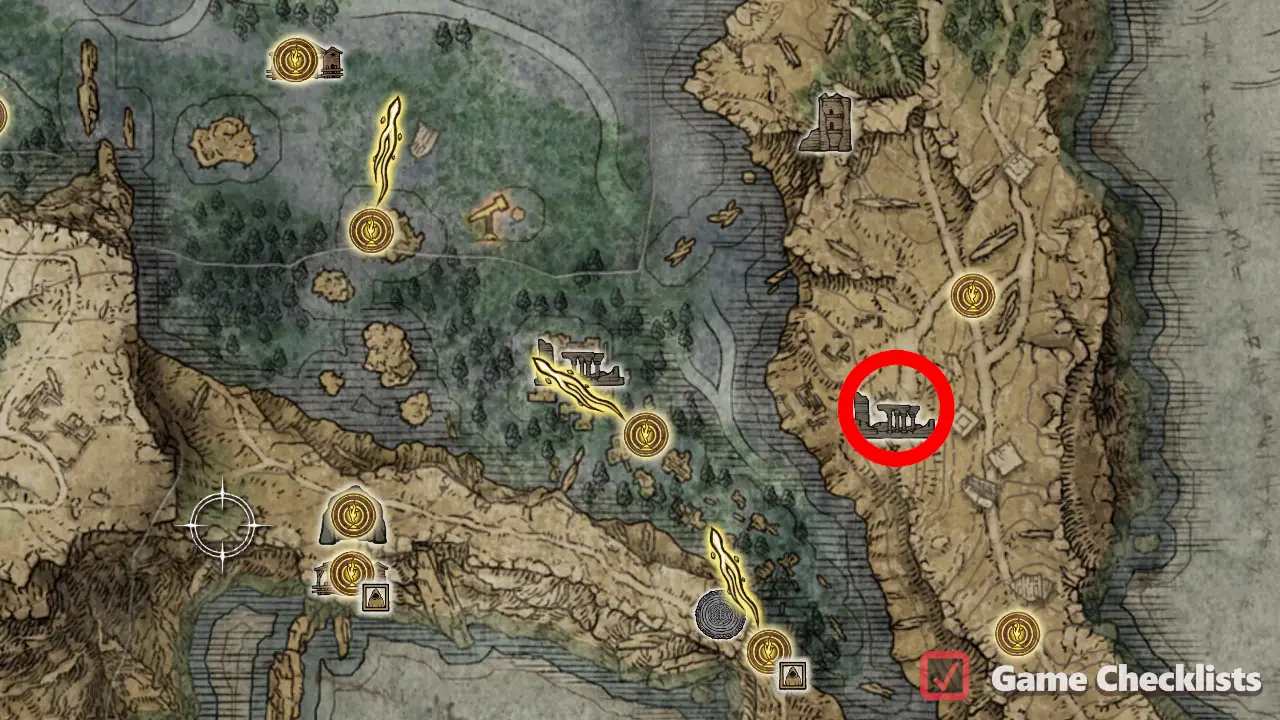 |
||
|
In the tower chest of Prospect Town, a settlement just south of Location of Outer God Heirloom: 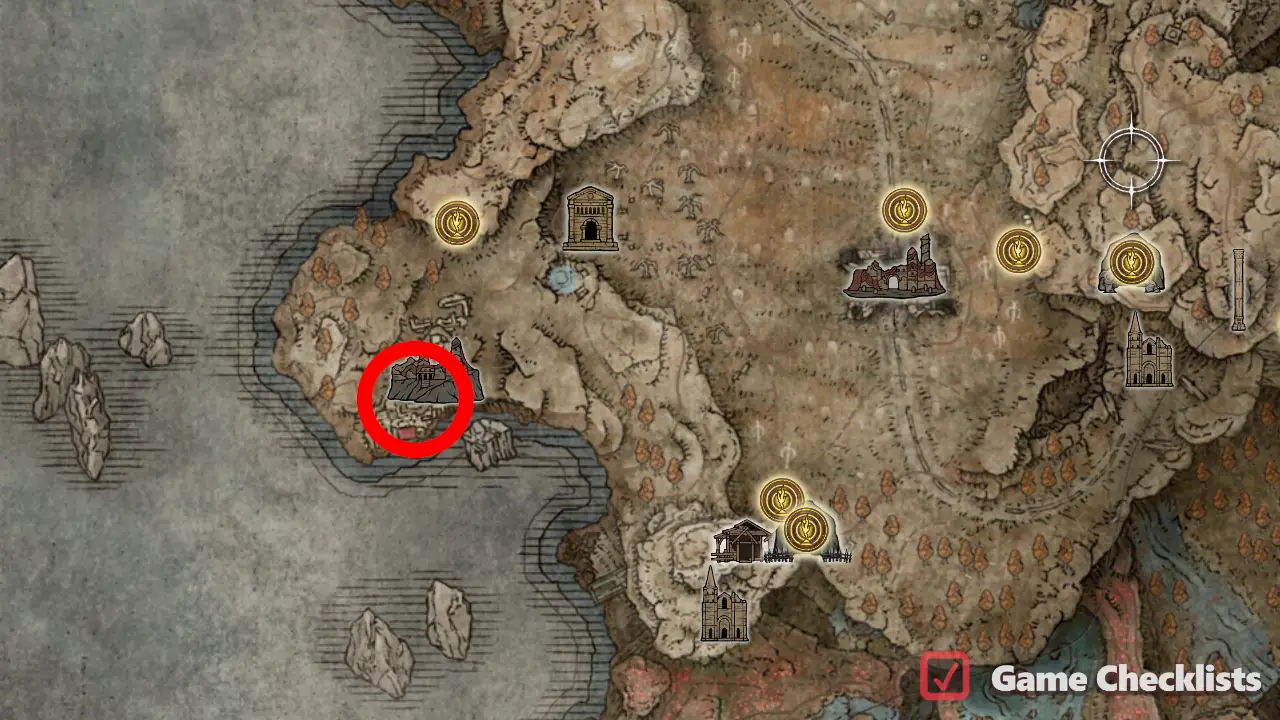 |
 Castle Morne Rampart
 Death Knight (Fog Rift Catacombs)
 Nepheli Loux's questline
All Defense-Focused Talismans
The second group of Talismans, in the order as seen in Elden Ring's game inventory. Talismans that increase your defense stats and resistances.
There are 39 Talismans in All Defense-Focused Talismans.
| ✓ | Talisman | Description | |
|---|---|---|---|
|
Behind Location of Dragoncrest Shield Talisman: 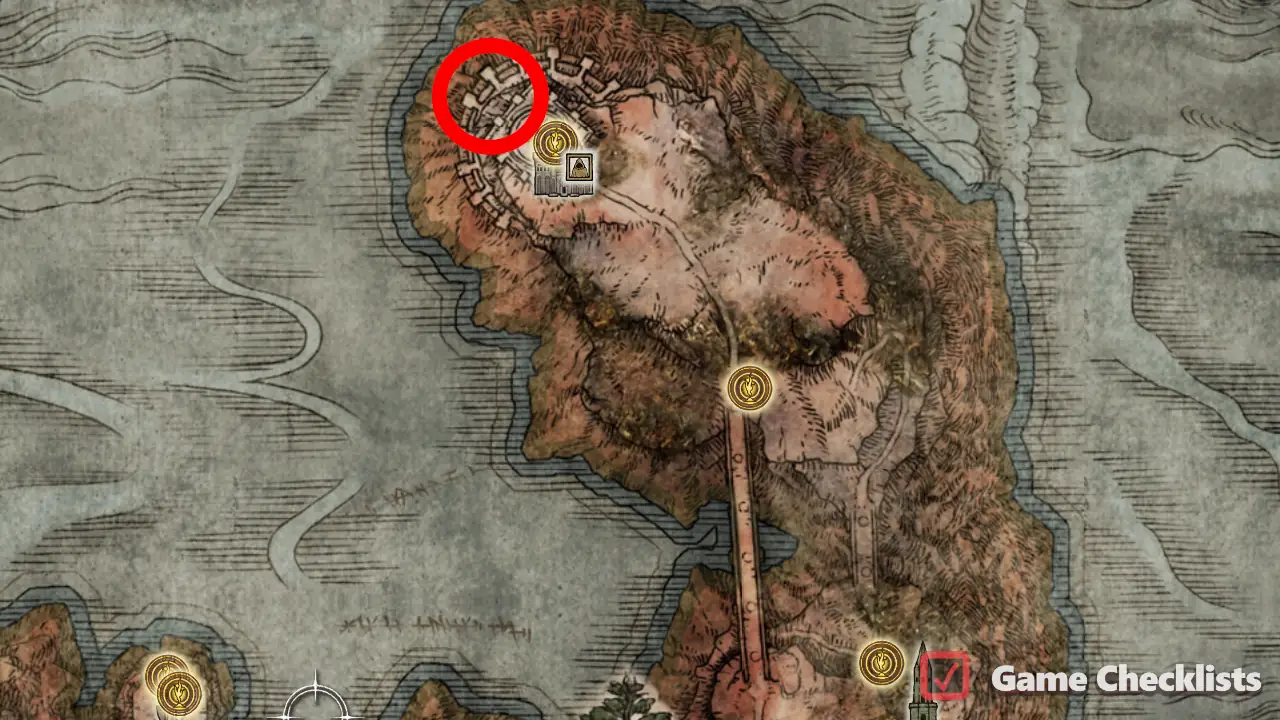 |
||
|
Located behind the second Imp Seal Gate in this dungeon. Continue along the main path until you reach an area with falling blades. Jump on one of them, which will lead you to a side passage on the left. Continue this path and open the gate. Location of Dragoncrest Shield Talisman +1: |
||
|
Take the northern exit from Location of Dragoncrest Shield Talisman +2:  |
||
|
From the Location of Dragoncrest Greatshield Talisman: 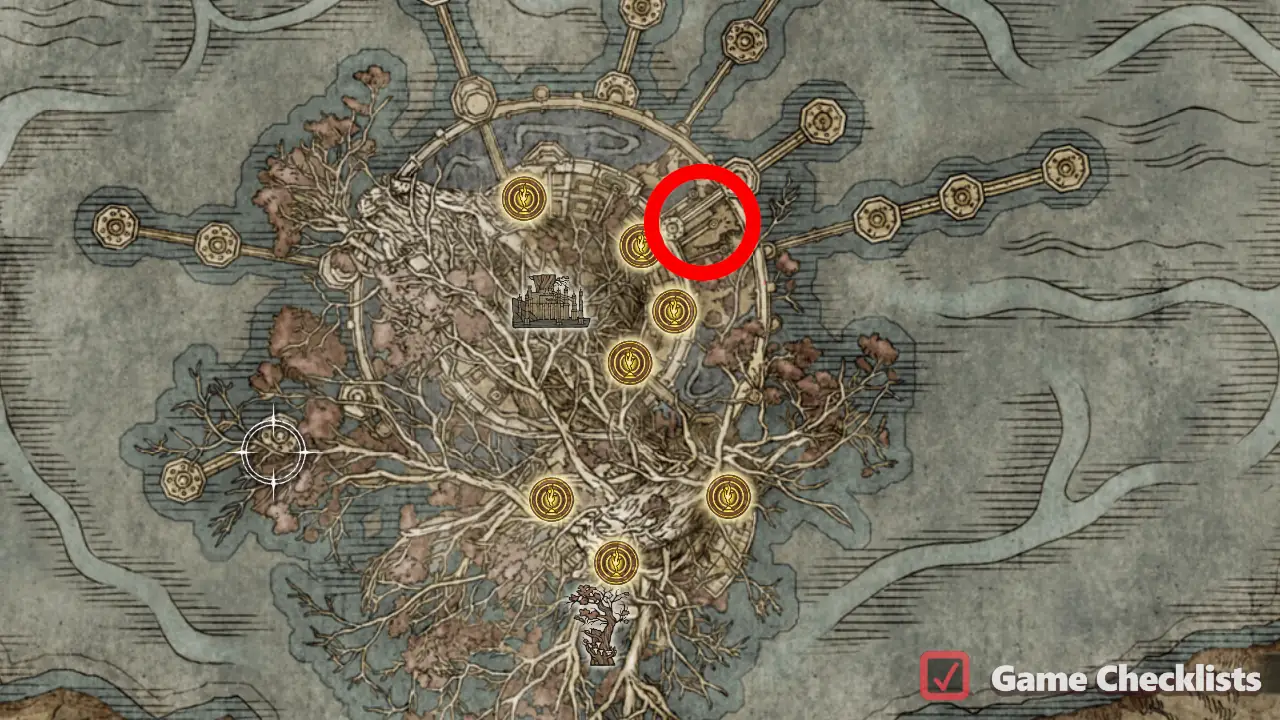 |
||
|
Defeat the Location of Spelldrake Talisman: 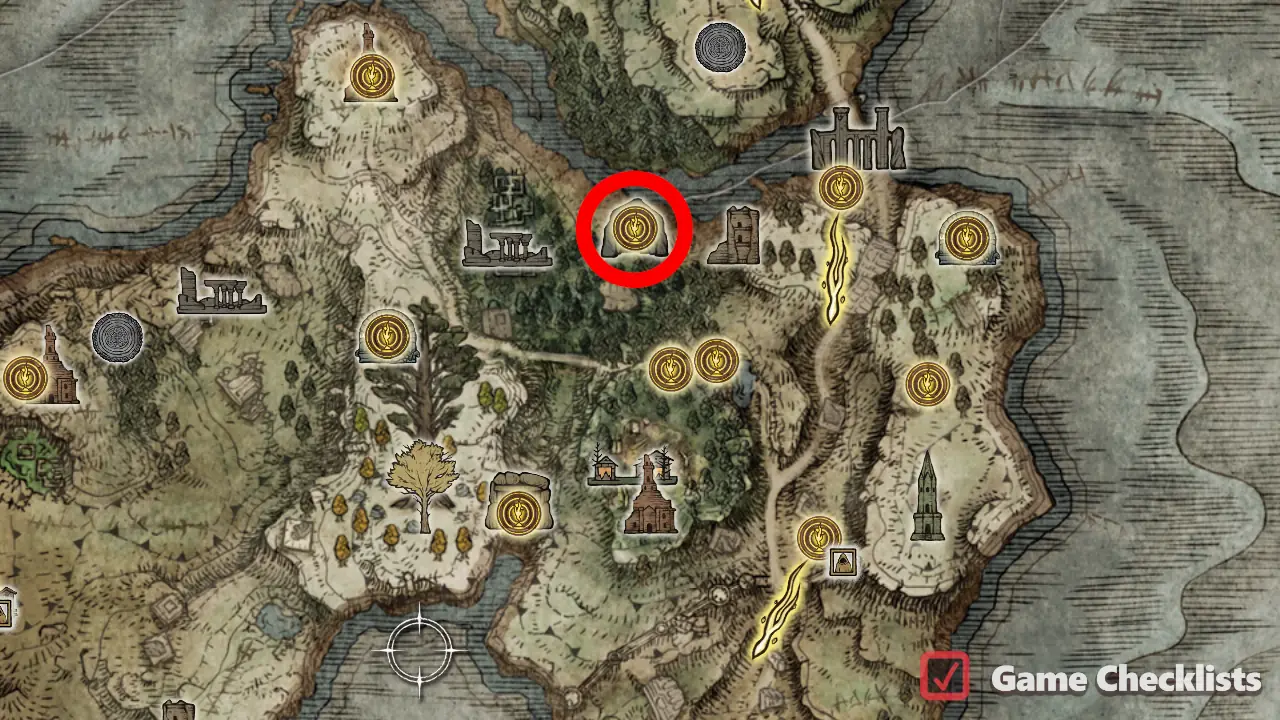 |
||
|
Light all the braziers in Sellia so the magic barries disappear. Loot the chest in one of the northwestern houses. Location of Spelldrake Talisman +1:  |
||
|
From the Location of Spelldrake Talisman +2: 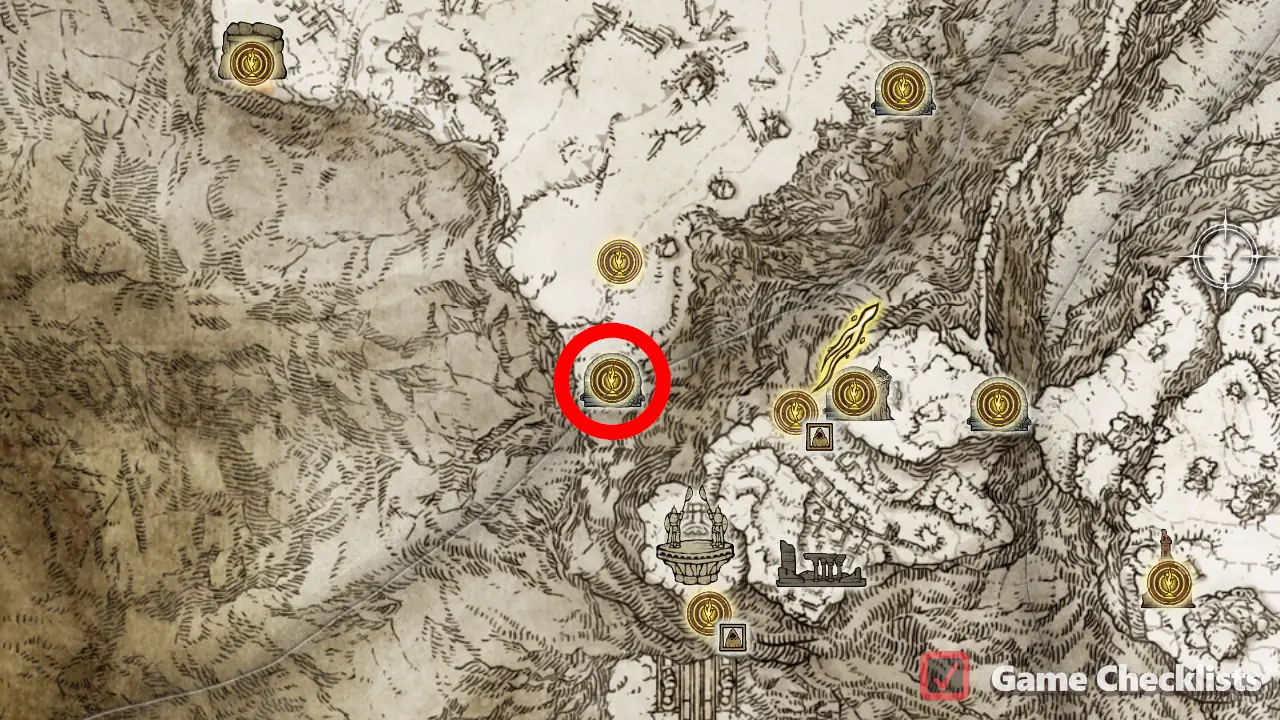 |
||
|
From Location of Spelldrake Talisman +3: 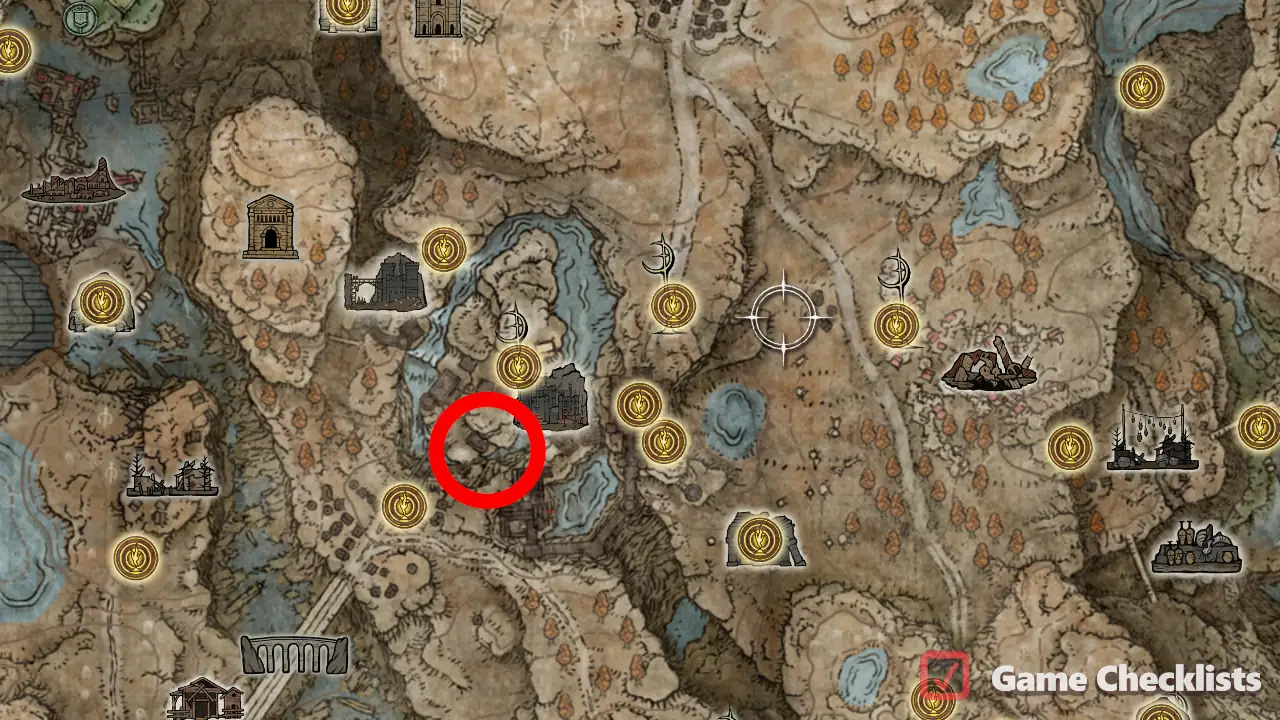 |
||
|
Defeat the Location of Flamedrake Talisman: 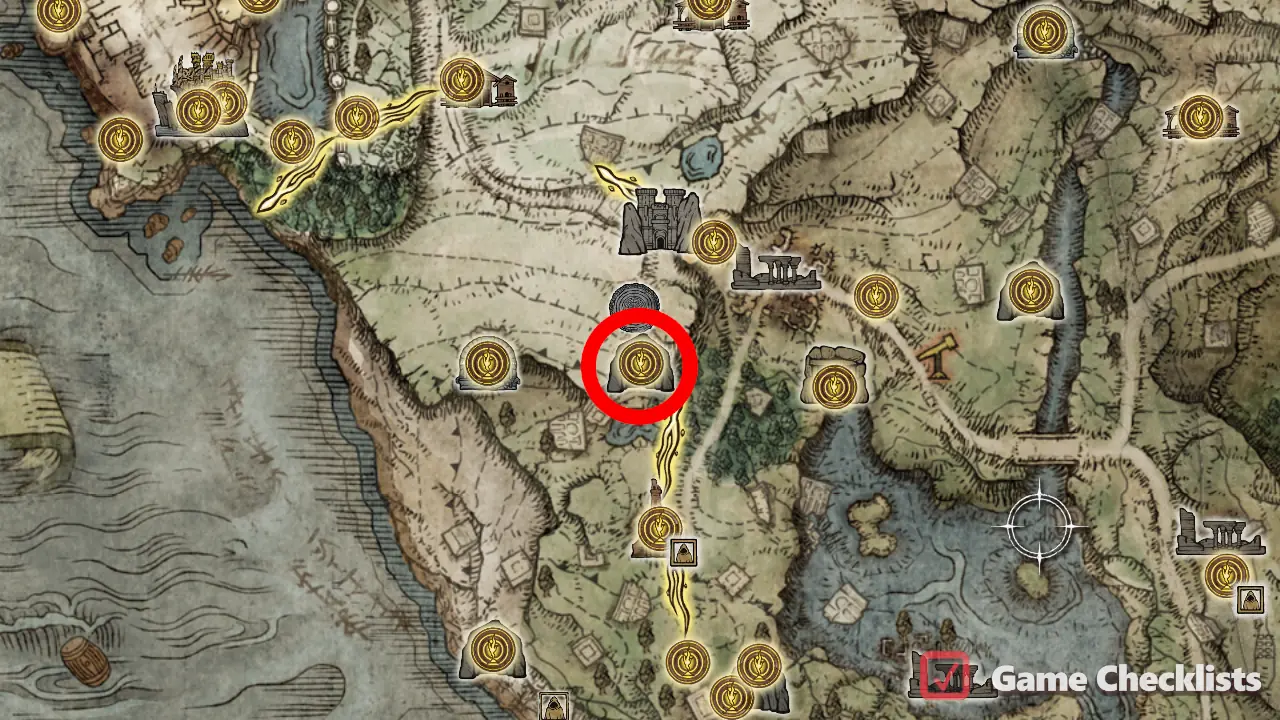 |
||
|
On the bridge leading from Leyndell to Location of Flamedrake Talisman +1: 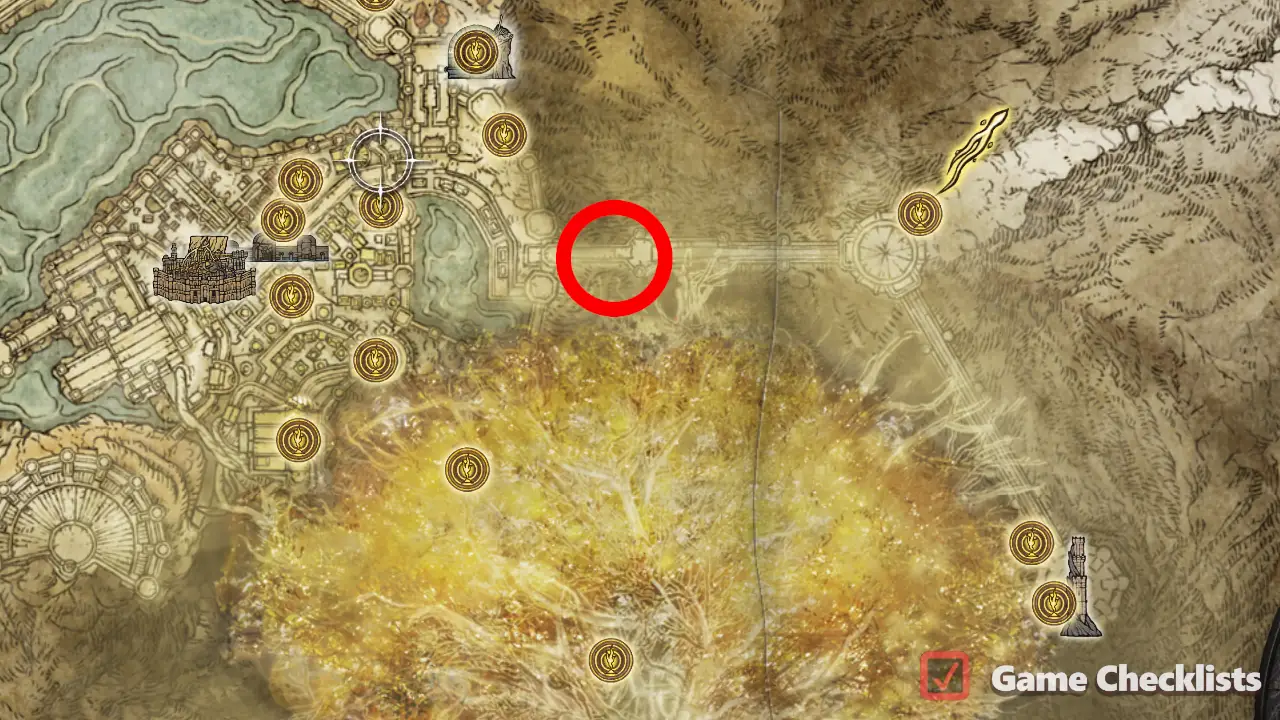 |
||
|
Defeat the Location of Flamedrake Talisman +2:  |
||
|
Enter the courtyard of Location of Flamedrake Talisman +3:  |
||
|
On a corpse nearby. Location of Boltdrake Talisman: 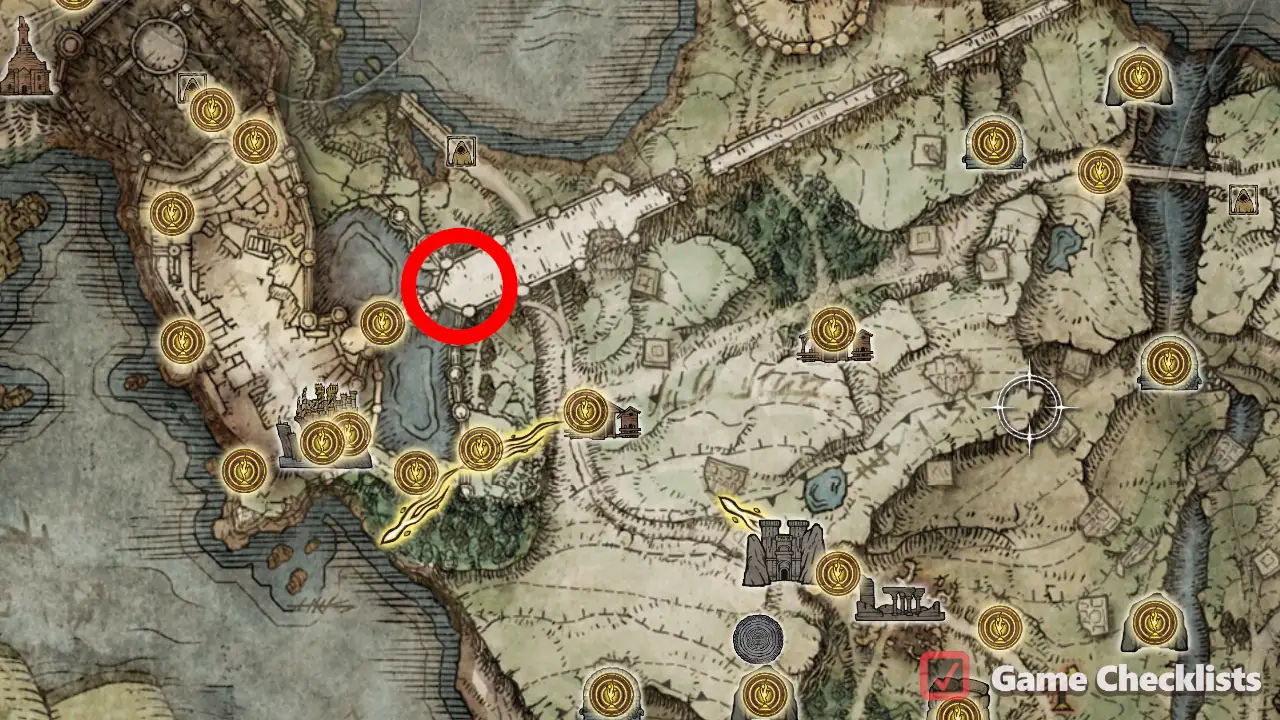 |
||
|
Go on the main path until you reach a ladder, climb it and loot the Boltdrake Talisman +1 from a wooden shack. Location of Boltdrake Talisman +1: 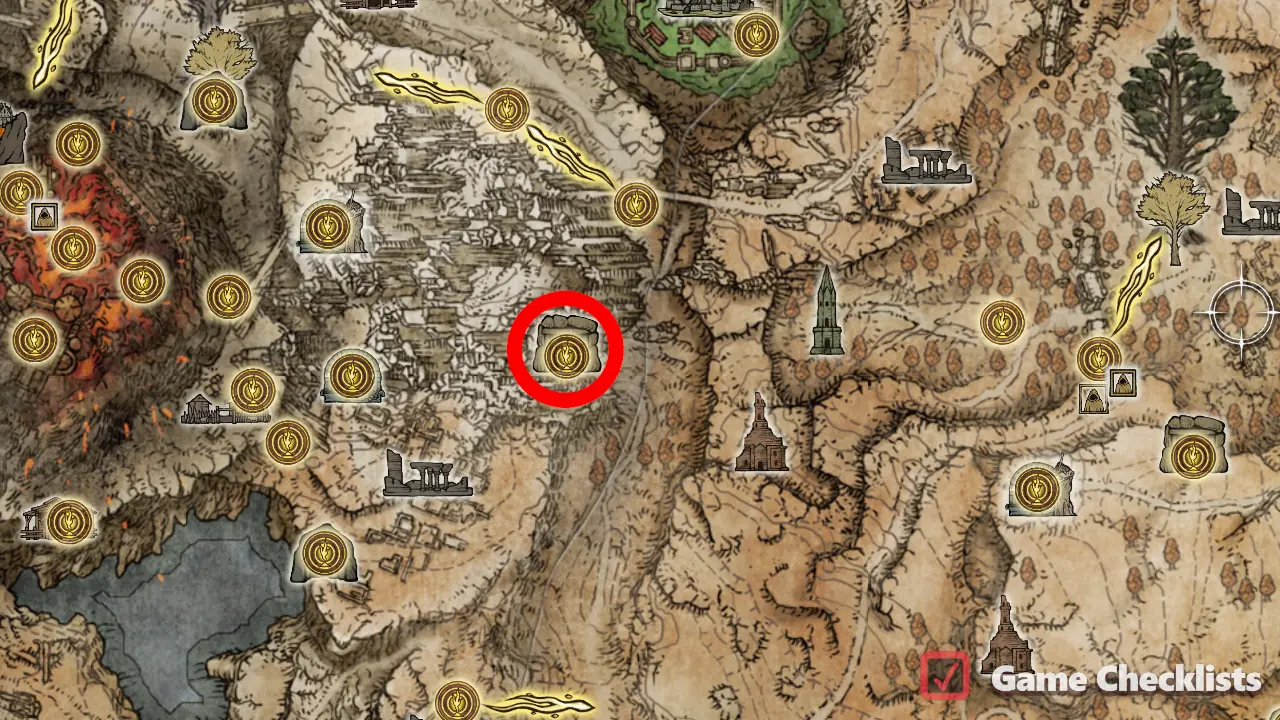 |
||
|
From Location of Boltdrake Talisman +2: 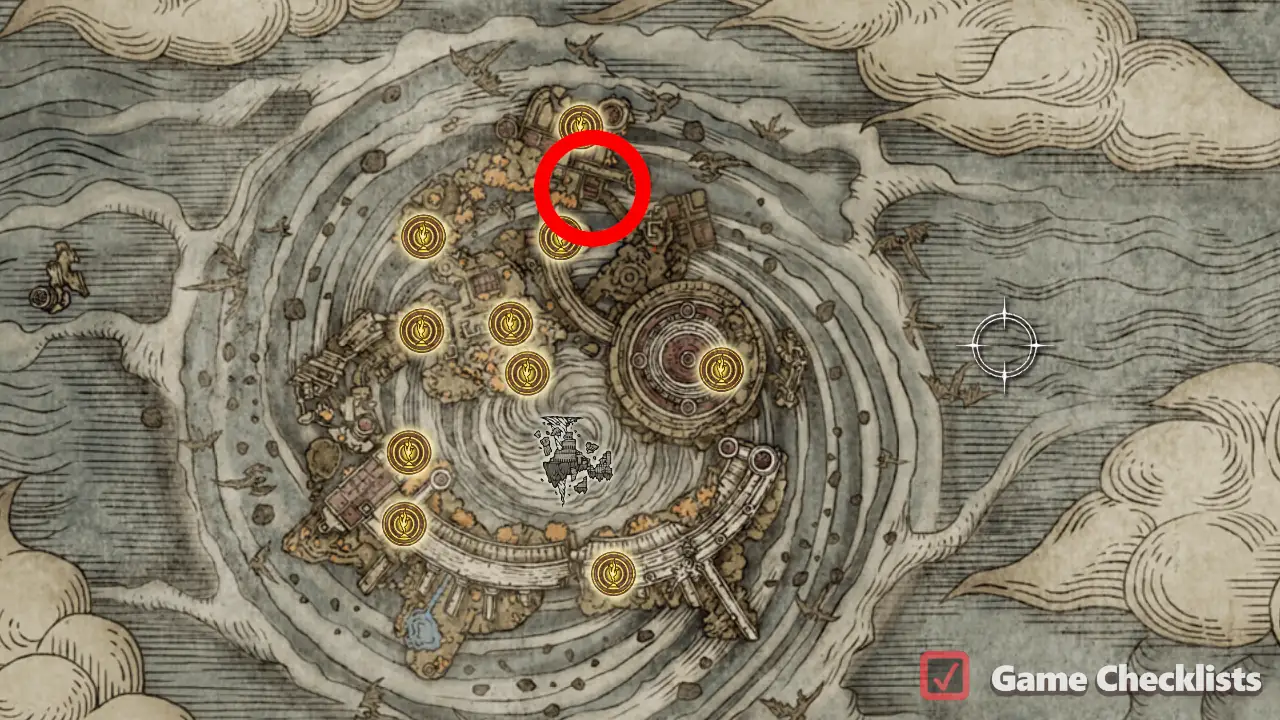 |
||
|
From Location of Boltdrake Talisman +3: 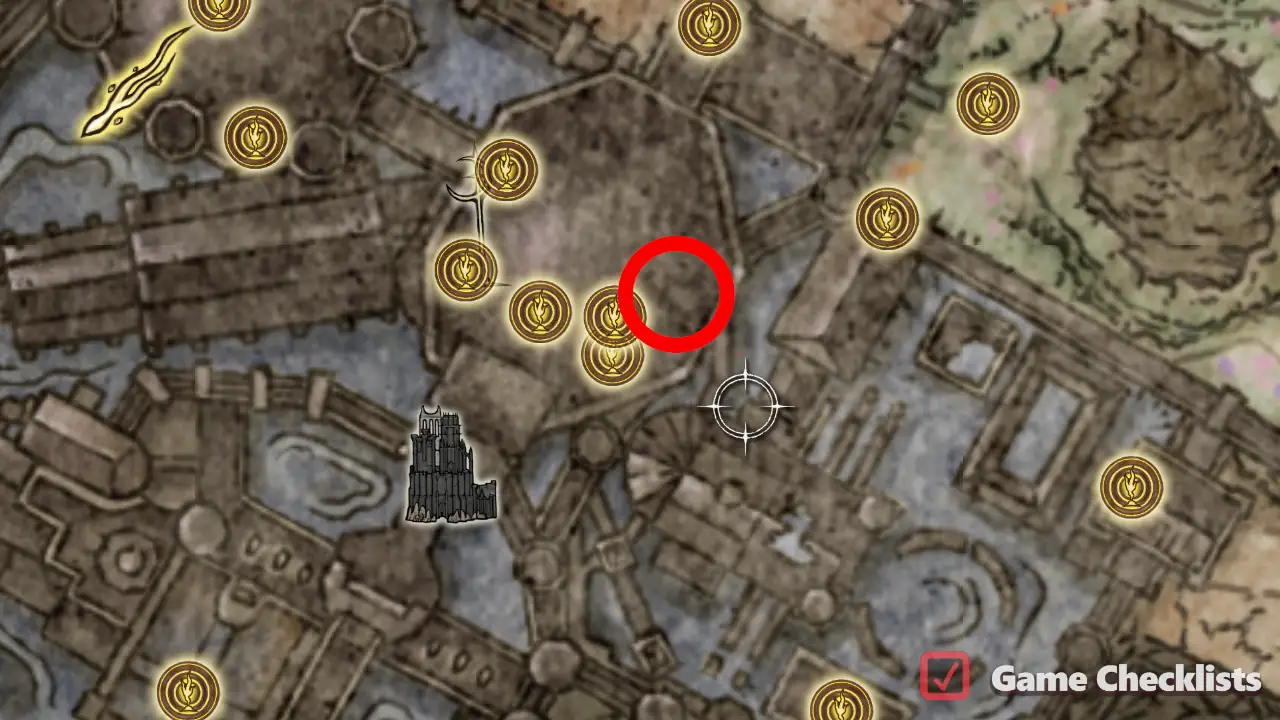 |
||
|
From Location of Haligdrake Talisman: 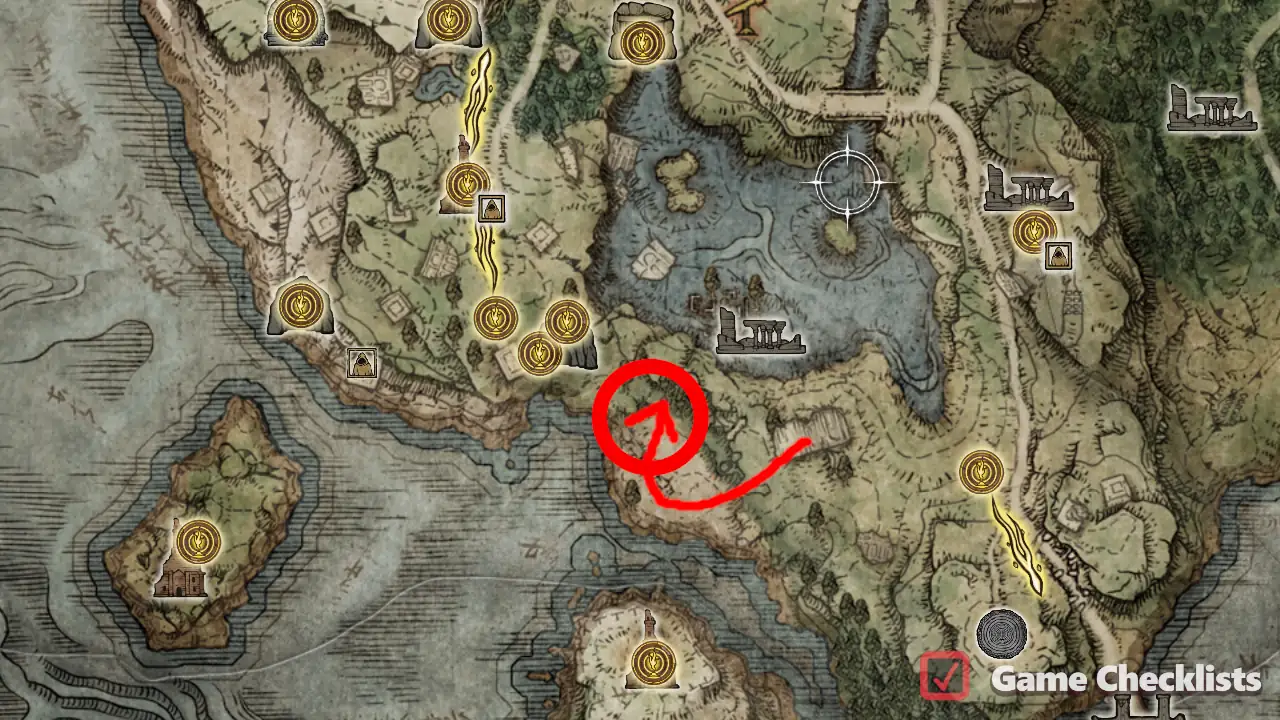 |
||
|
From the Location of Haligdrake Talisman +1: 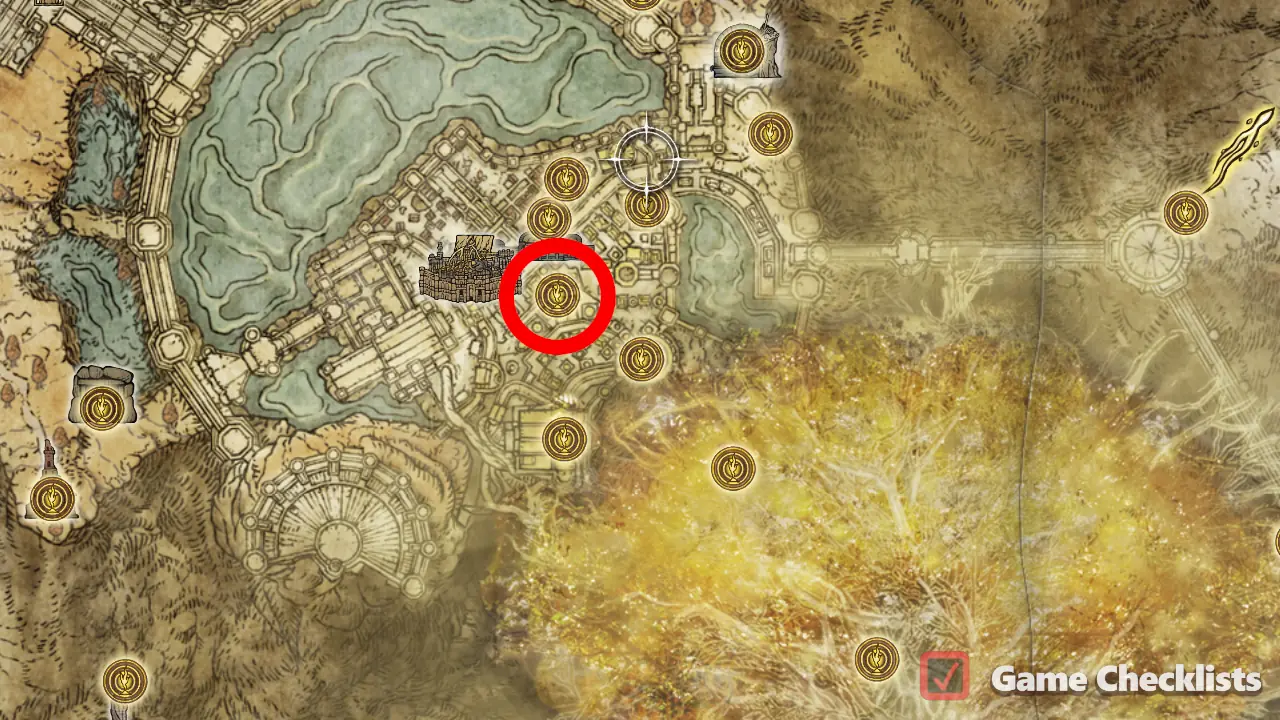 |
||
|
Head back into the woods, past the gigantic skeletons and keep the cliff on your right side all the way. After a while, you will go around the whole area and reach a graveyard with Haligtree Talisman +2 near one of the graves. Location of Haligdrake Talisman +2: 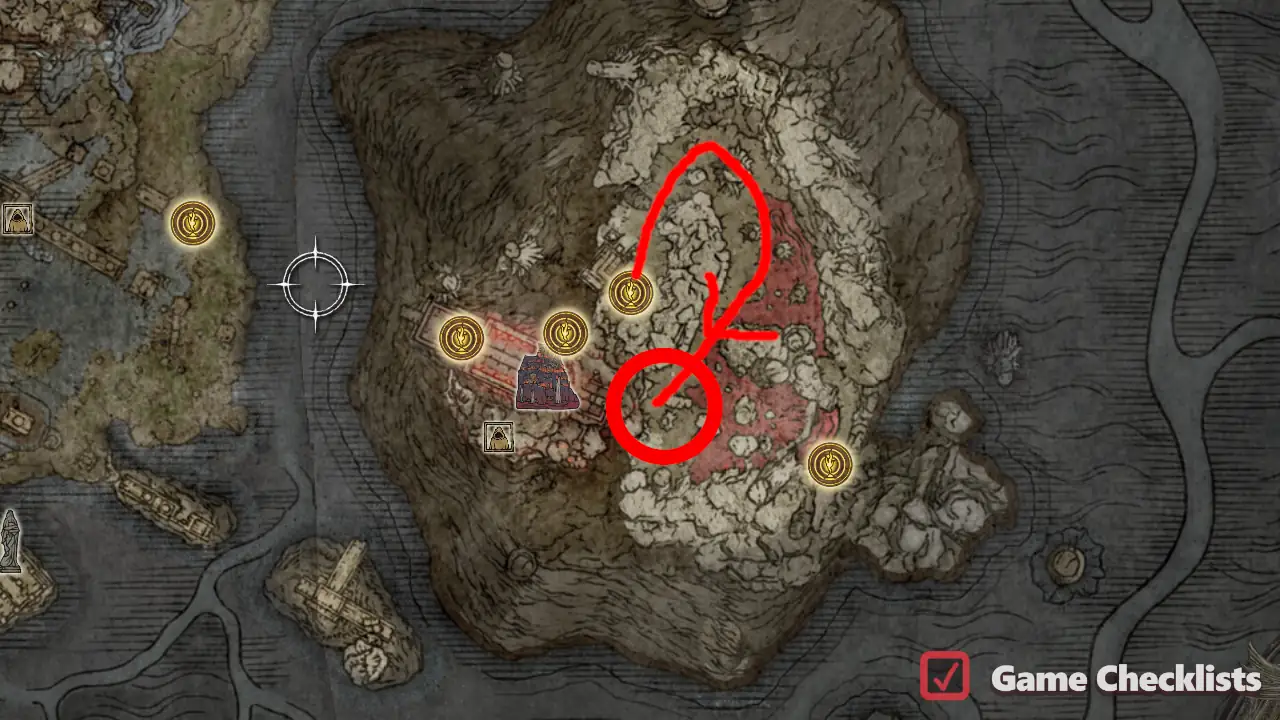 |
||
|
Inside Shaman Village, near a tree. Location of Golden Braid: 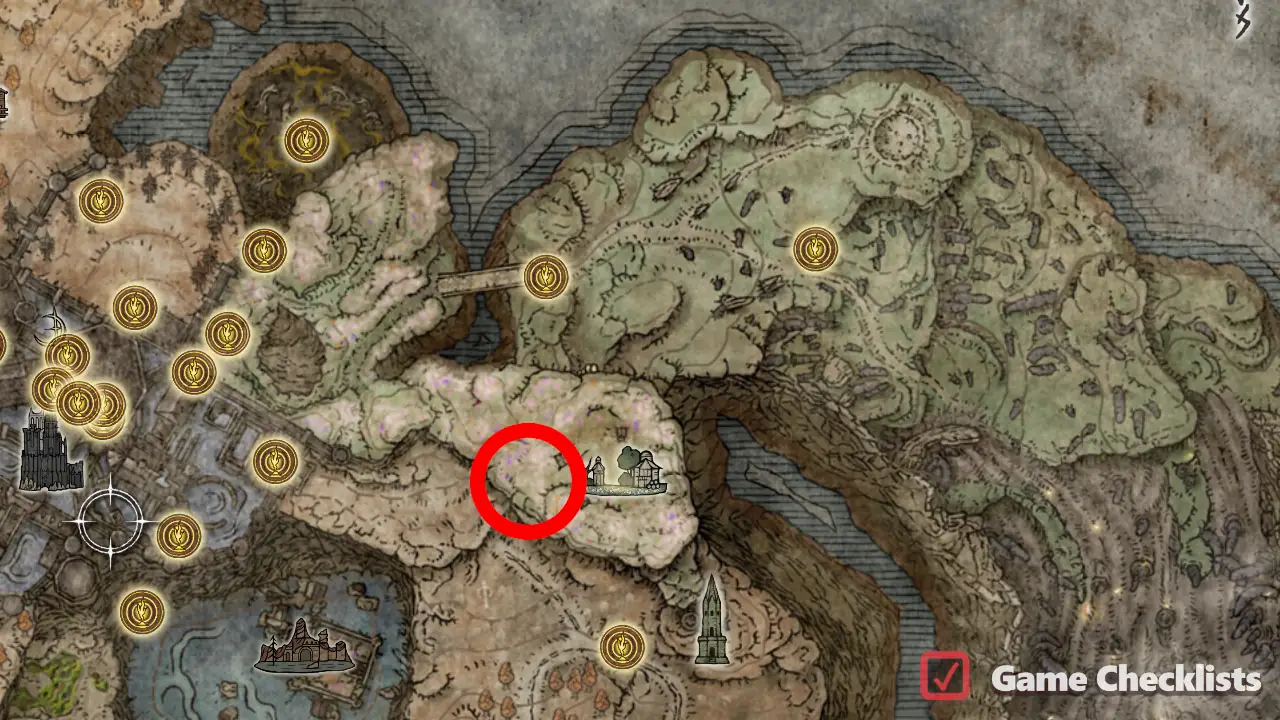 |
||
|
Take the first belfry portal (Crumbling Lands) to get to early Crumbling Farum Azula. Drop down as much as you can to get the Pearldrake Talisman. Location of Pearldrake Talisman: 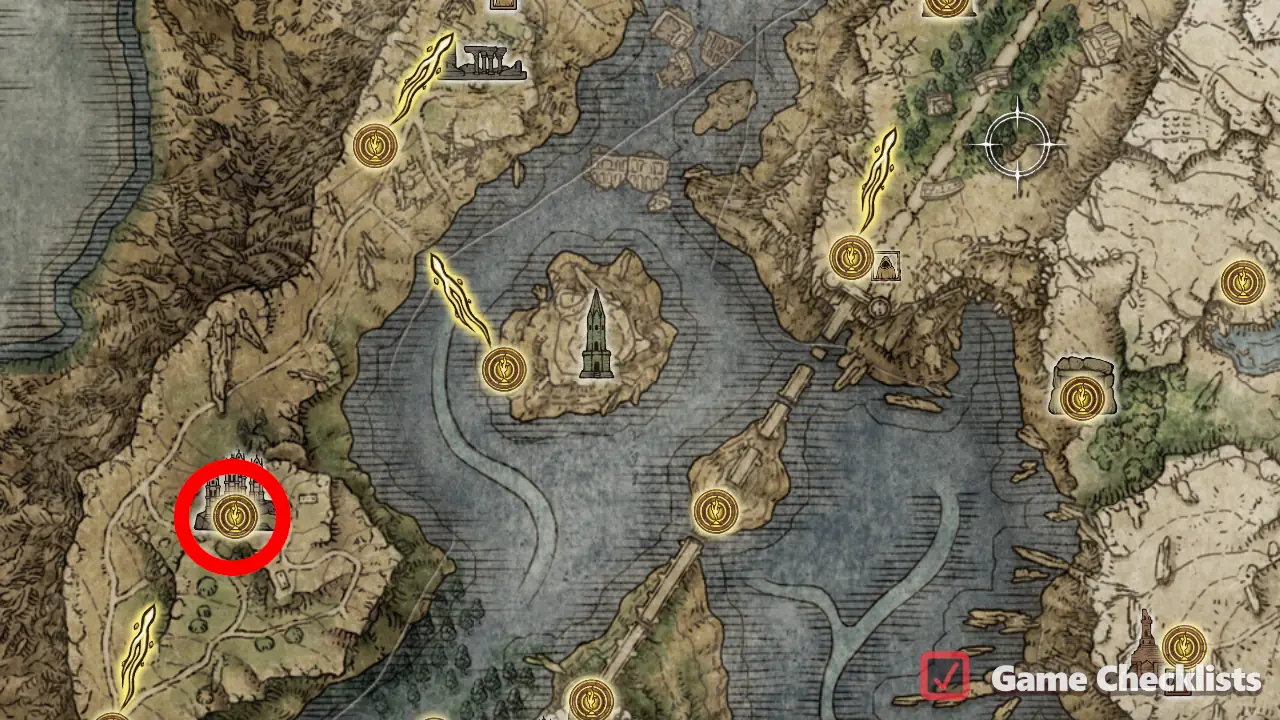 |
||
|
Not in the catacombs (it's just the closest site of grace), but in the cellar of Wyndham Ruins. Location of Pearldrake Talisman +1: 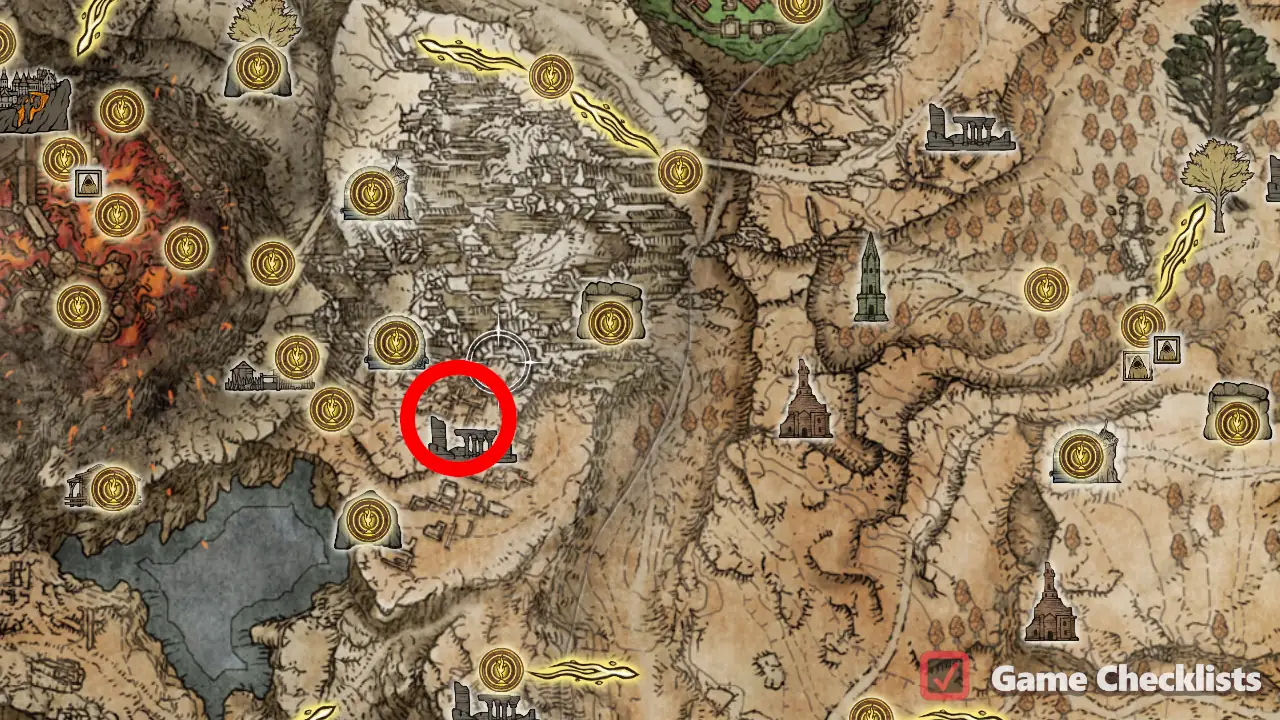 |
||
|
From Location of Pearldrake Talisman +2:  |
||
|
"Move the statue first: From Get to the statue after: From Location of Pearldrake Talisman +3:  |
||
|
Just past Location of Immunizing Horn Charm: 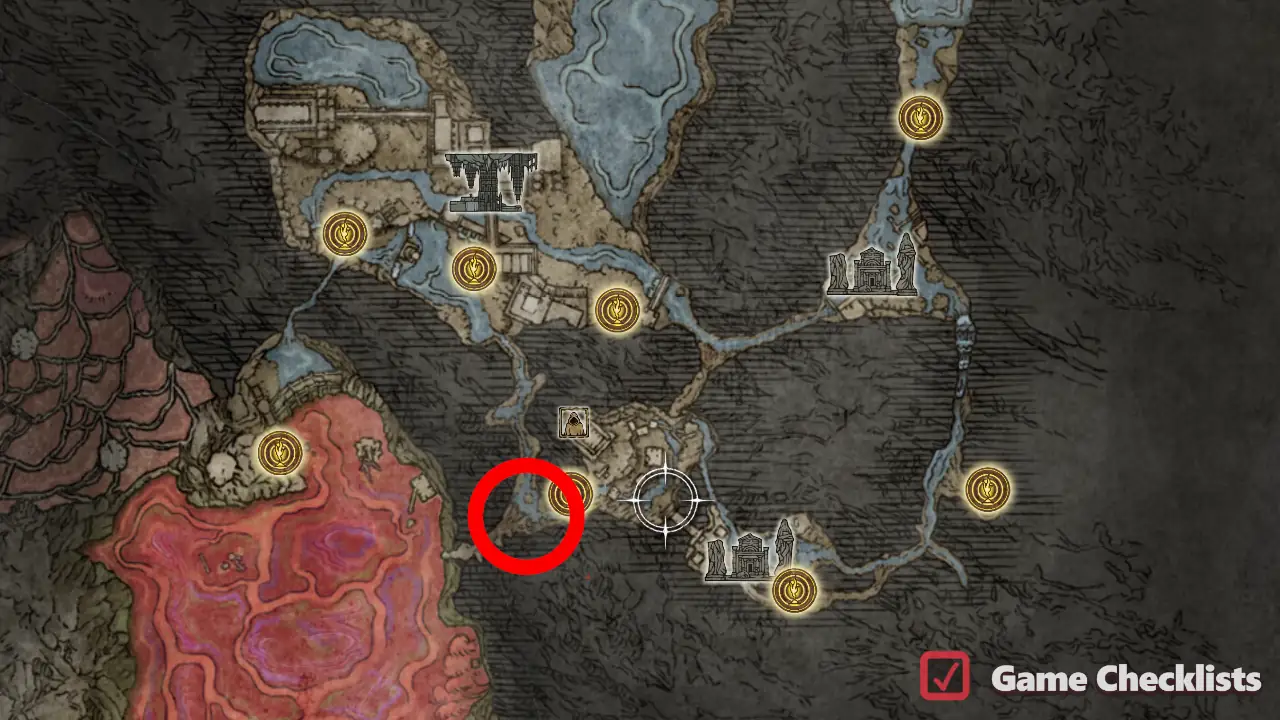 |
||
|
From the shore, head southeast to soon spot a suspiciously solitary Ancestral Follower (minotaur) enemy walking in the lake. Defeat him and he will drop the Immunizing Horn Charm +1. Location of Immunizing Horn Charm +1: 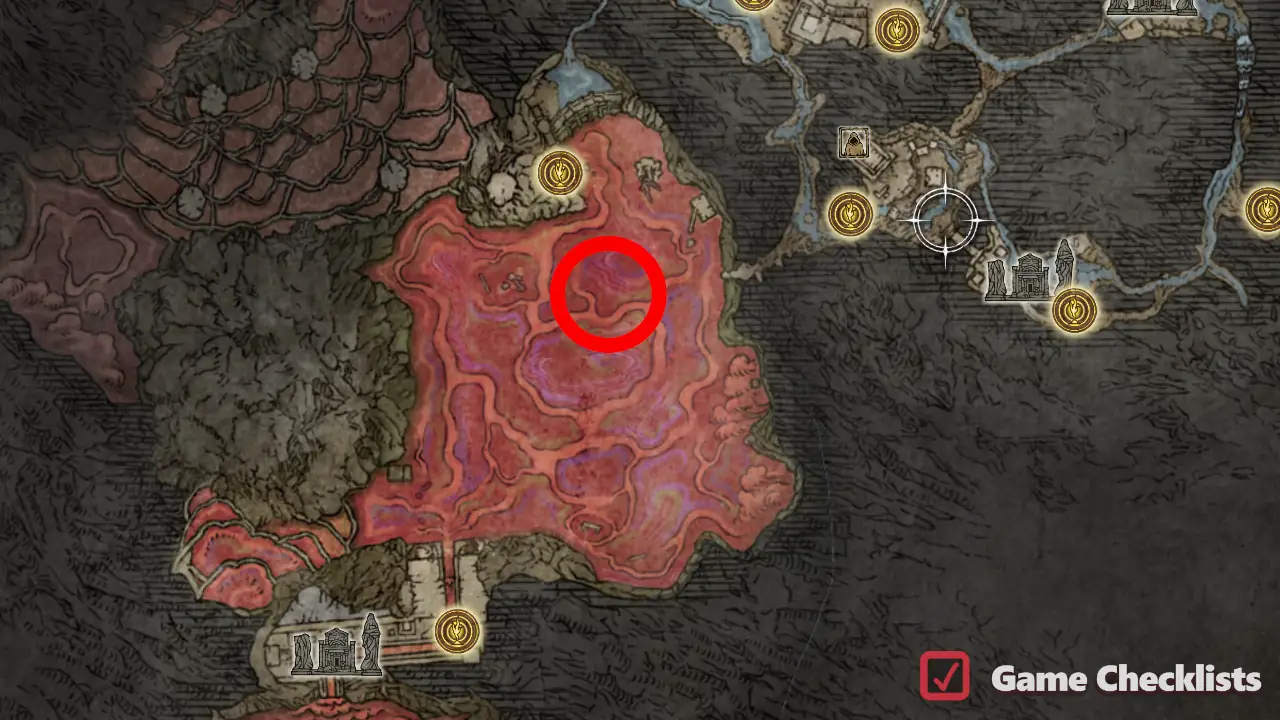 |
||
|
Defeat the lesser Ulcerated Tree Spirit in the swamp in the eastern part of Belurat. Location of Immunizing Horn Charm +2: 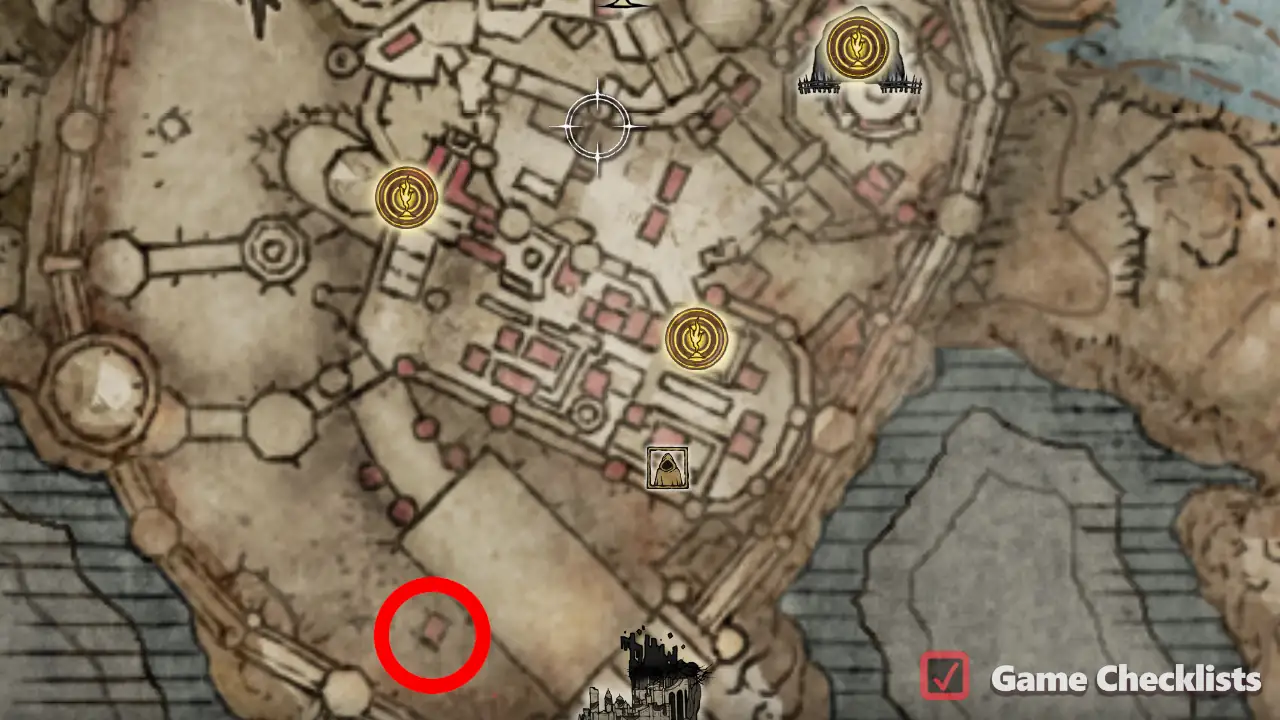 |
||
|
From the Location of Stalwart Horn Charm:  |
||
|
From the Location of Stalwart Horn Charm +1: 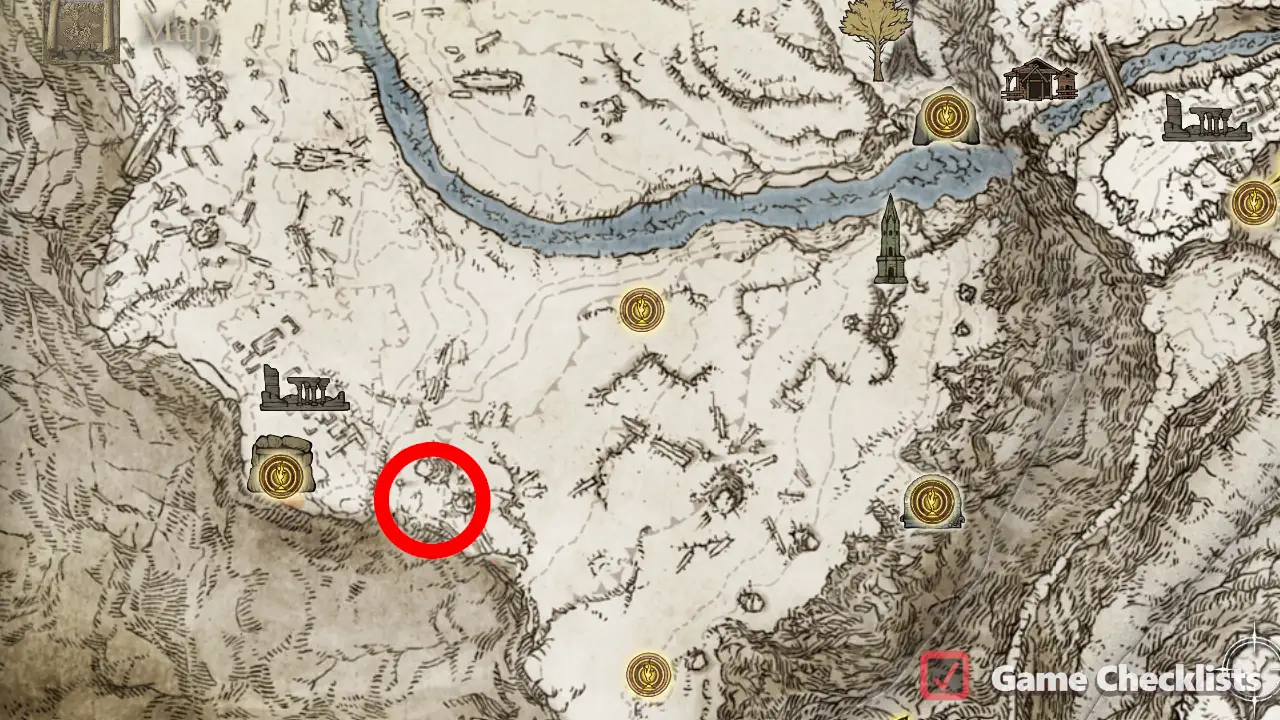 |
||
|
In Location of Stalwart Horn Charm +2: 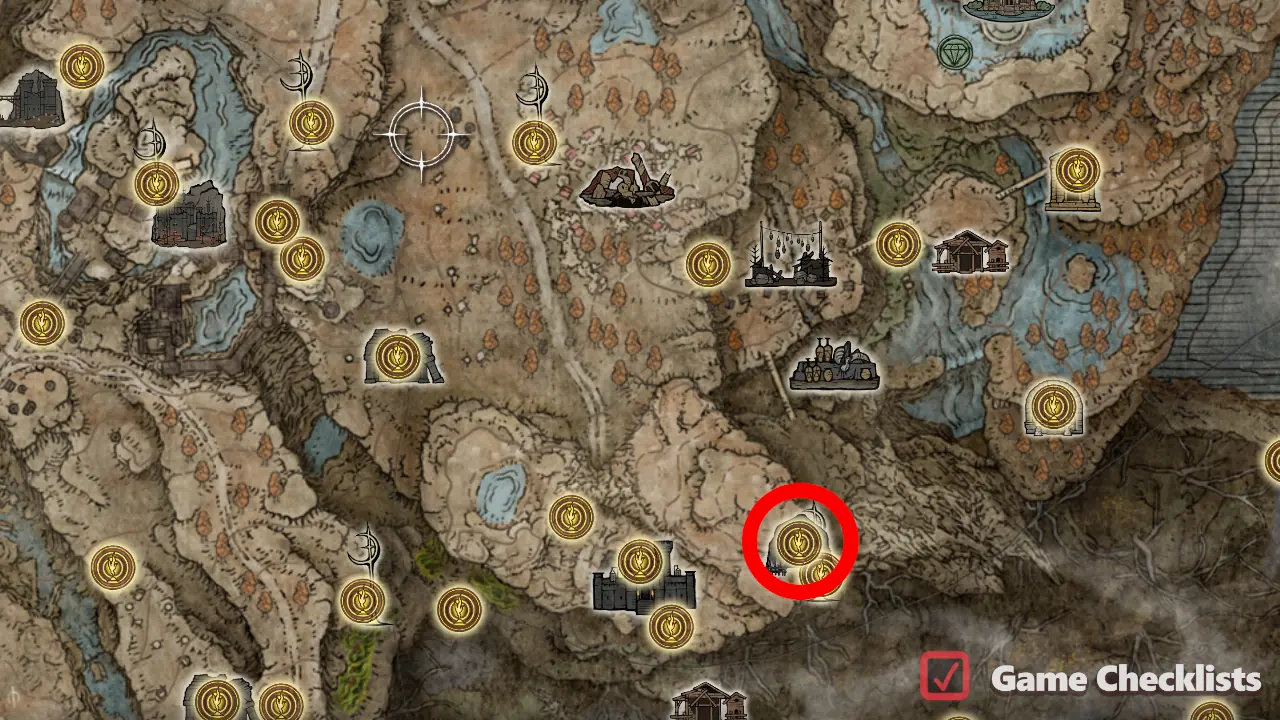 |
||
|
On the stairs leading to the elevator. Location of Clarifying Horn Charm: 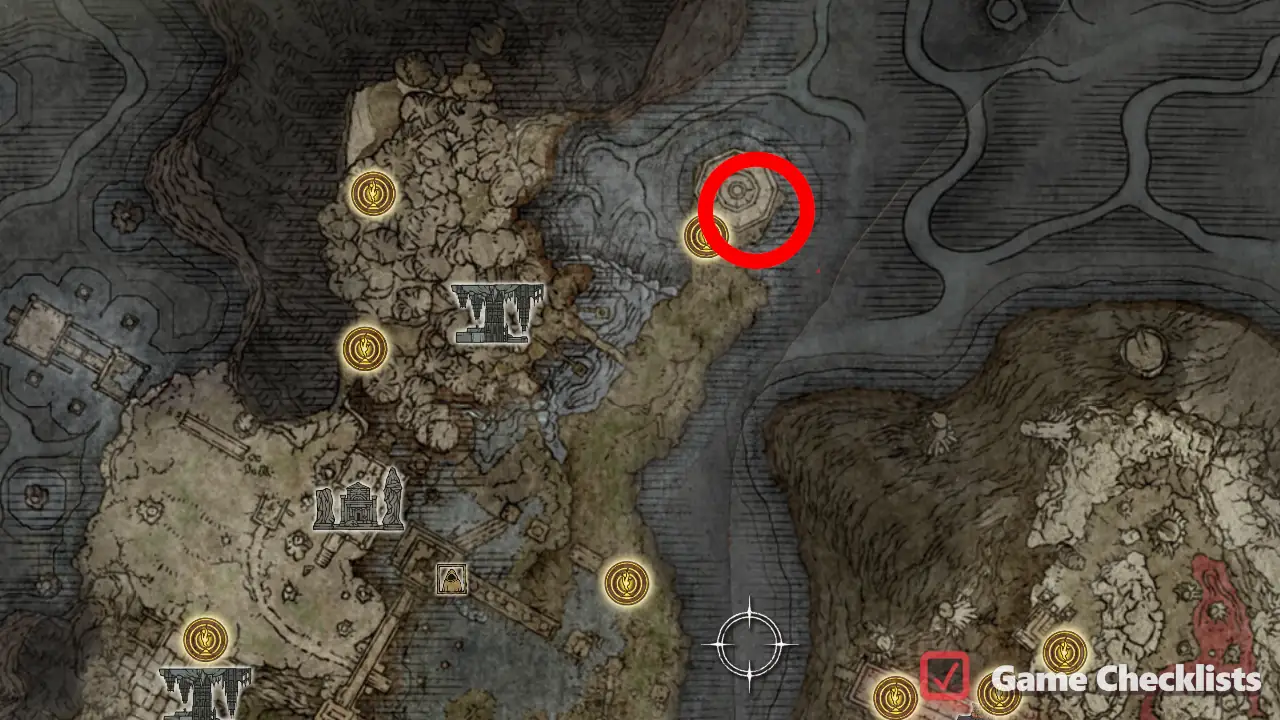 |
||
|
From Location of Clarifying Horn Charm +1: 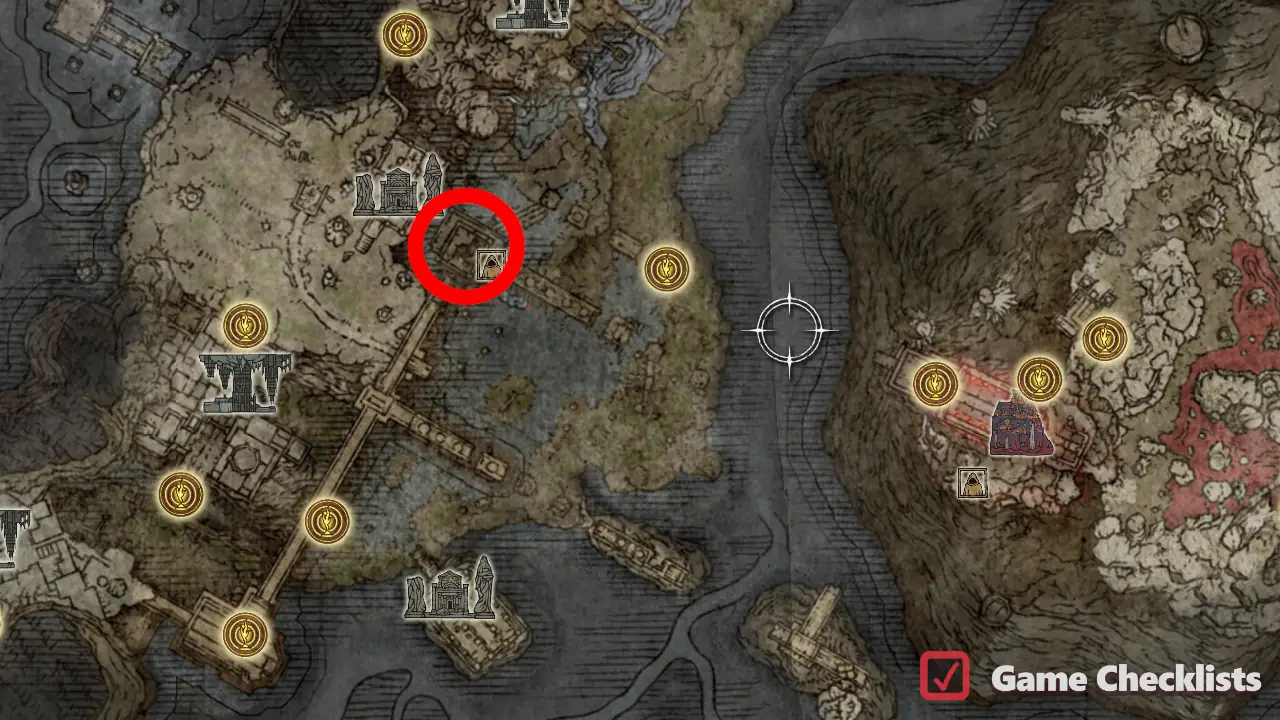 |
||
|
In Location of Clarifying Horn Charm +2: 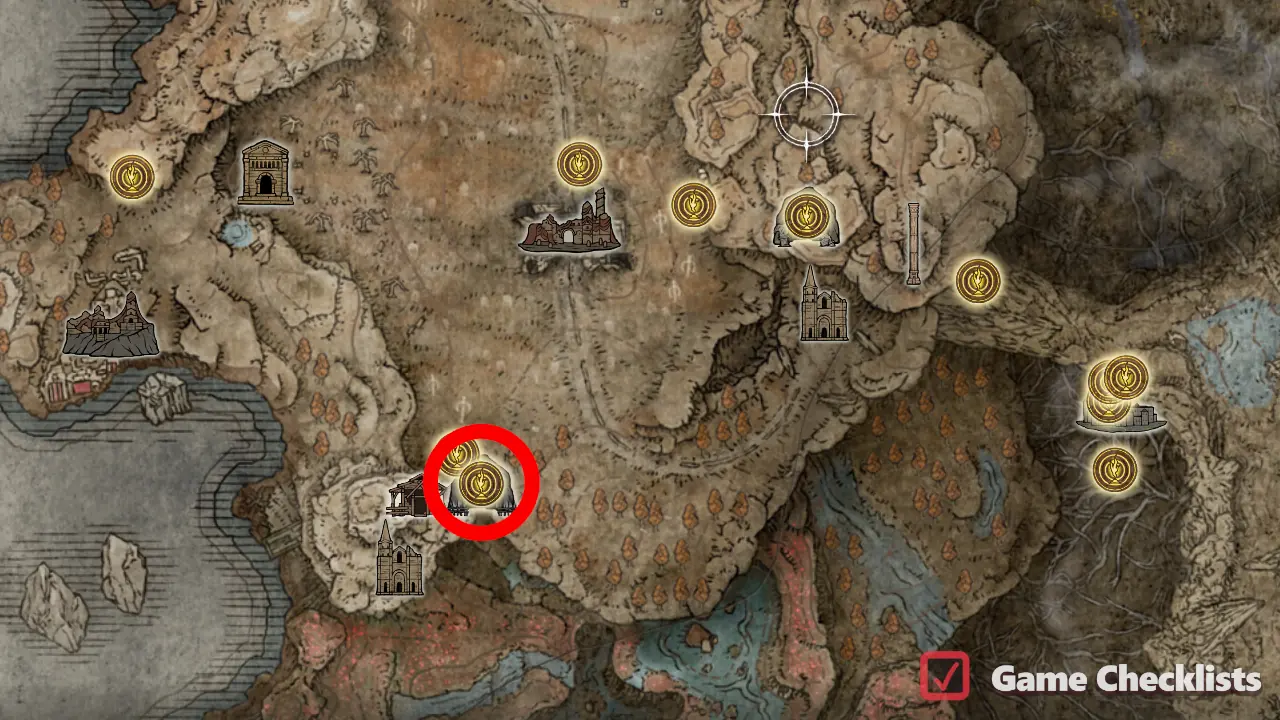 |
||
|
Take the third belfry portal (Night Sky Unceasing) to get isolated part of Nokron. Drop down to get the Mottled Necklace. Lesser Crucible Knight is also here. Location of Mottled Necklace: |
||
|
Head past the Location of Mottled Necklace +1: 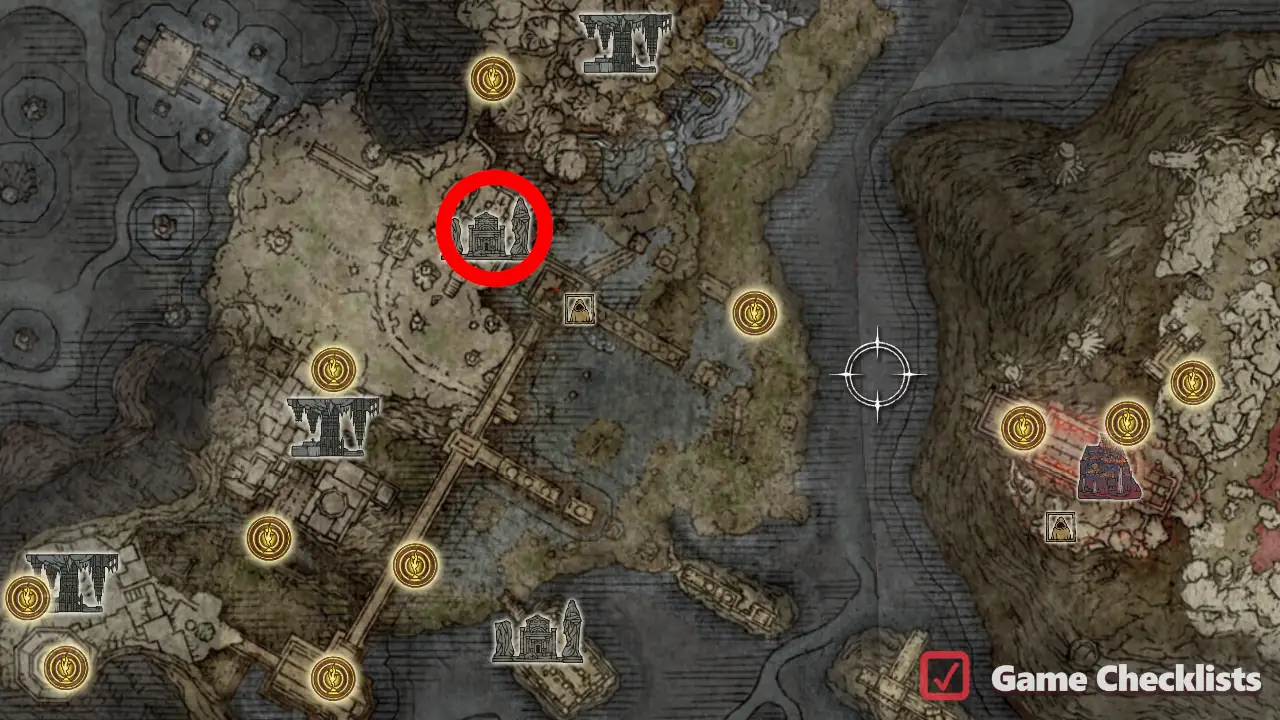 |
||
|
From Location of Mottled Necklace +2: 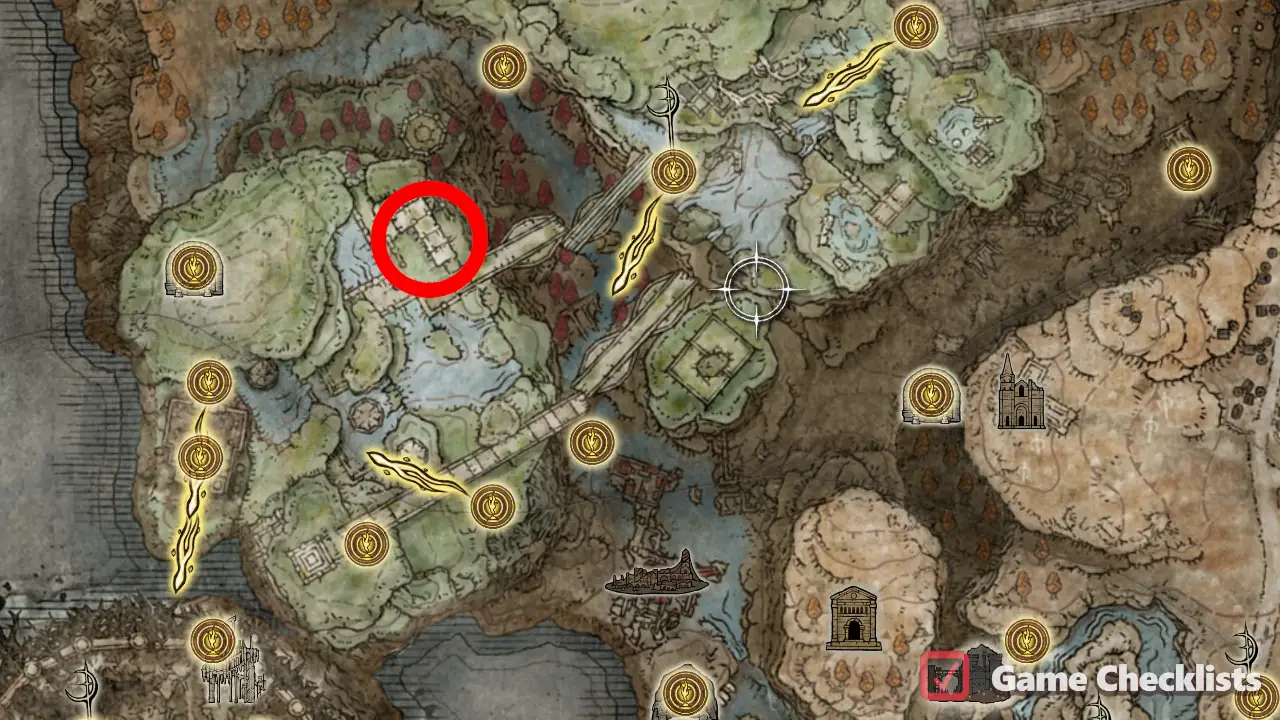 |
||
|
From the Location of Prince of Death's Pustule: 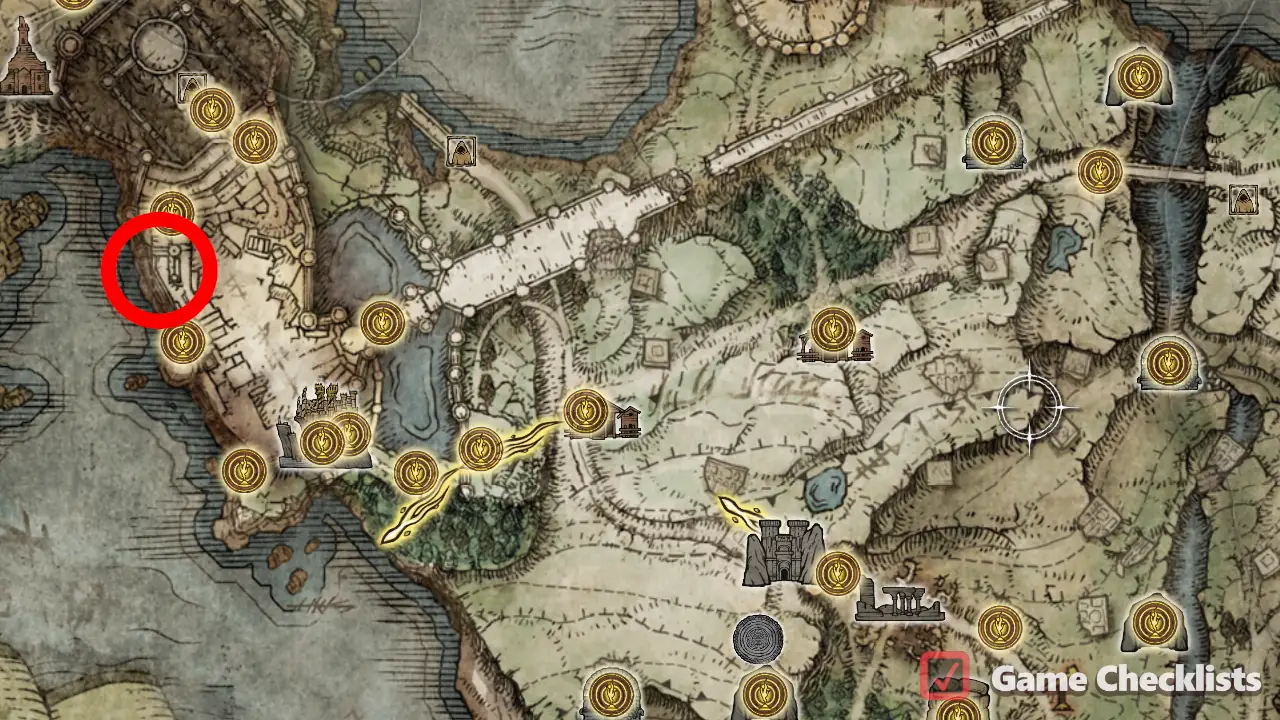 |
||
|
From Location of Prince of Death's Cyst: 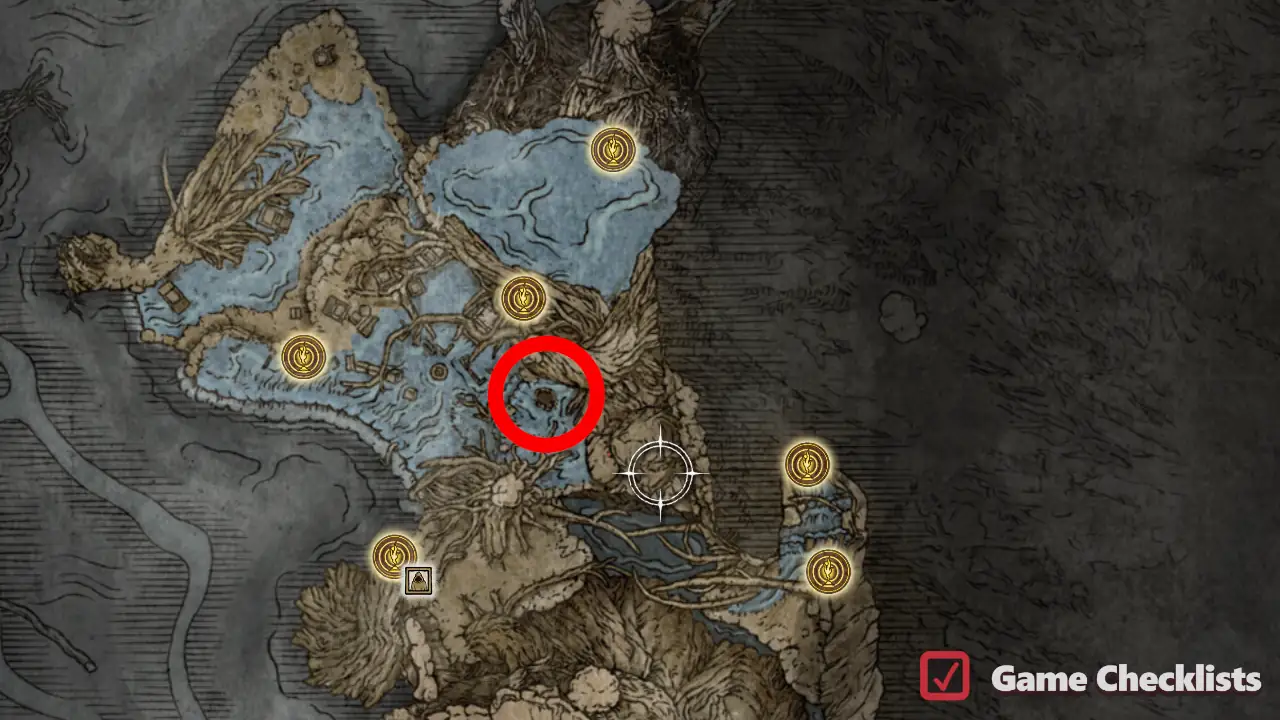 |
||
|
On a small porch on the northeastern edge of the Abandoned Ailing Village. Location of Ailment Talisman: 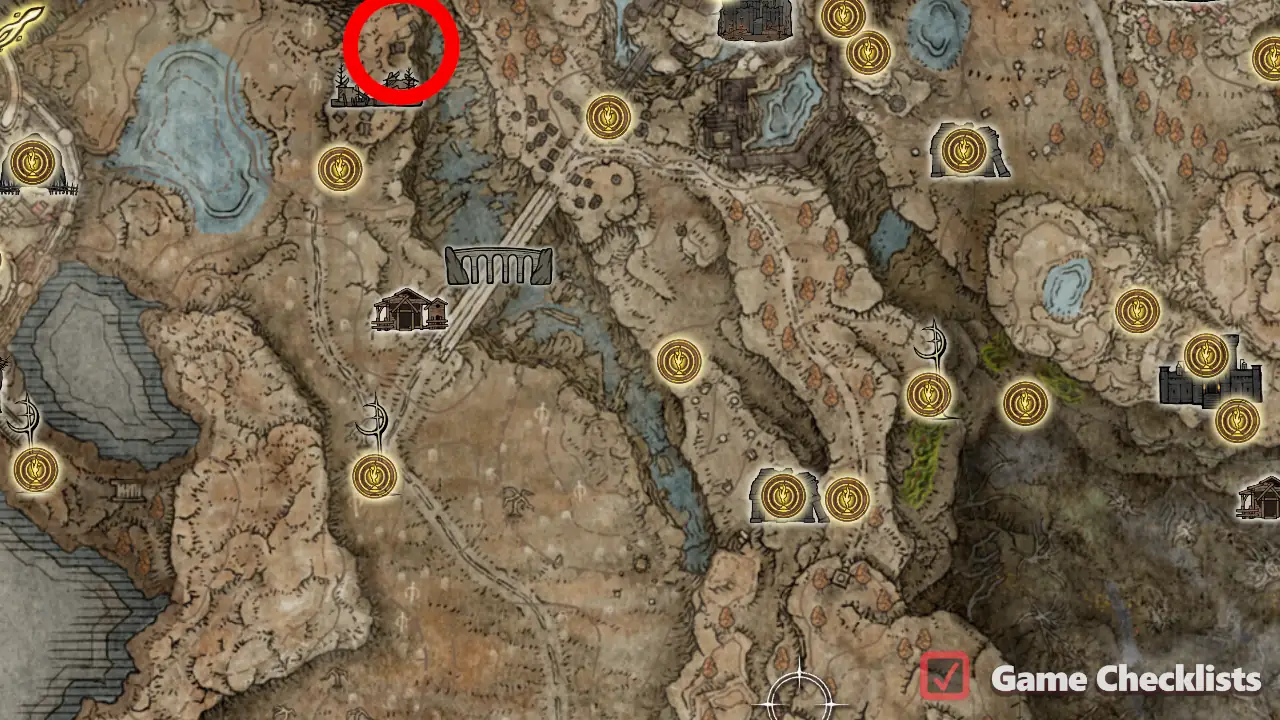 |
All Weapon Talismans
The third group of Talismans, in the order as seen in Elden Ring's game inventory. Talismans that reward playing with specific weapon classes, or the moves possible with certain weapon classes.
There are 17 Talismans in All Weapon Talismans.
| ✓ | Talisman | Description | |
|---|---|---|---|
|
From the Location of Dagger Talisman: 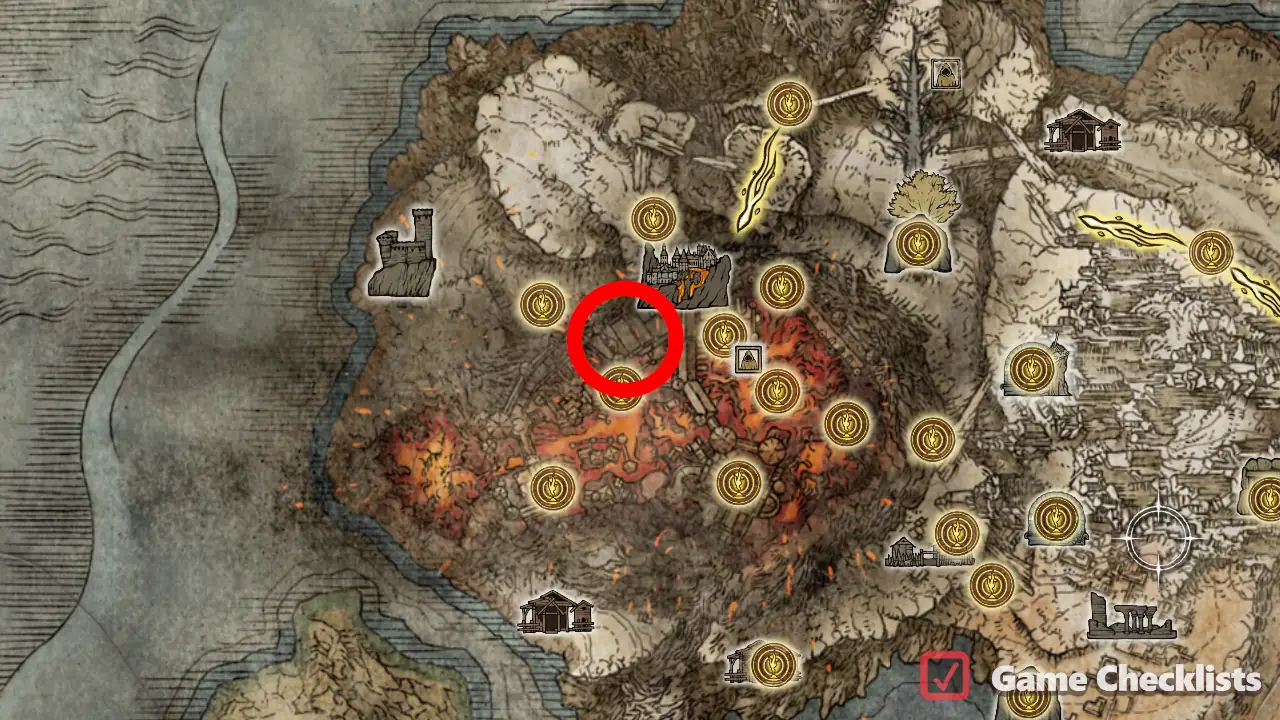 |
||
|
In the room with the Banished Knight where Location of Curved Sword Talisman: 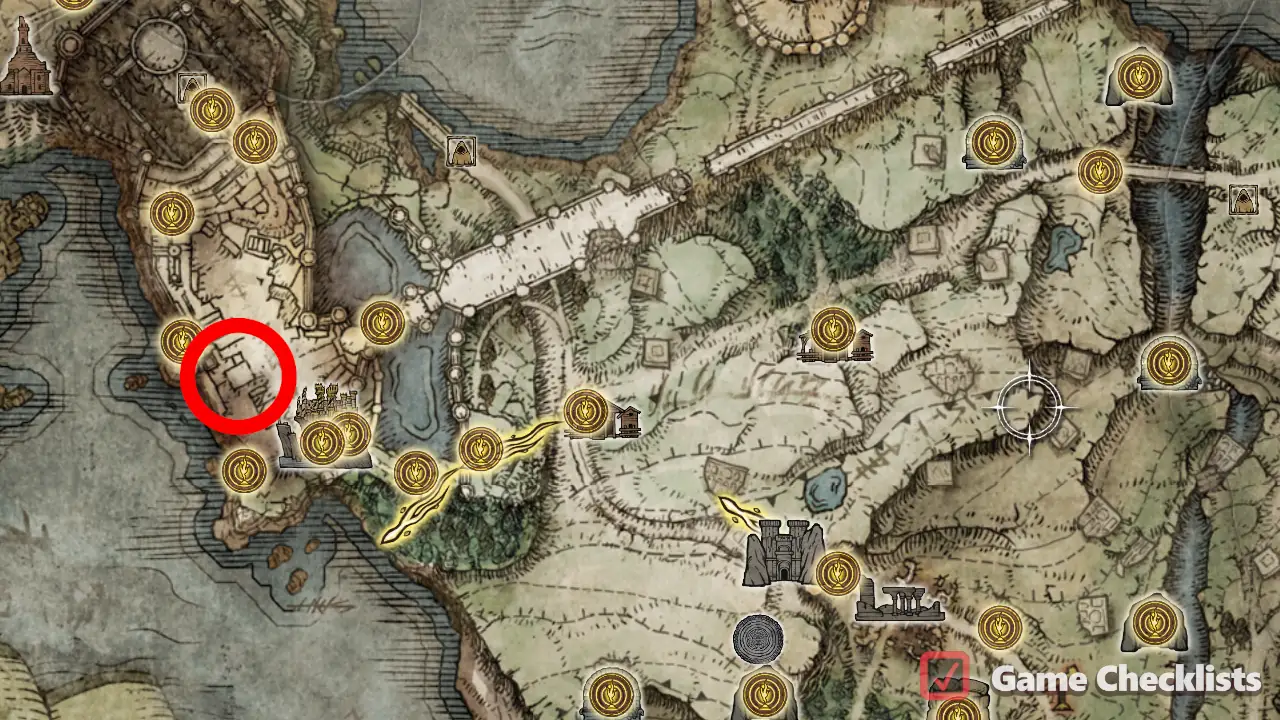 |
||
|
From Location of Twinblade Talisman: 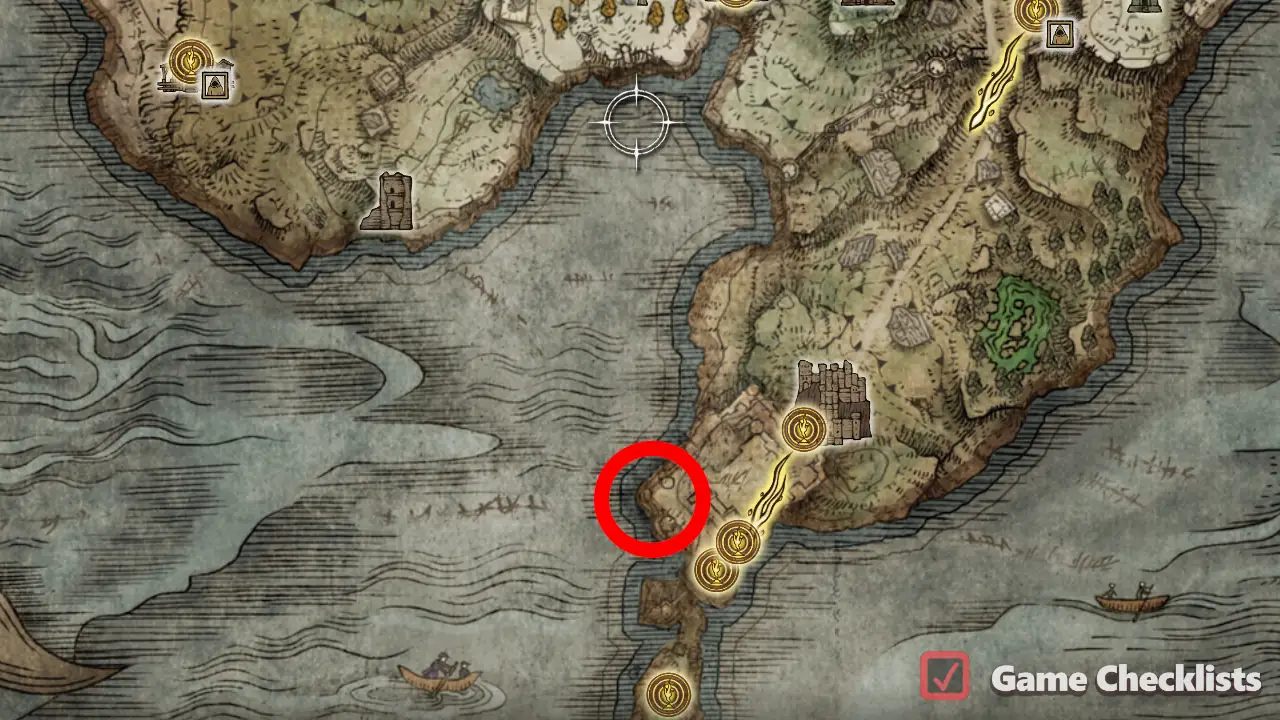 |
||
|
In the cellar of Mistwood Ruins. Location of Axe Talisman: 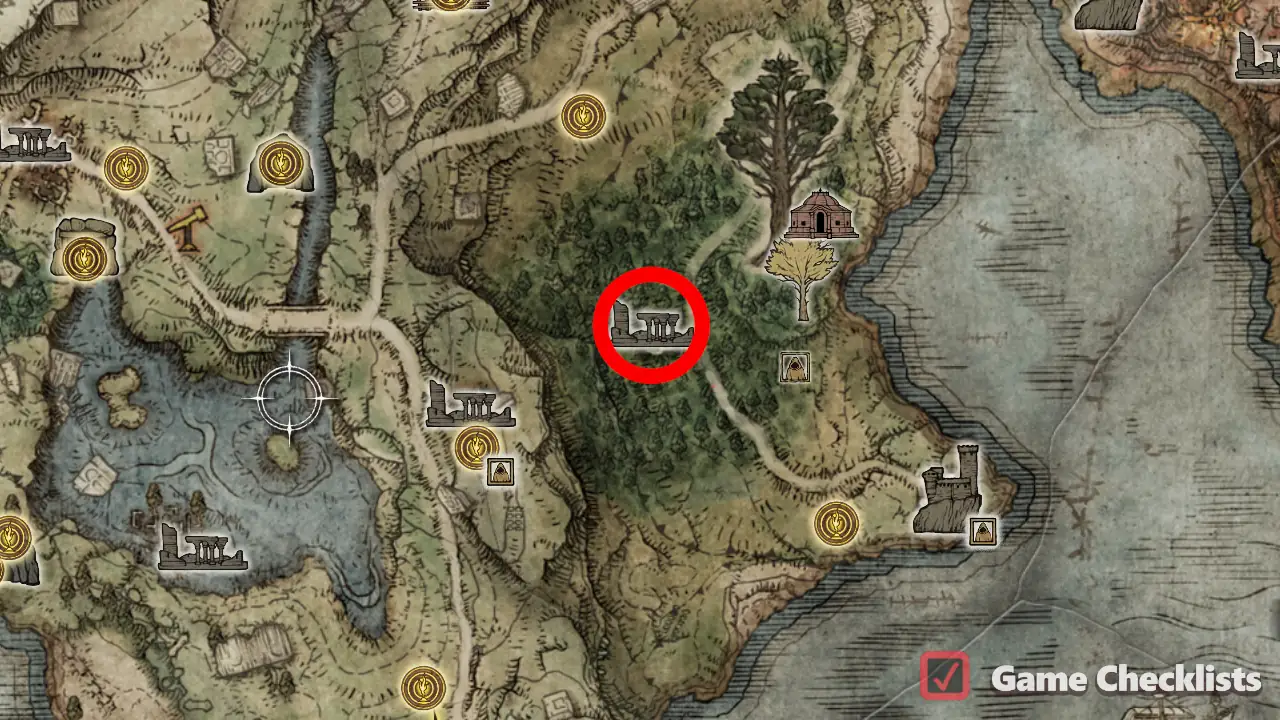 |
||
|
Missable! Defeat Recusant Henricus invader near the Limgrave Colosseum. You must do this before joining the Location of Hammer Talisman:  |
||
|
In Location of Spear Talisman: |
||
|
Directly north of Location of Lance Talisman: 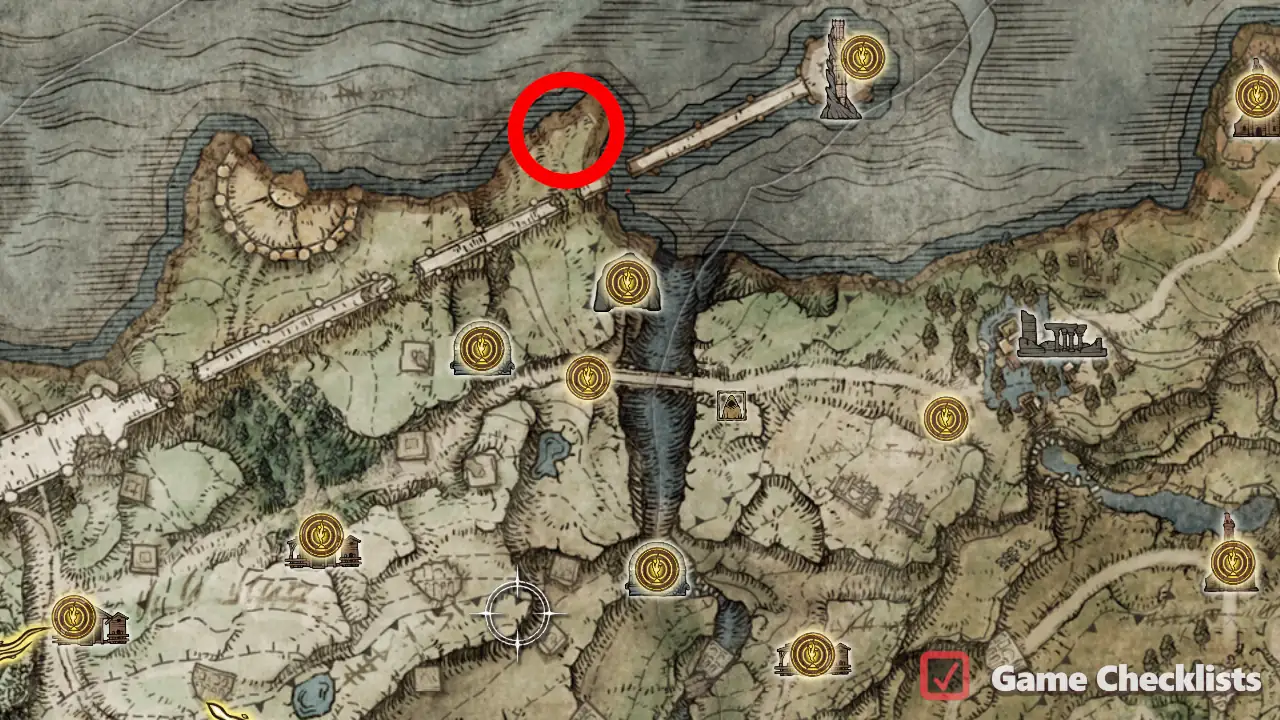 |
||
|
Head to the rooftops and immediatelly go right and drop down on a roof. Use the pillar to go up and get to a ladder leading to the talisman. Location of Claw Talisman: 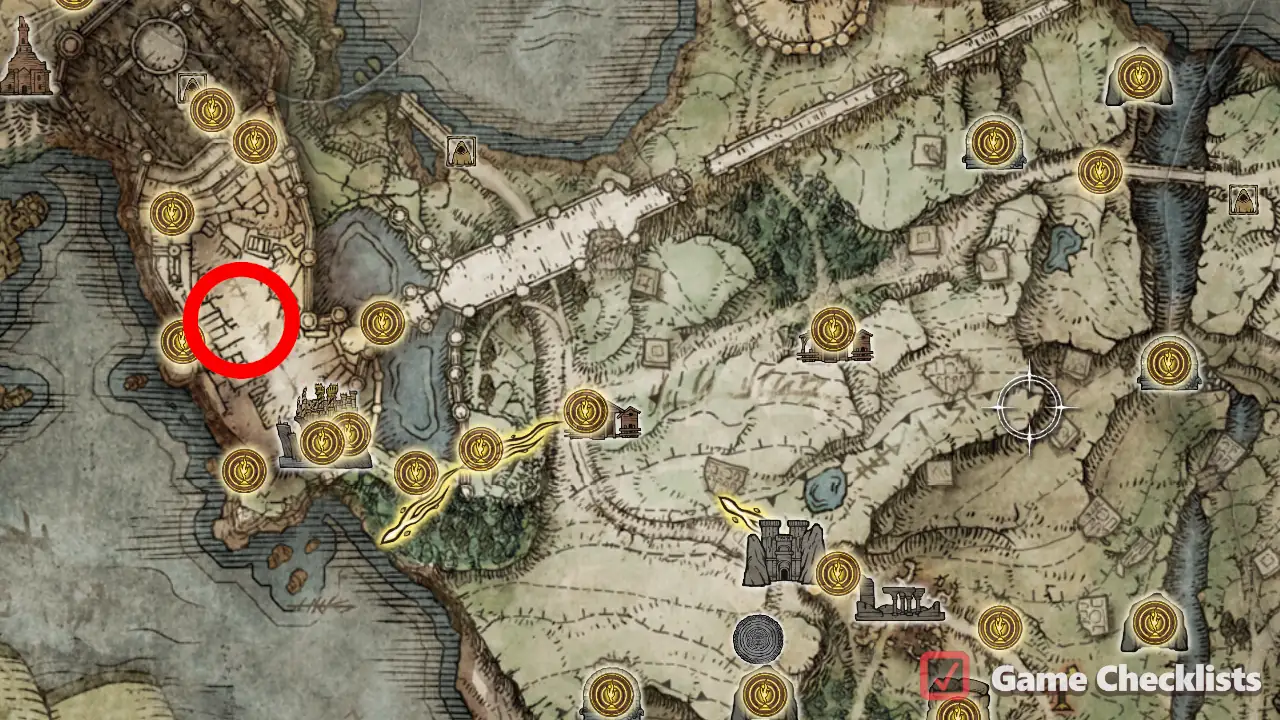 |
||
|
Enter the Location of Two-Handed Sword Talisman: 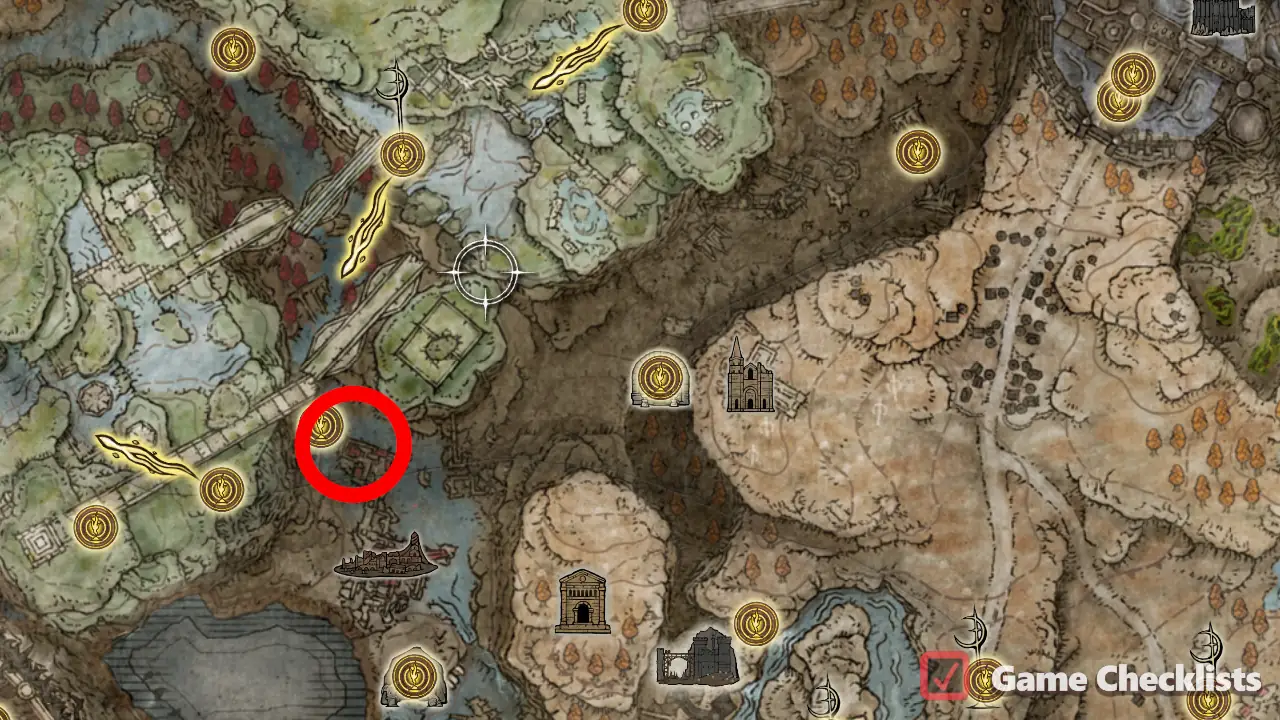 |
||
|
In a large carriage inside enemy camp southeast of Location of Greatshield Talisman: 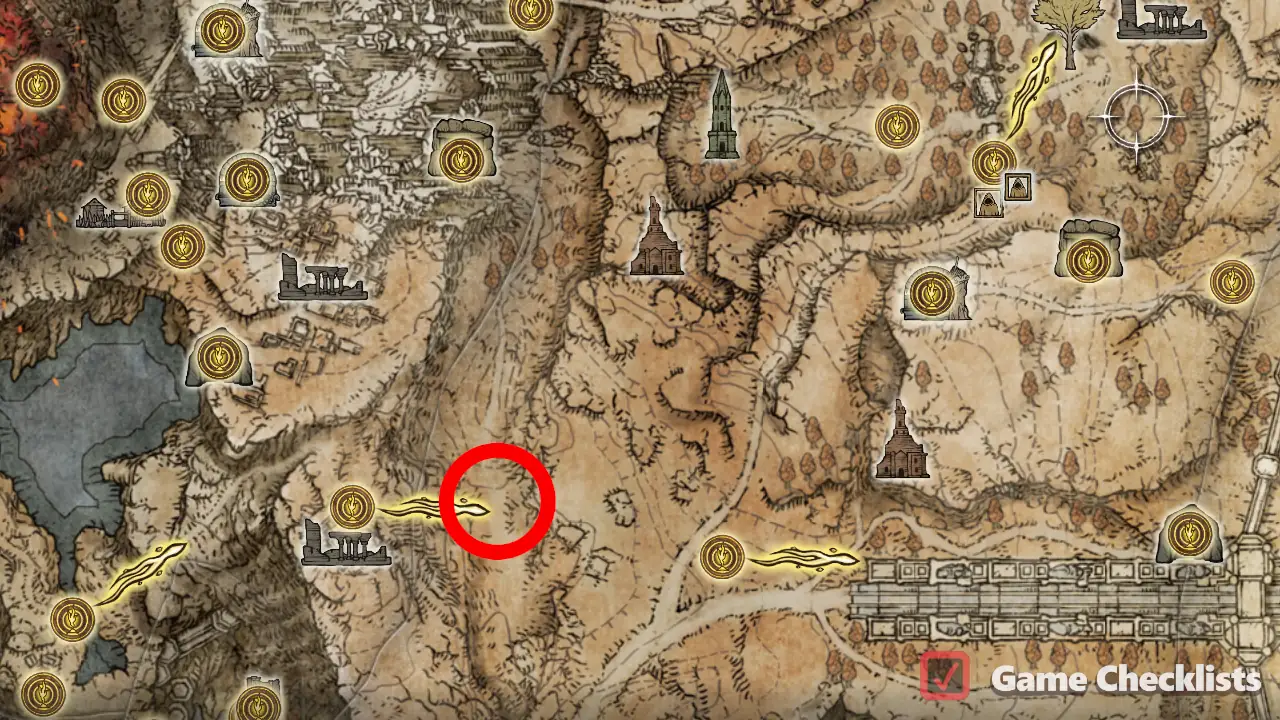 |
||
|
In a chest in a small enemy camp just northwest of the Location of Pearl Shield Talisman: 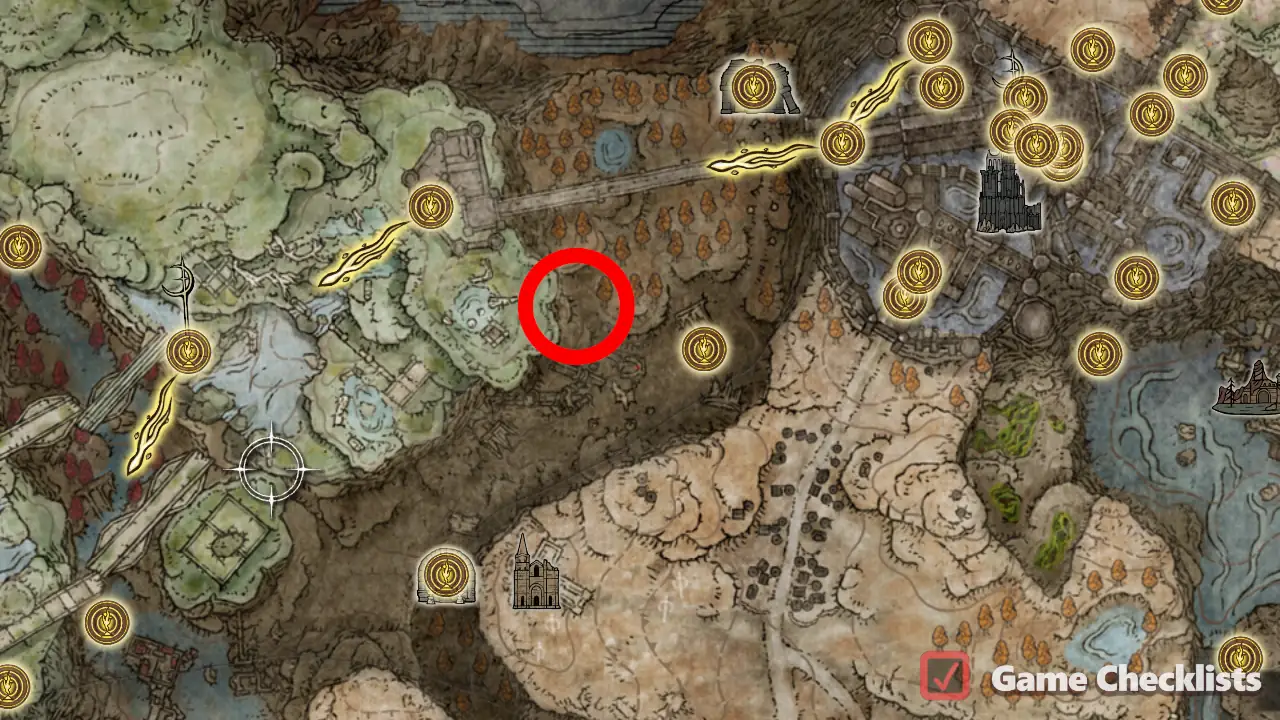 |
||
|
Missable! Part of Location of Retaliatory Crossed-Tree: 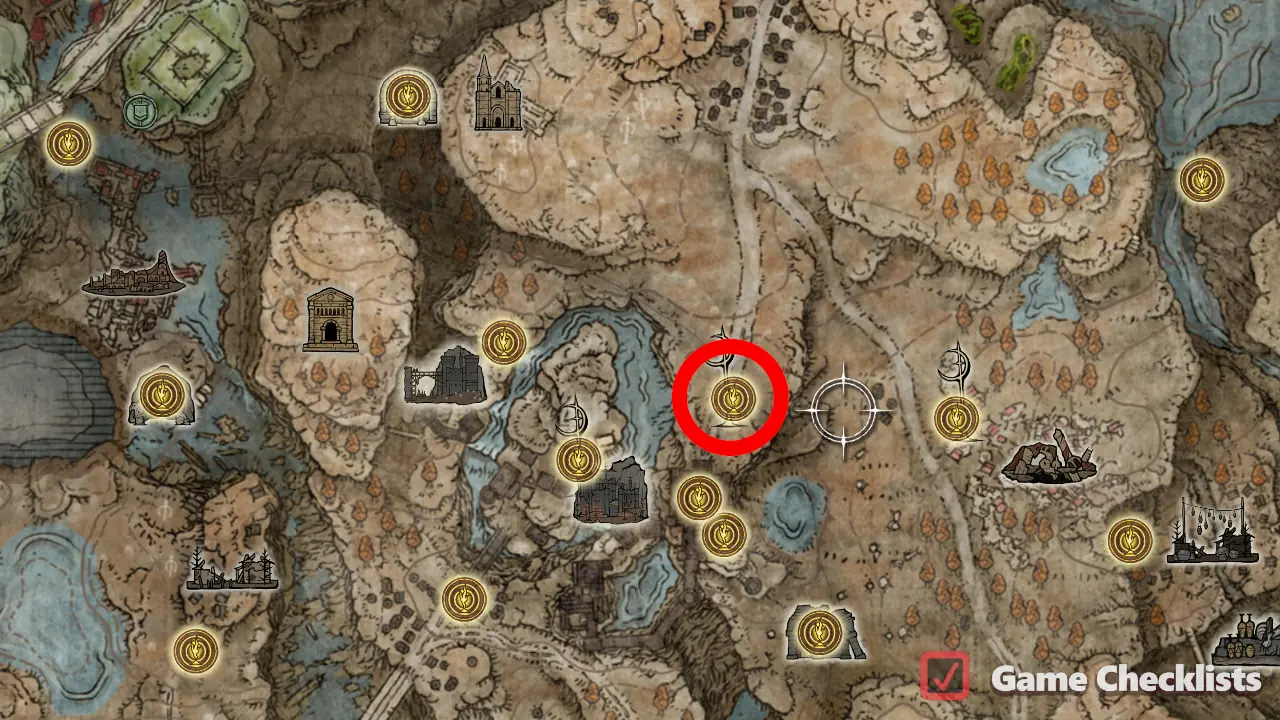 |
||
|
Missable! Part of Location of Lacerating Crossed-Tree: |
||
|
Inside a chest on top of the watchtower. Location of Arrow's Sting Talisman: 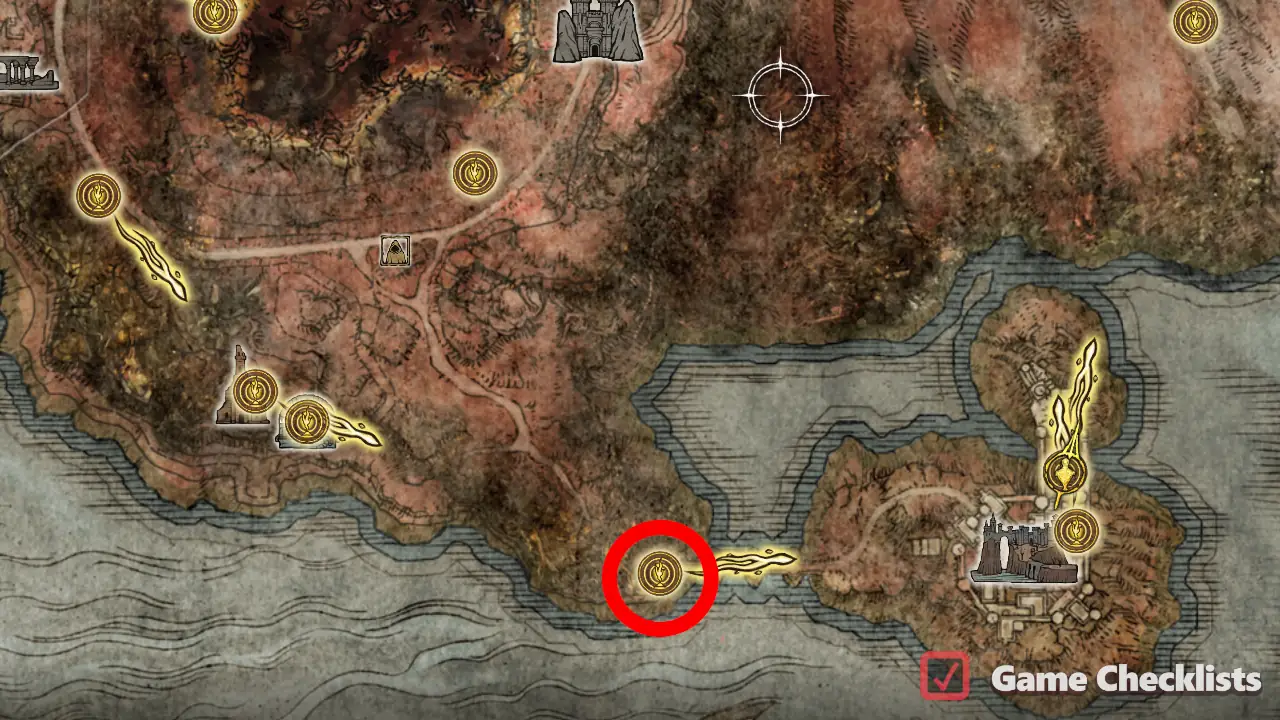 |
||
|
Located on top of the Location of Arrow's Reach Talisman: 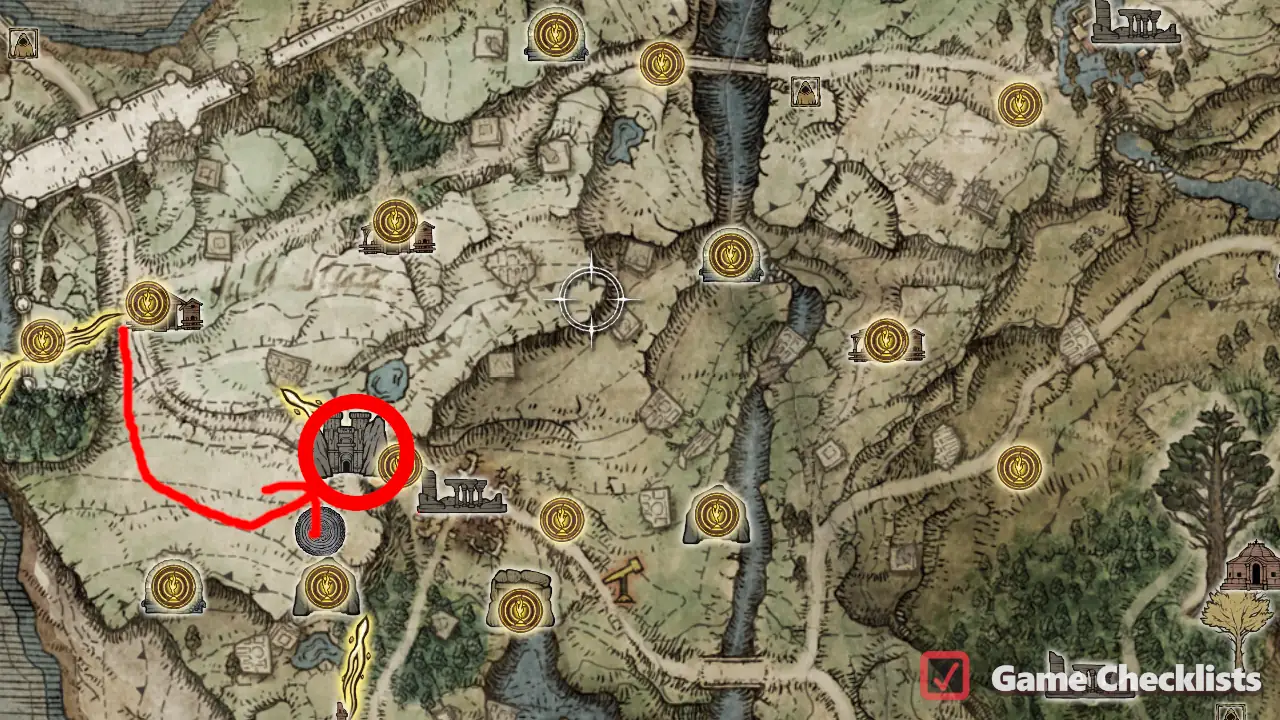 |
||
|
First get to Fog Rift Fort, accessible by going west and dropping down the cliffs from Location of Arrow's Soaring Sting Talisman: 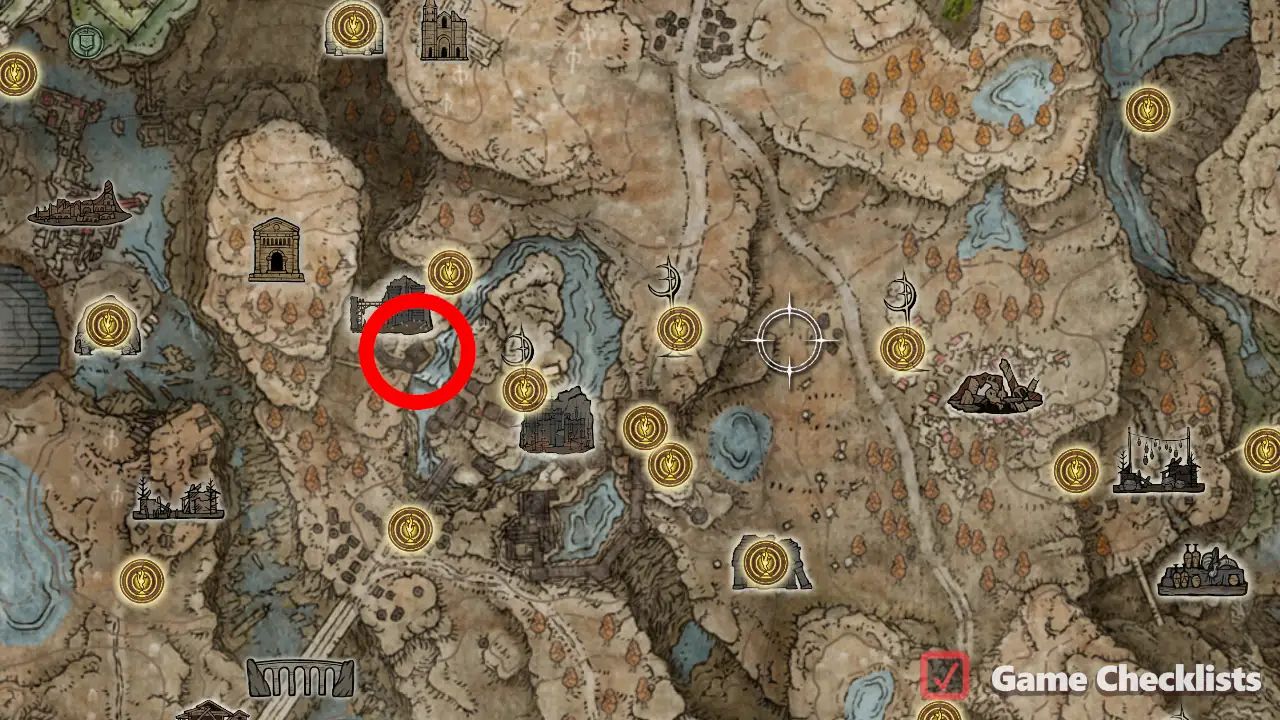 |
||
|
Defeat the Location of Sharpshot Talisman: 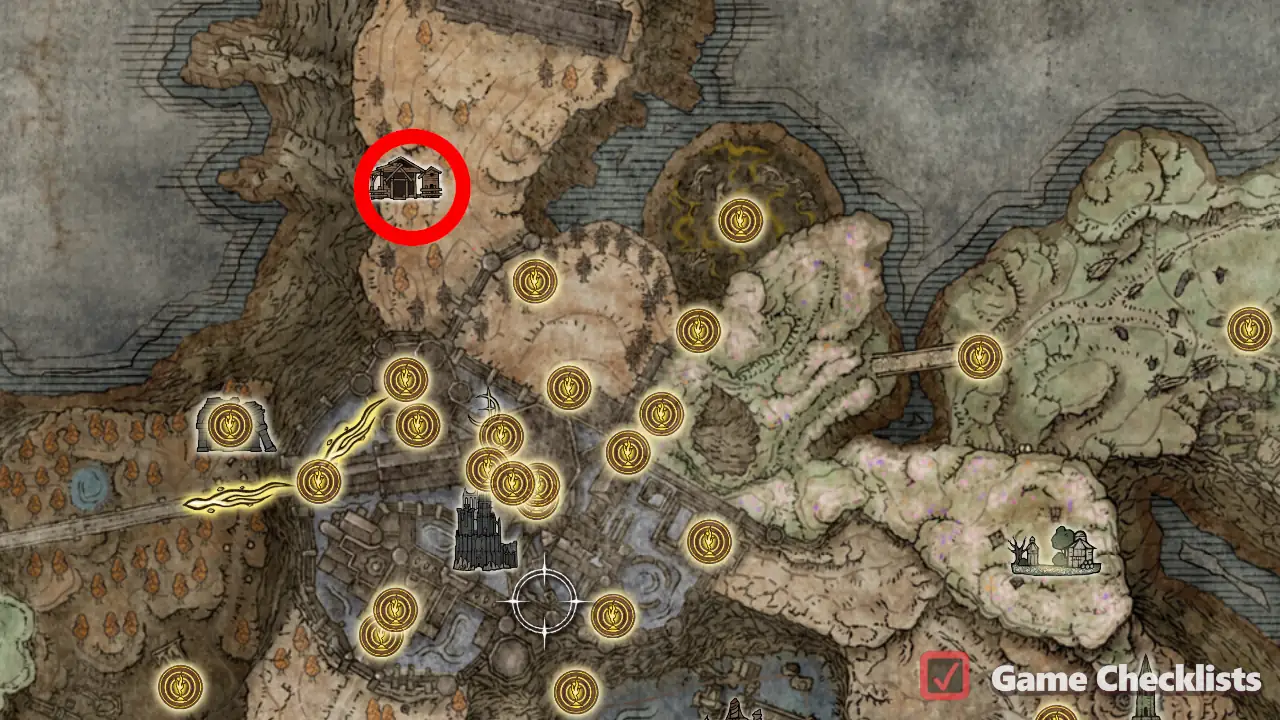 |
All Sorcery & Incantation Talismans
The fourth group of Talismans, in the order as seen in Elden Ring's game inventory. Talismans that reward playing with sorceries and incantations.
There are 9 Talismans in All Sorcery & Incantation Talismans.
| ✓ | Talisman | Description | |
|---|---|---|---|
|
Go back towards the stairs and find a bookshelf with no books on the right side, which is an illusory wall. Go up the ladder, then to the right side and find a hole covered by books. Drop into the hole, then another hole, to appear near a large crystal with the talisman in front of it. Location of Graven-School Talisman: 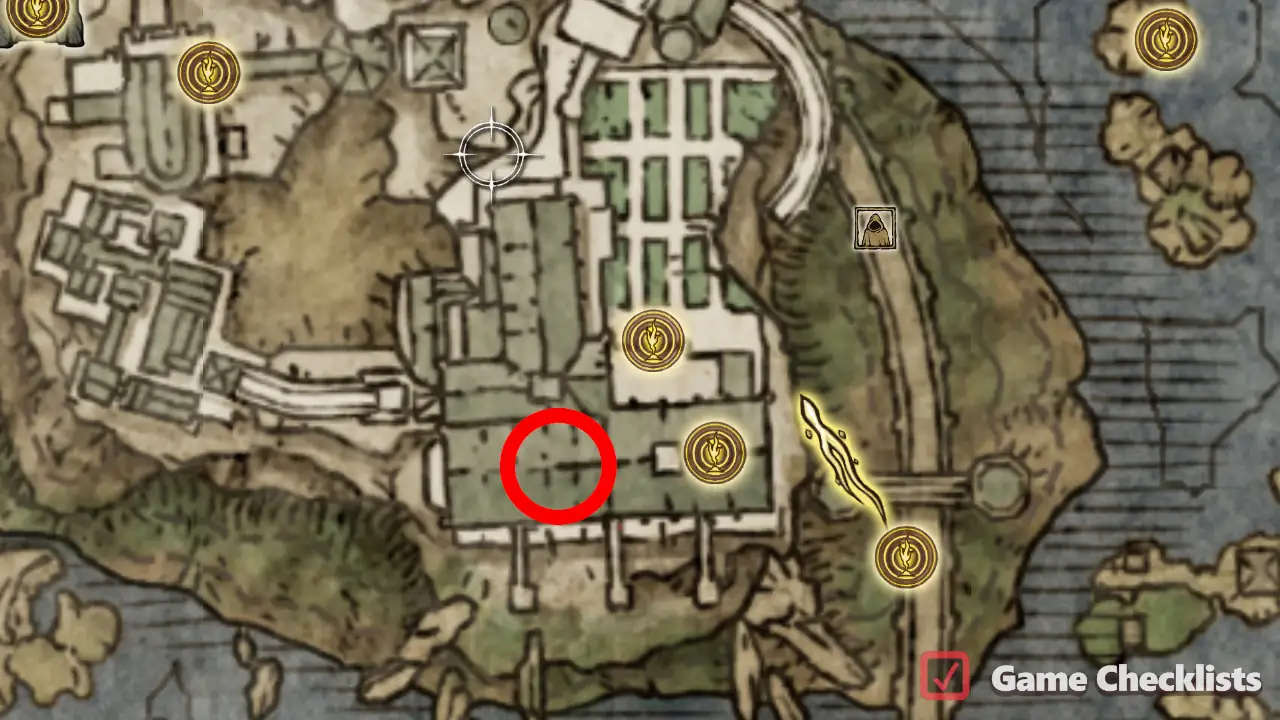 |
||
|
On top of the Albinauric Rise, east of the Location of Graven-Mass Talisman: 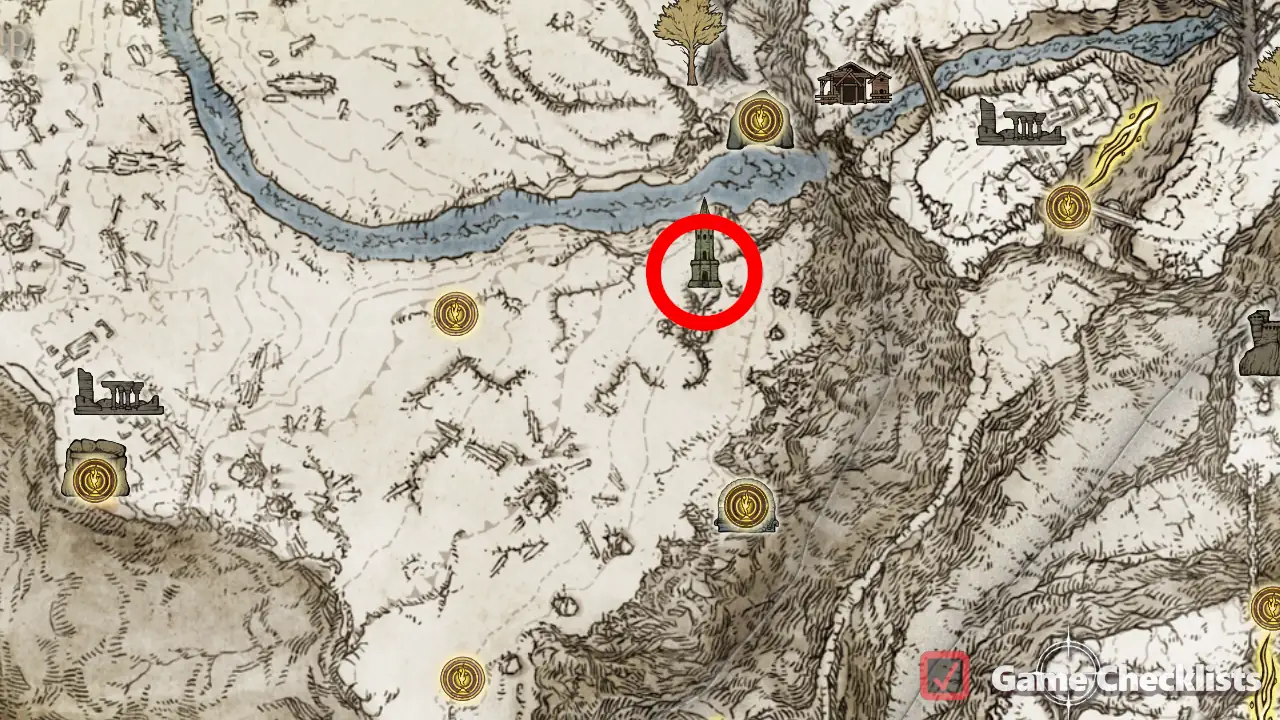 |
||
|
Inside Location of Faithful's Canvas Talisman: 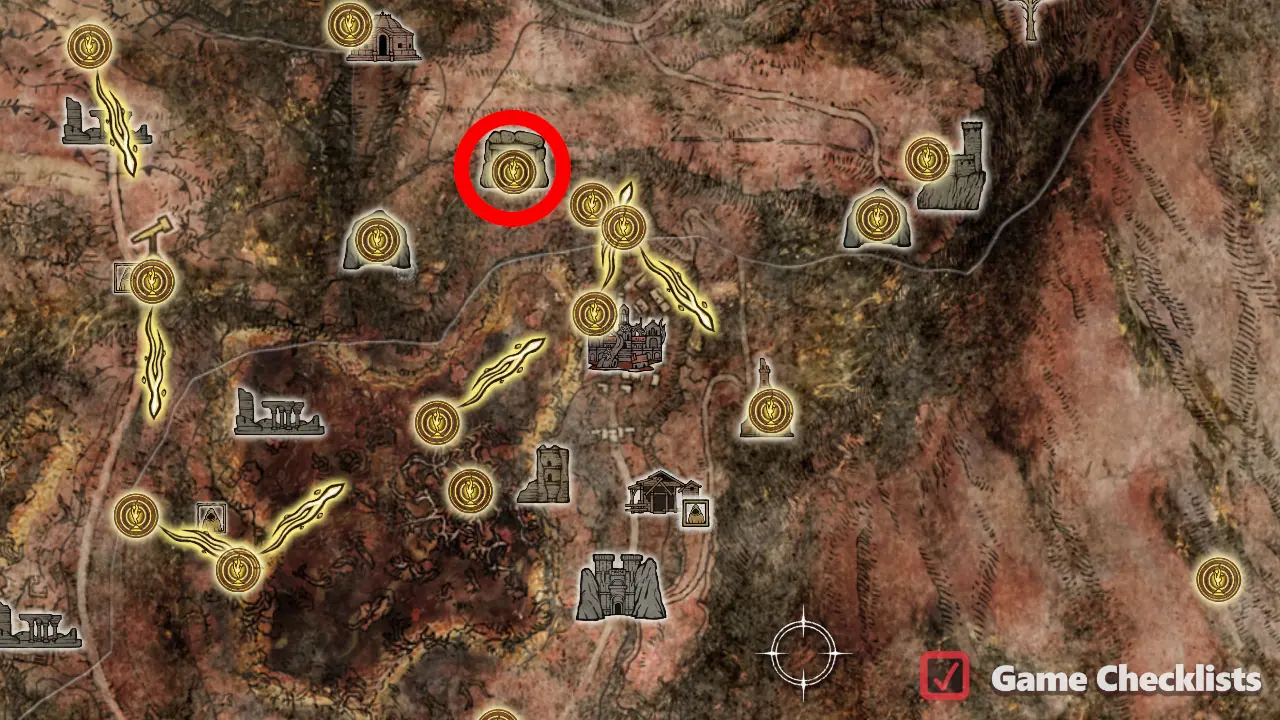 |
||
|
Obtained from Gowry - complete Location of Flock's Canvas Talisman: 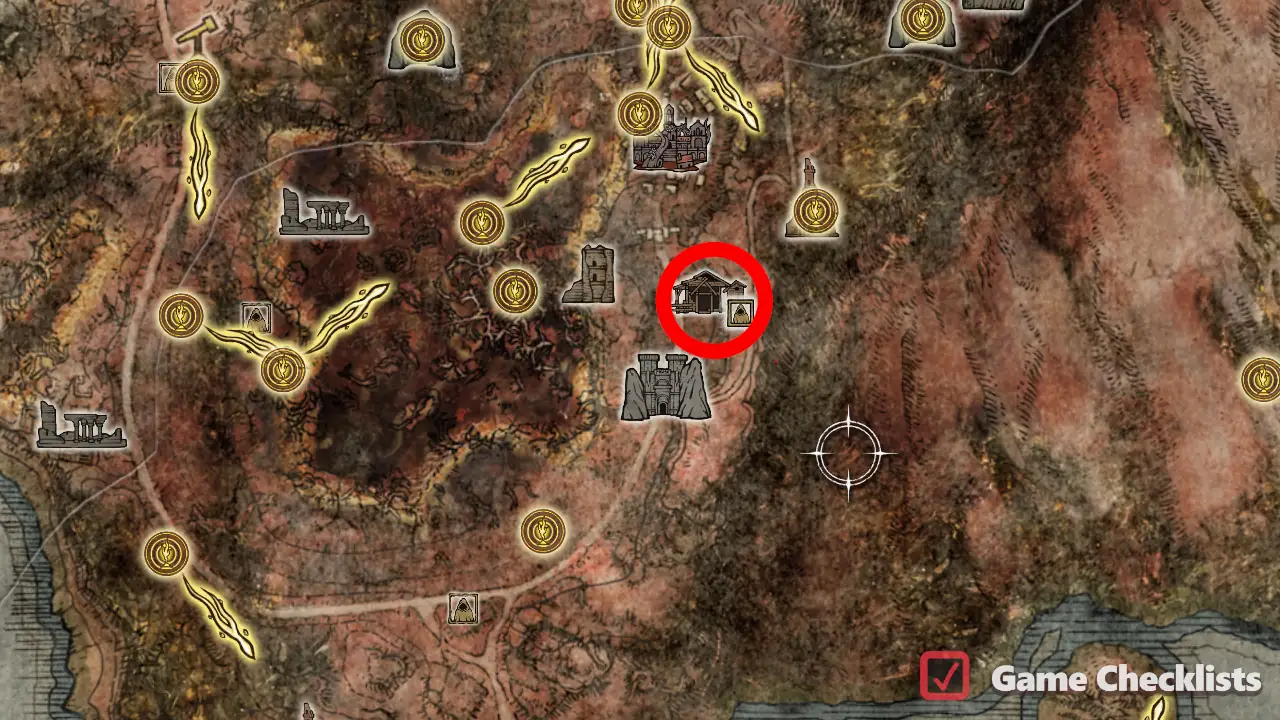 |
||
|
Complete the Location of Primal Glintstone Blade: 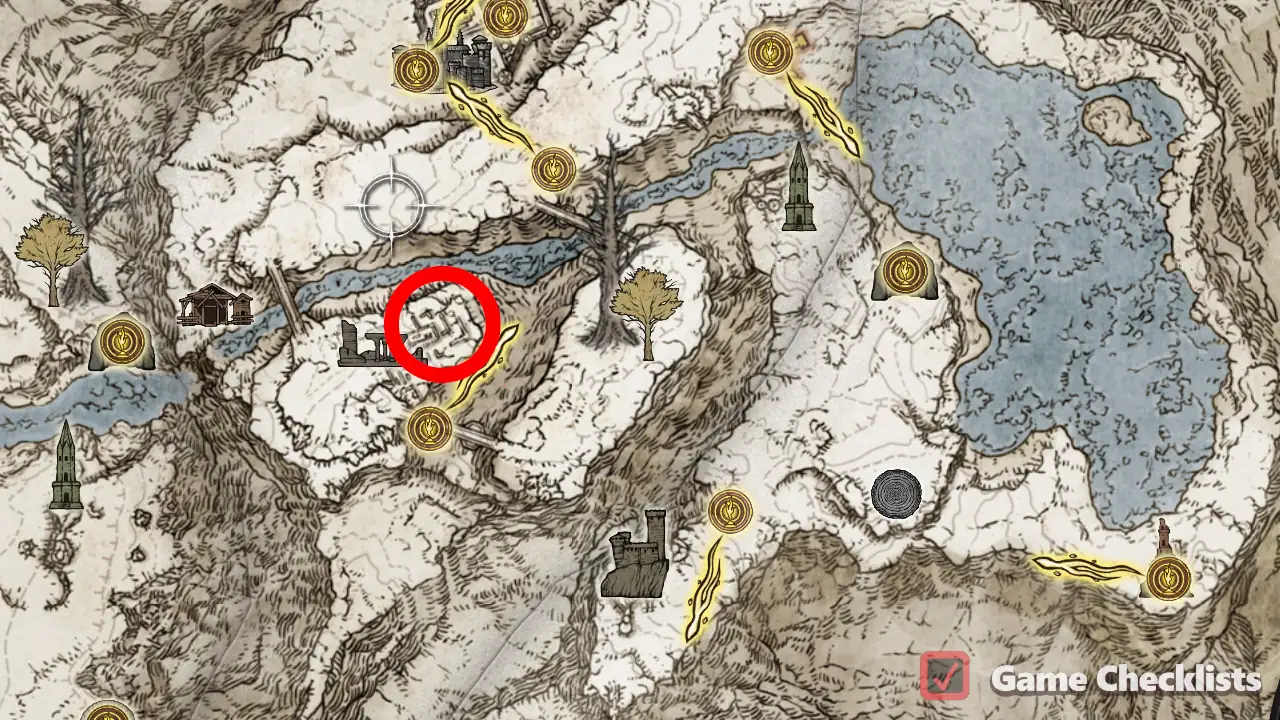 |
||
|
At the very end of Nokstella - go up the stairs and progress the city to its end. Location of Moon of Nokstella: 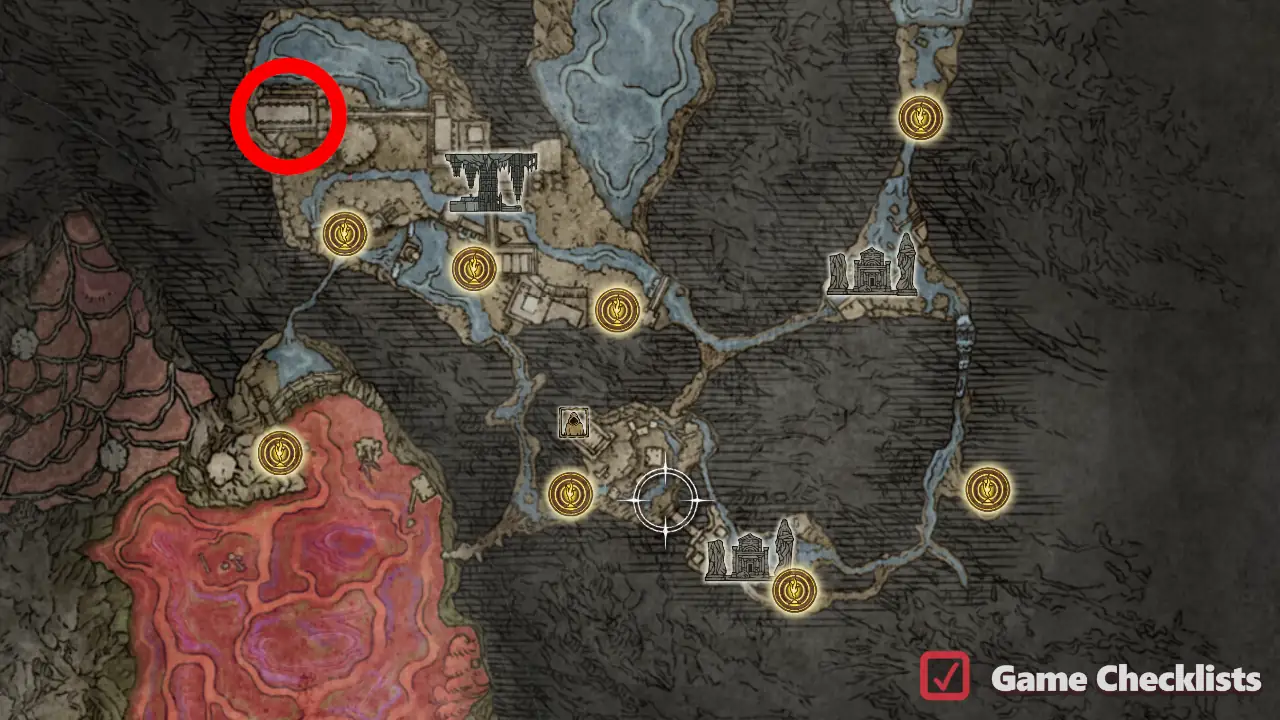 |
||
|
Get on the bridge and go north. Enter the temple through the archway and follow the path. Spot a ladder on the balcony, go down and enter the large tower with a chest. If you've completed Location of Old Lord's Talisman: 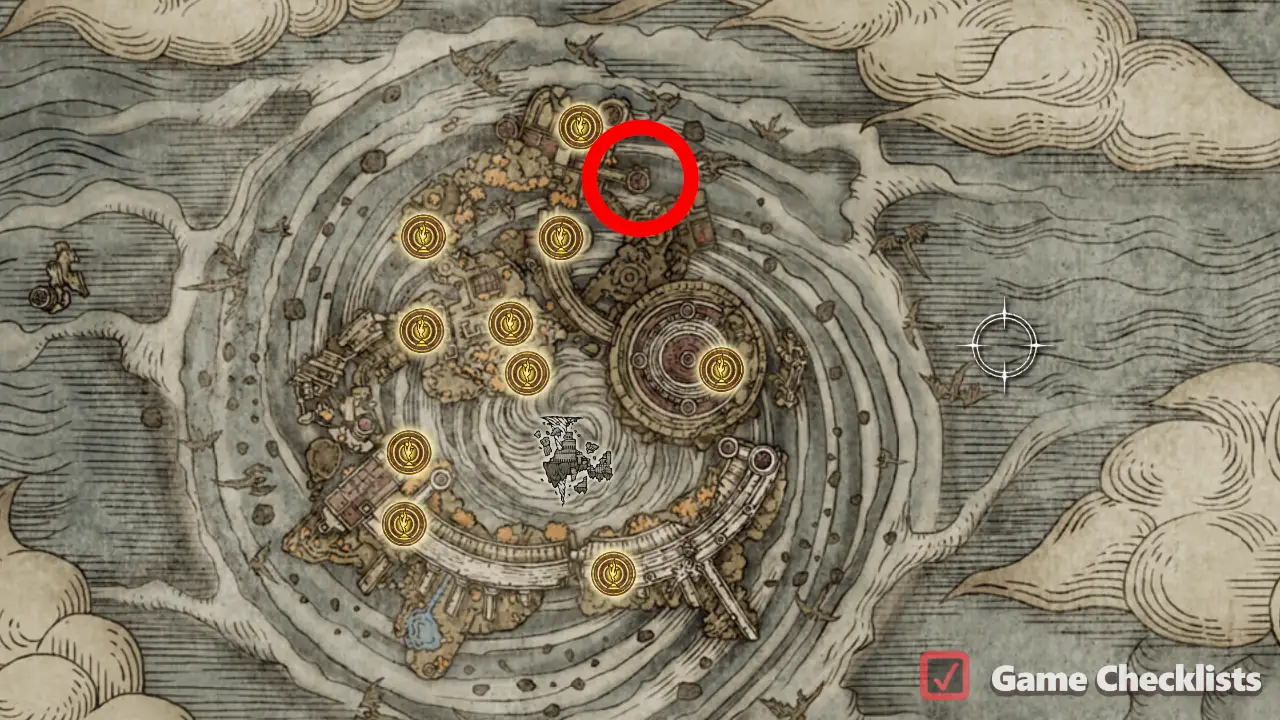 |
||
|
Go into the courtyard and immediately turn right twice. Jump over the railing, then use the ladder in front of you. From inside, drop out of the broken window to appear on the balcony above the Location of Radagon Icon: 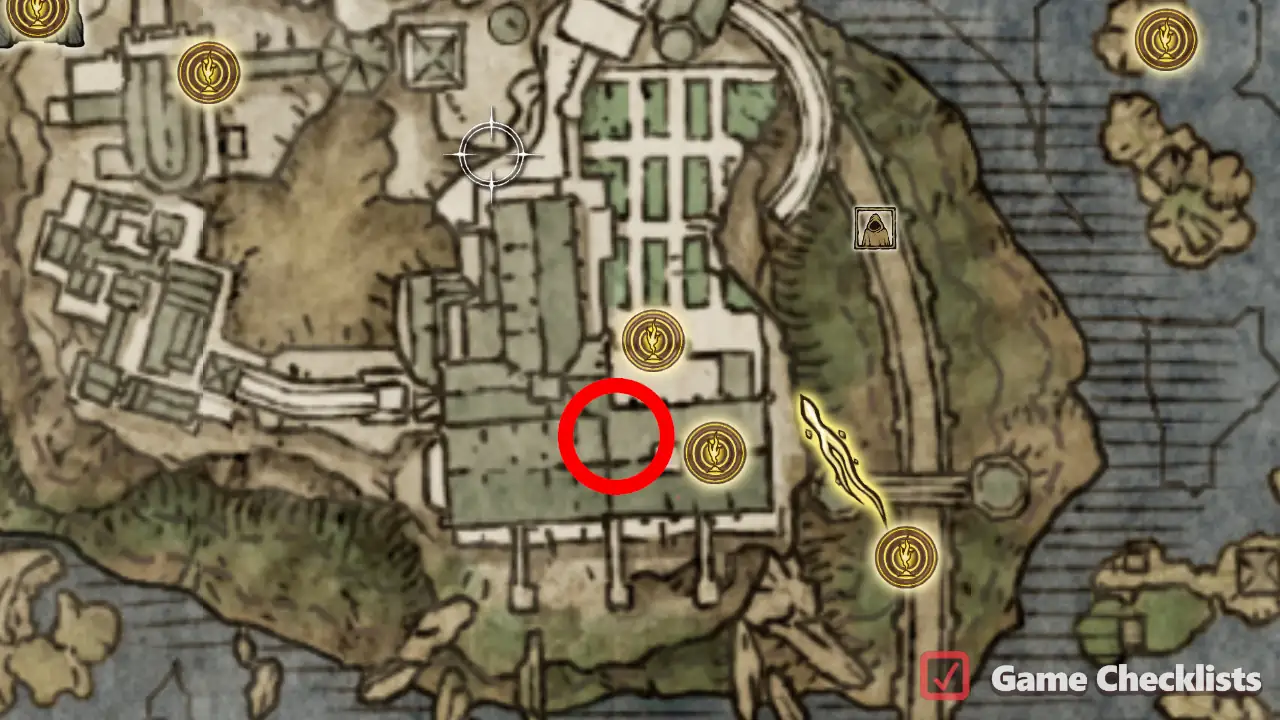 |
||
|
Progress Location of Beloved Stardust: 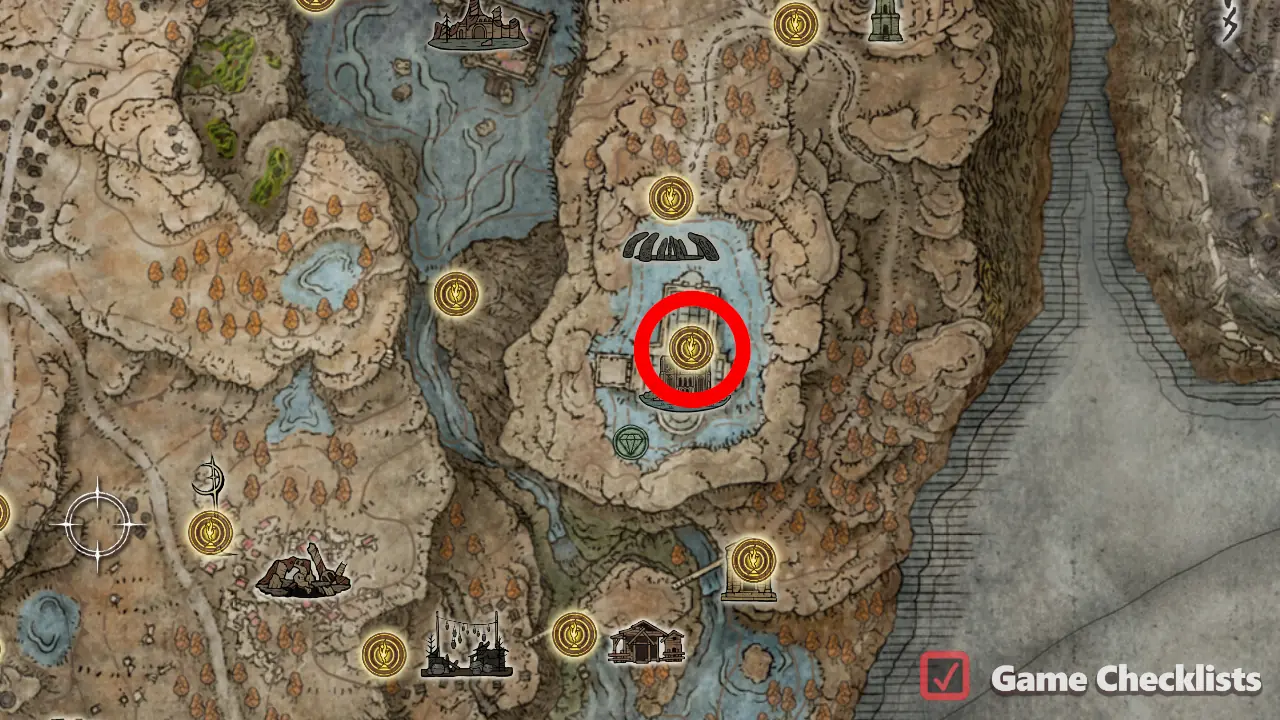 |
All Ash of War & Consumable Talismans
The fifth group of Talismans, in the order as seen in Elden Ring's game inventory. Talismans that reward using skills (Ashes of War) or consumables.
There are 12 Talismans in All Ash of War & Consumable Talismans.
| ✓ | Talisman | Description | |
|---|---|---|---|
|
Defeat the Location of Roar Medallion: 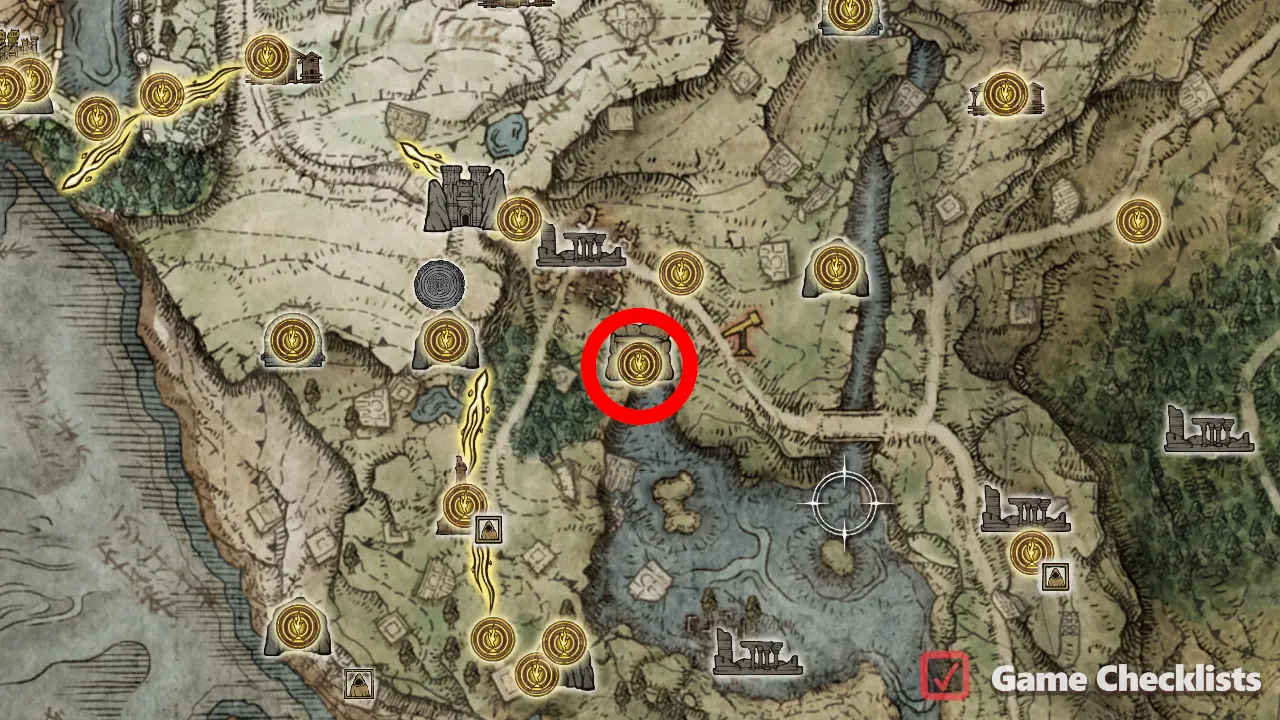 |
||
|
Complete Location of Companion Jar:  |
||
|
Not in Location of Perfumer's Talisman: 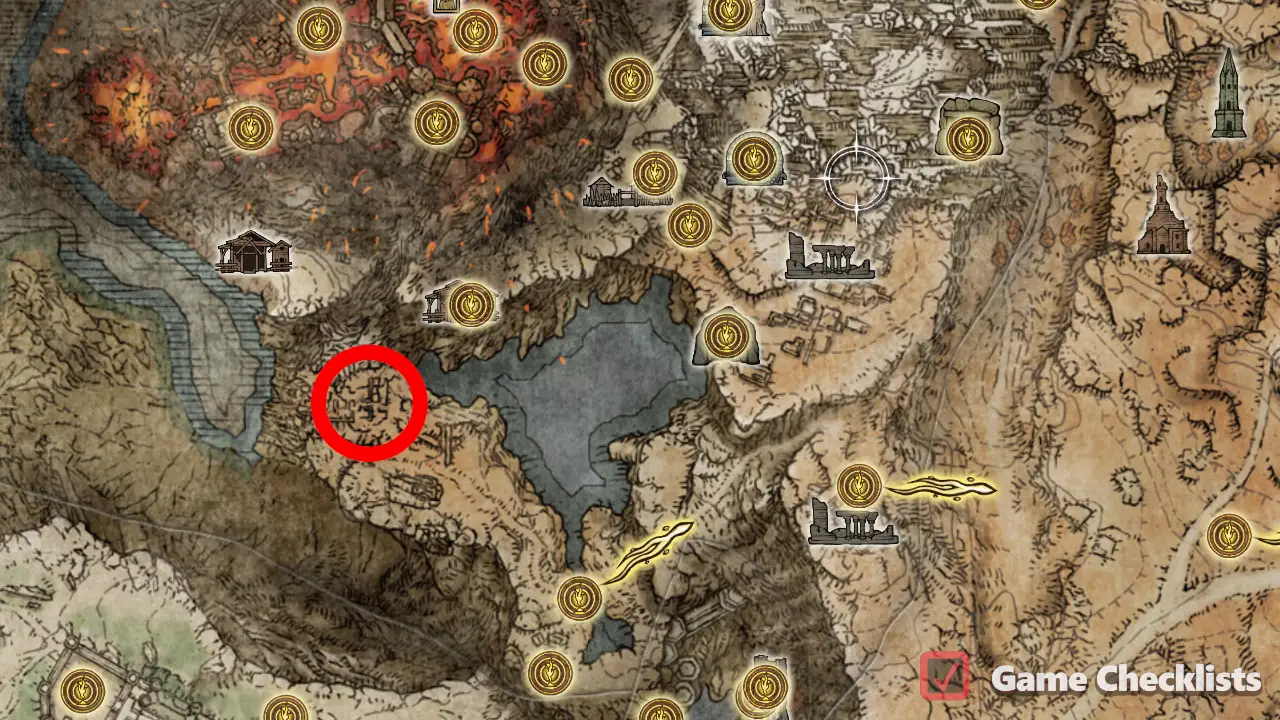 |
||
|
Missable! Do Location of Carian Filigreed Crest:  |
||
|
Missable! Kill Location of Warrior Jar Shard: 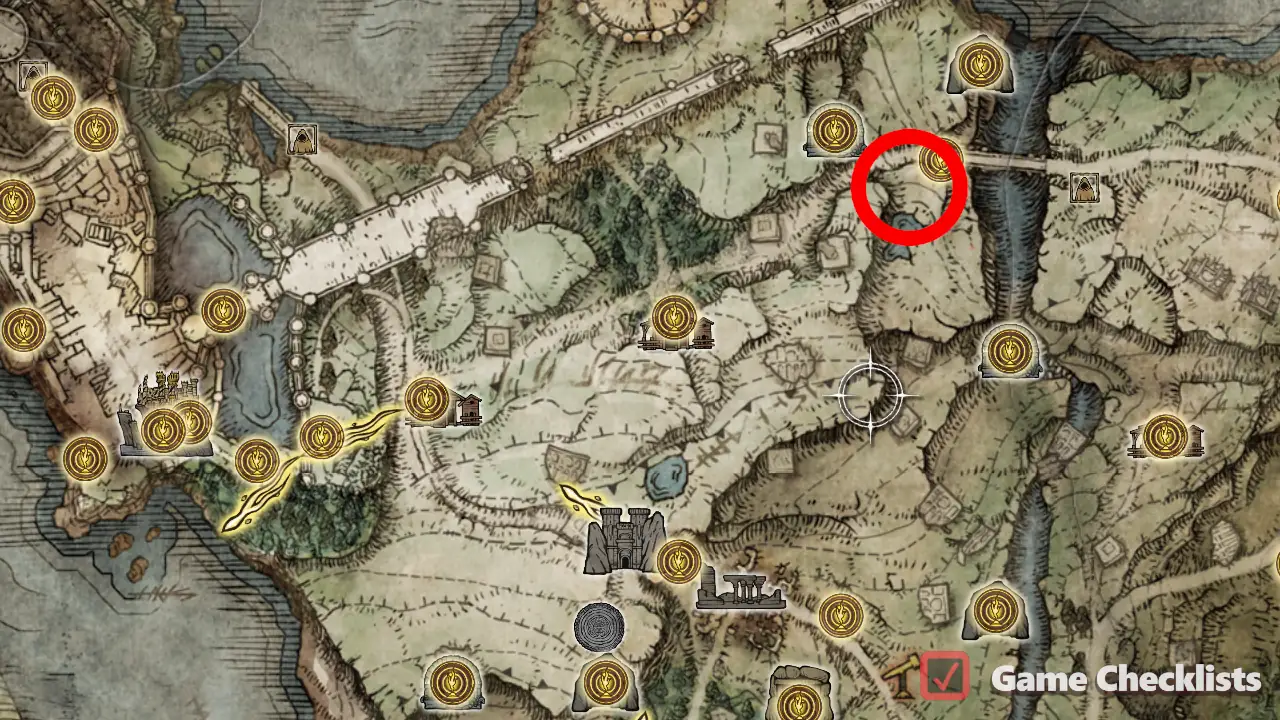 |
||
|
Missable! Complete Location of Shard of Alexander: 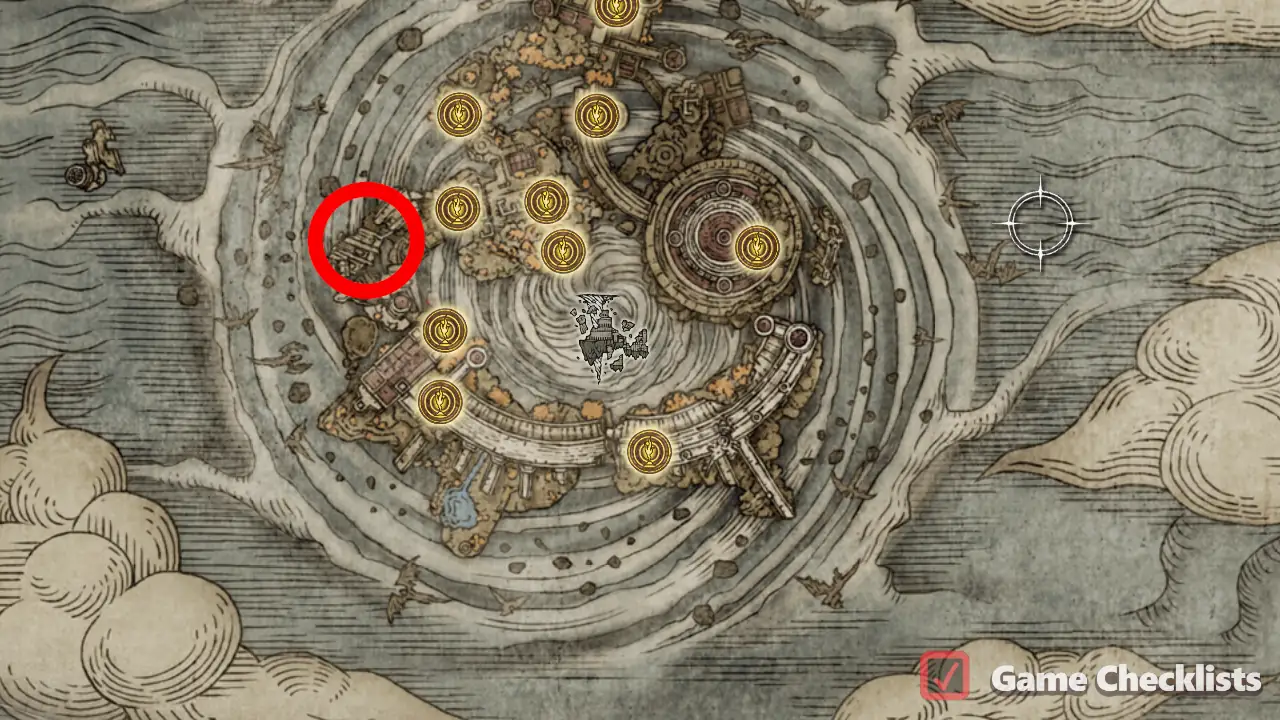 |
||
|
Defeat the Location of Godfrey Icon: 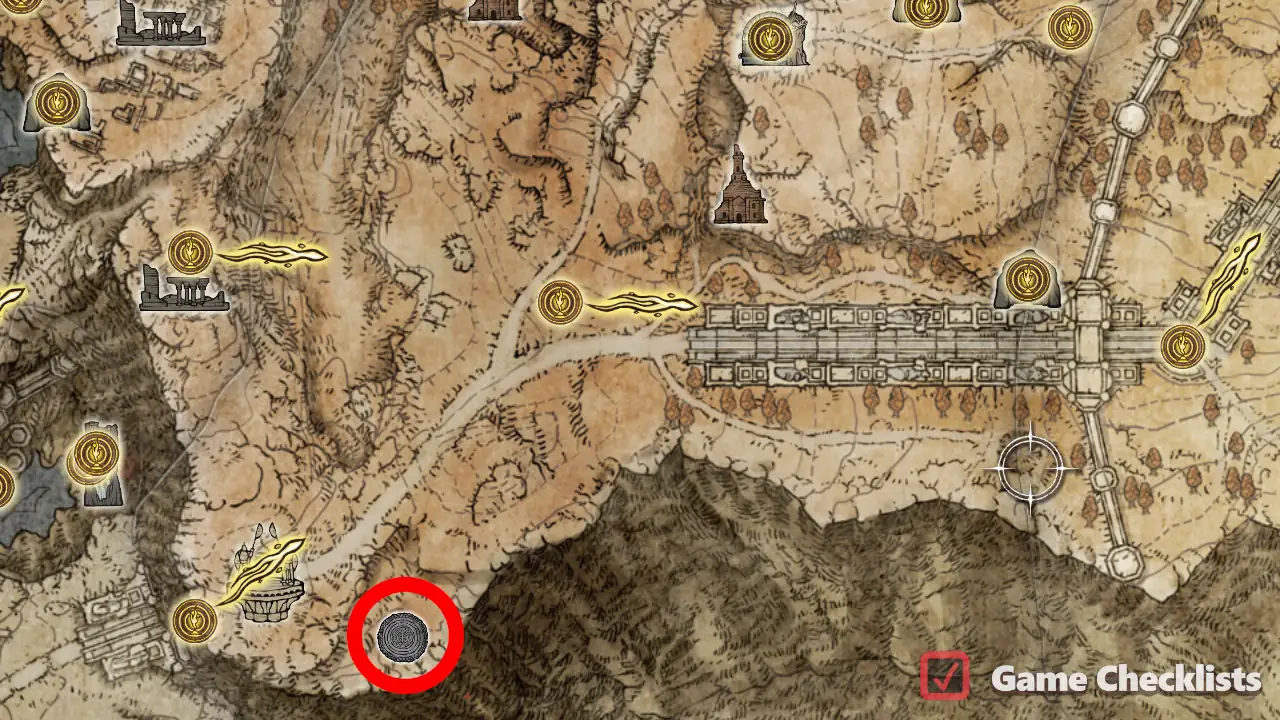 |
||
|
Pretty much on the main path. From Location of Rellana's Cameo:  |
||
|
Near the jumping spot (still on top) inside Location of Shattered Stone Talisman: 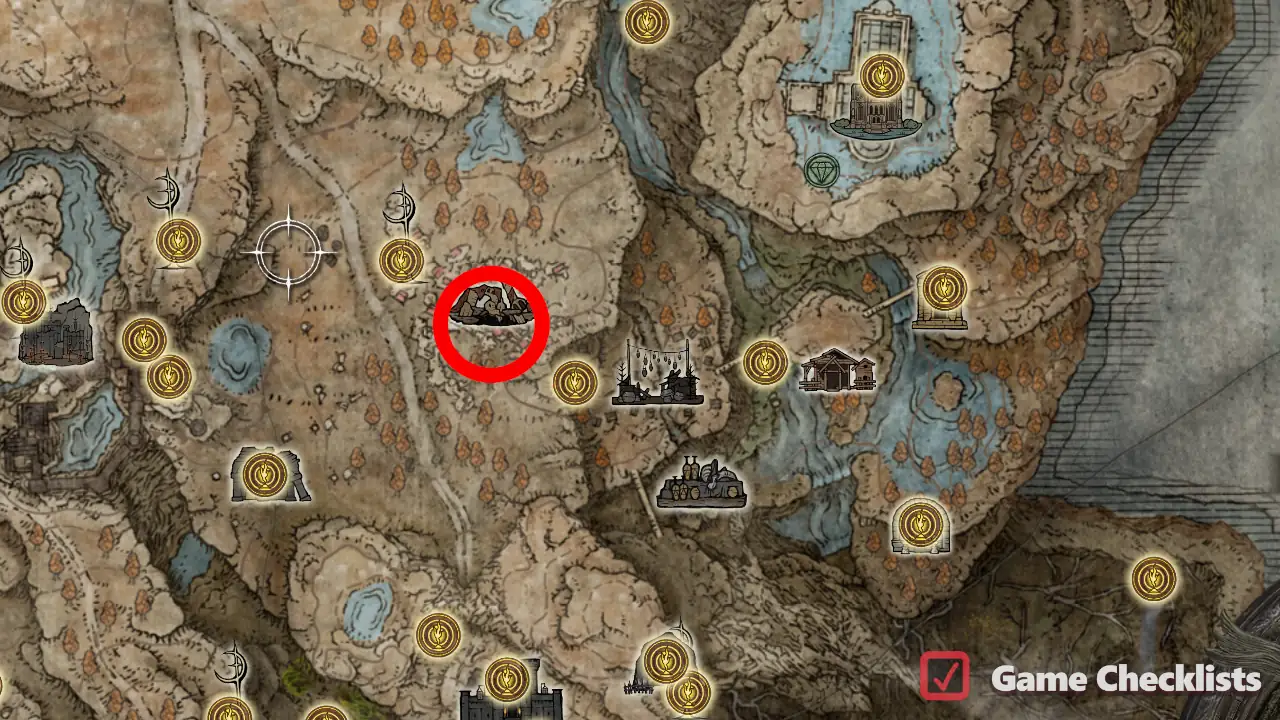 |
||
|
Inside Location of Smithing Talisman: 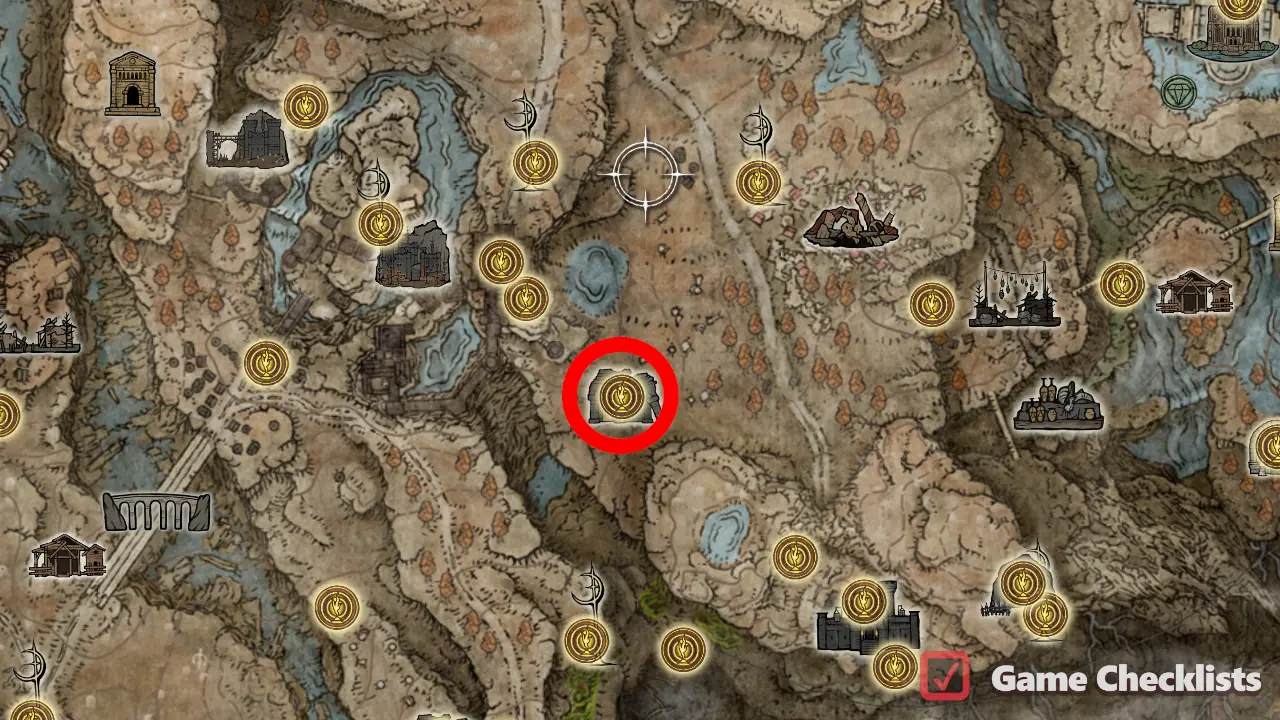 |
||
|
Missable! Sold by Finger Reader Enia for the Remembrance of the Dancing Lion, dropped from the Divine Beast Dancing Lion. |
||
|
At Elder's Hovel. This is a long journey - start at Location of Talisman of the Dread: 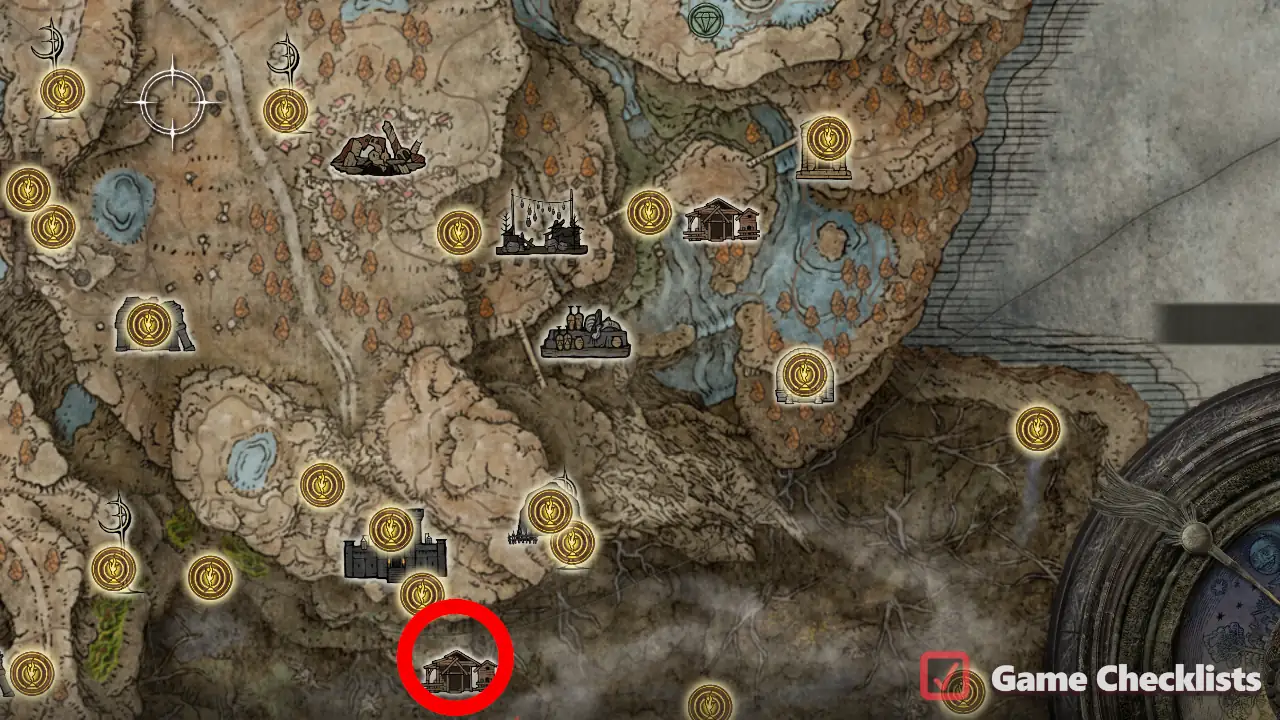 |
All Attack, Scorpion & Crucible Talismans
The sixth group of Talismans, in the order as seen in Elden Ring's game inventory. Talismans with seemingly unconnected effects. Most of them have powerful effects with drawbacks.
There are 12 Talismans in All Attack, Scorpion & Crucible Talismans.
| ✓ | Talisman | Description | |
|---|---|---|---|
|
After you meet the bear, head southeast to a tunnel leading to a lit up area with animals and this talisman. Location of Bull-Goat's Talisman: |
||
|
Defeat the Location of Blue Dancer Charm:  |
||
|
From the Location of Verdigris Discus:  |
||
|
Missable! Progress Location of Magic Scorpion Charm: 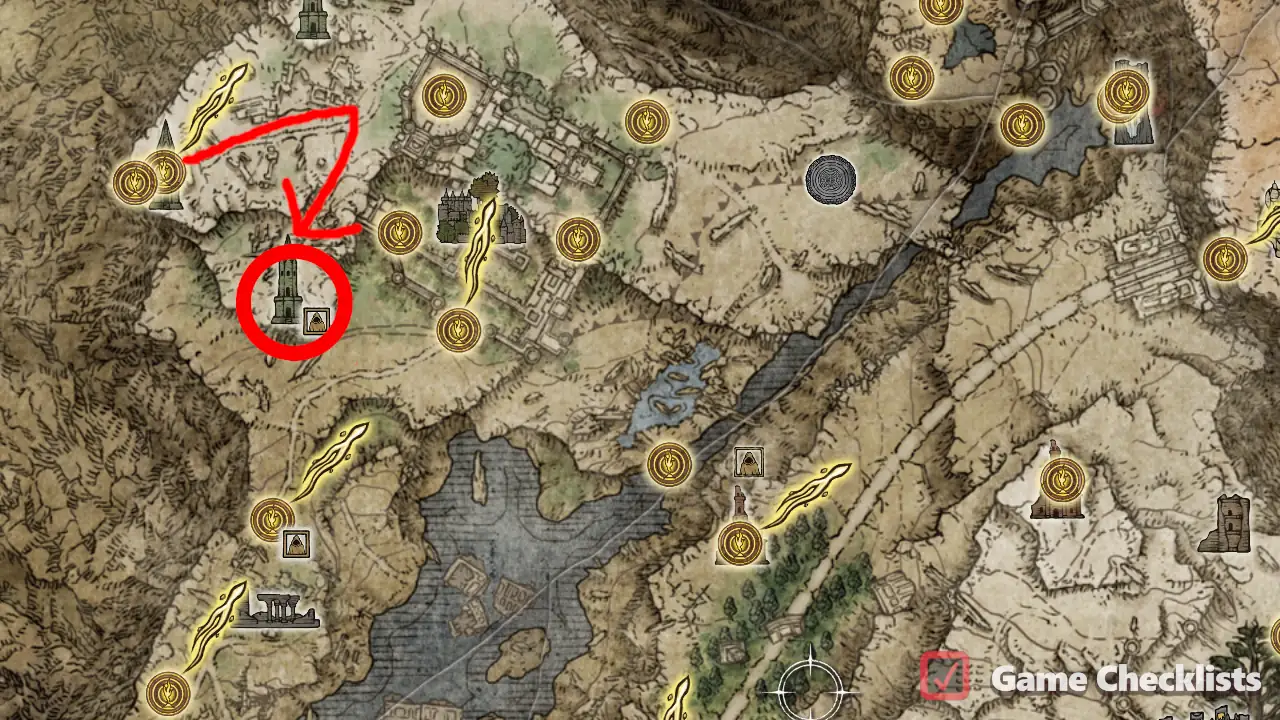 |
||
|
On a small ledge in Fort Laiedd behind a wall, where the Ghost dialogue lures you in. Fort Laiedd is west of Location of Fire Scorpion Charm:  |
||
|
Progress the Location of Lightning Scorpion Charm: 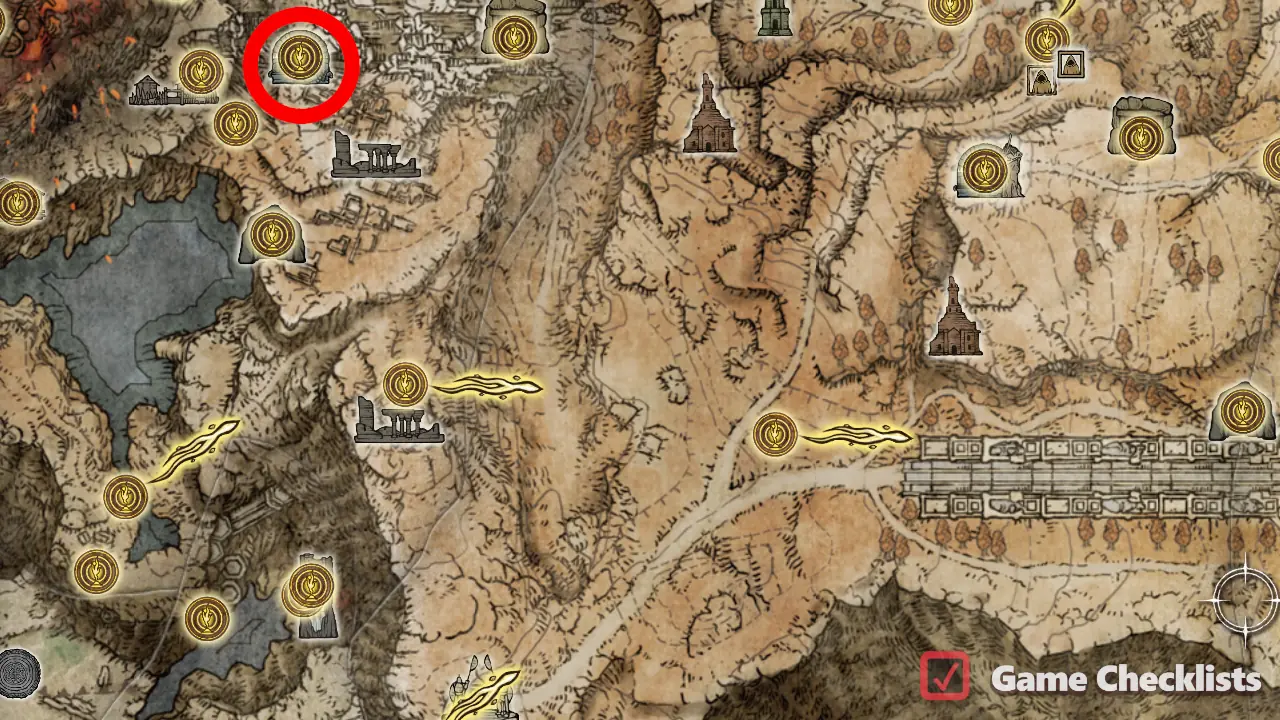 |
||
|
Defeat the Anastasia, Tarnished-Eater invader. Location of Sacred Scorpion Charm: 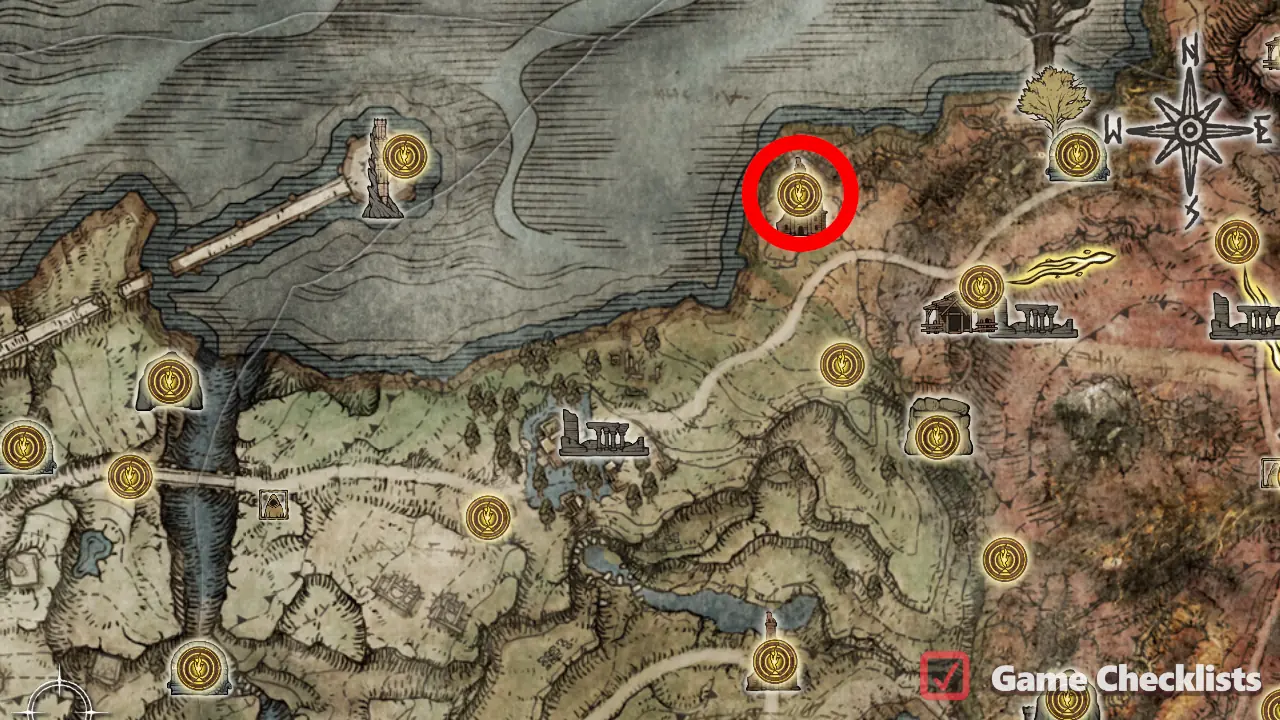 |
||
|
From the Location of Crucible Scale Talisman: |
||
|
At the first light circle, drop down and continue west, then turn right to appear in the double chariot area. Go down - after you reach the pillars, drop onto rafters five times to go onto a ladder on the southern side. This leads to another chariot slope - head all the way down and then left to find an Omen guarding this talisman. Location of Crucible Feather Talisman: 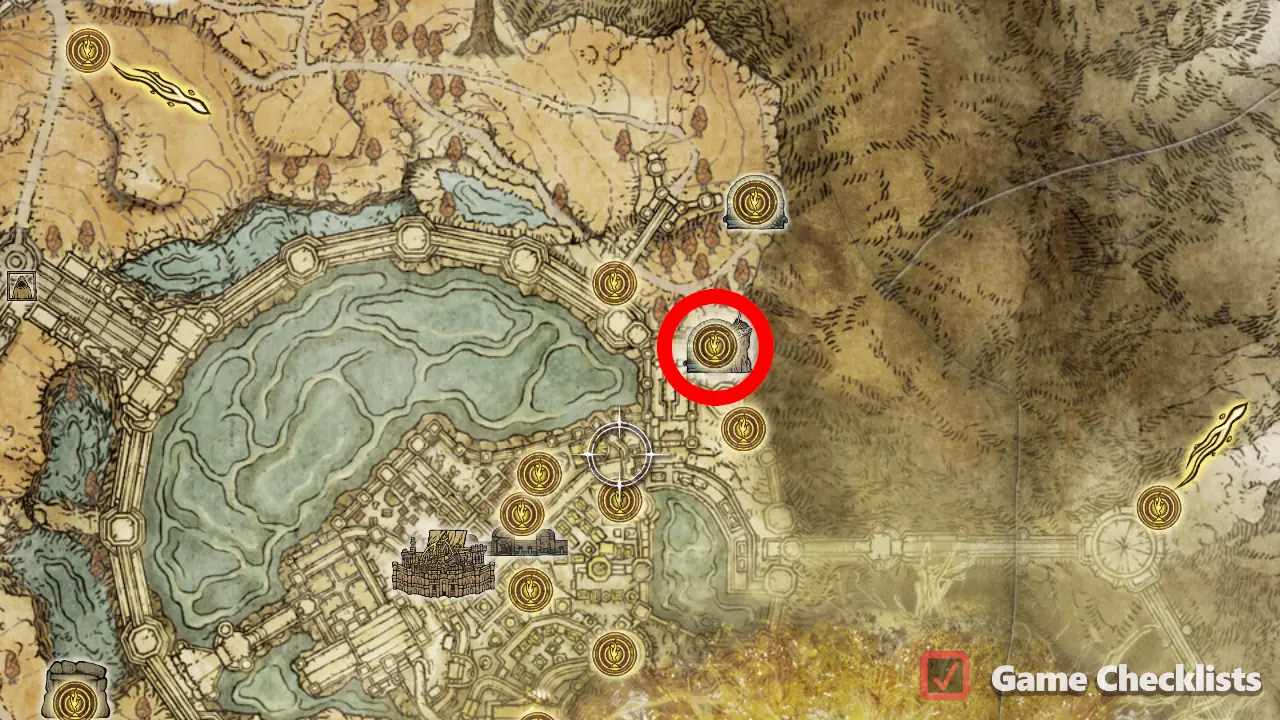 |
||
|
Defeat the Location of Crucible Knot Talisman:  |
||
|
From Location of Fine Crucible Feather Talisman:  |
||
|
From Location of Talisman of All Crucibles: 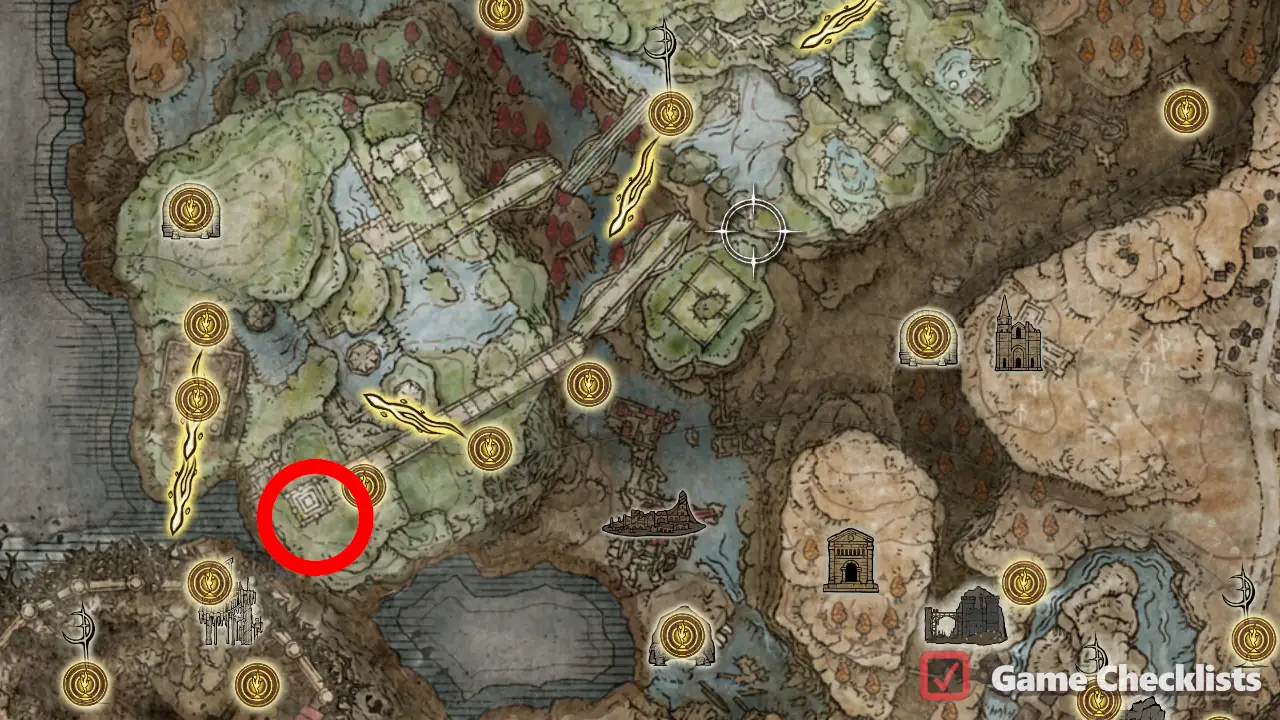 |
All Miscellaneous Talismans
The seventh group of Talismans, in the order as seen in Elden Ring's game inventory. Talismans with miscellaneous and niche effects.
There are 21 Talismans in All Miscellaneous Talismans.
| ✓ | Talisman | Description | |
|---|---|---|---|
|
Defeat the Location of Red-Feathered Branchsword: 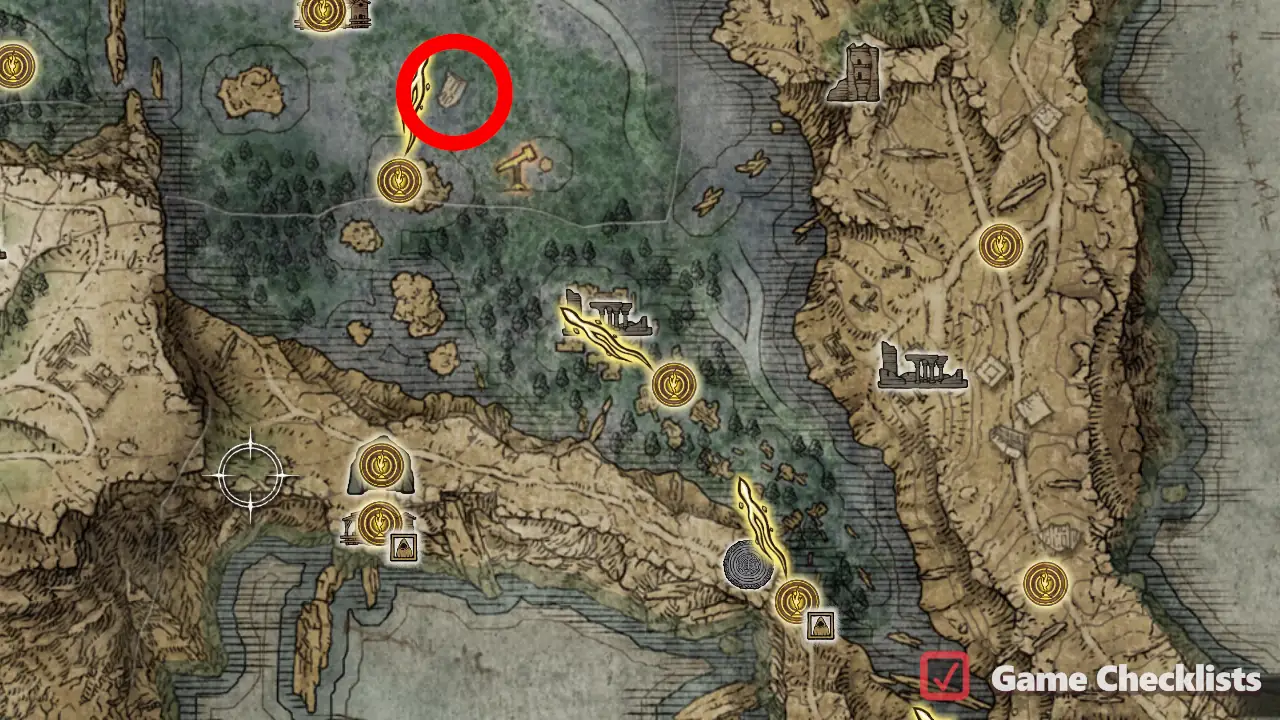 |
||
|
Defeat the Location of Blue-Feathered Branchsword: 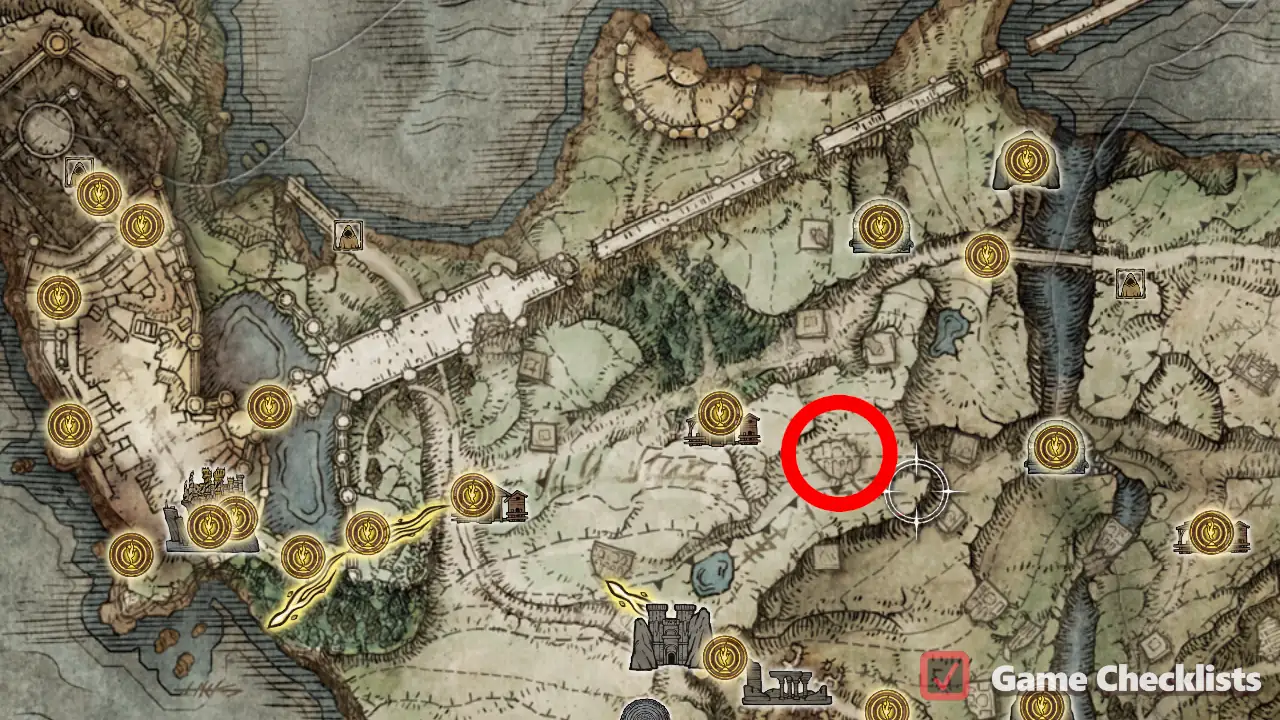 |
||
|
Defeat the Location of Ritual Sword Talisman:  |
||
|
In front of the Leyndell colosseum. Location of Ritual Shield Talisman: 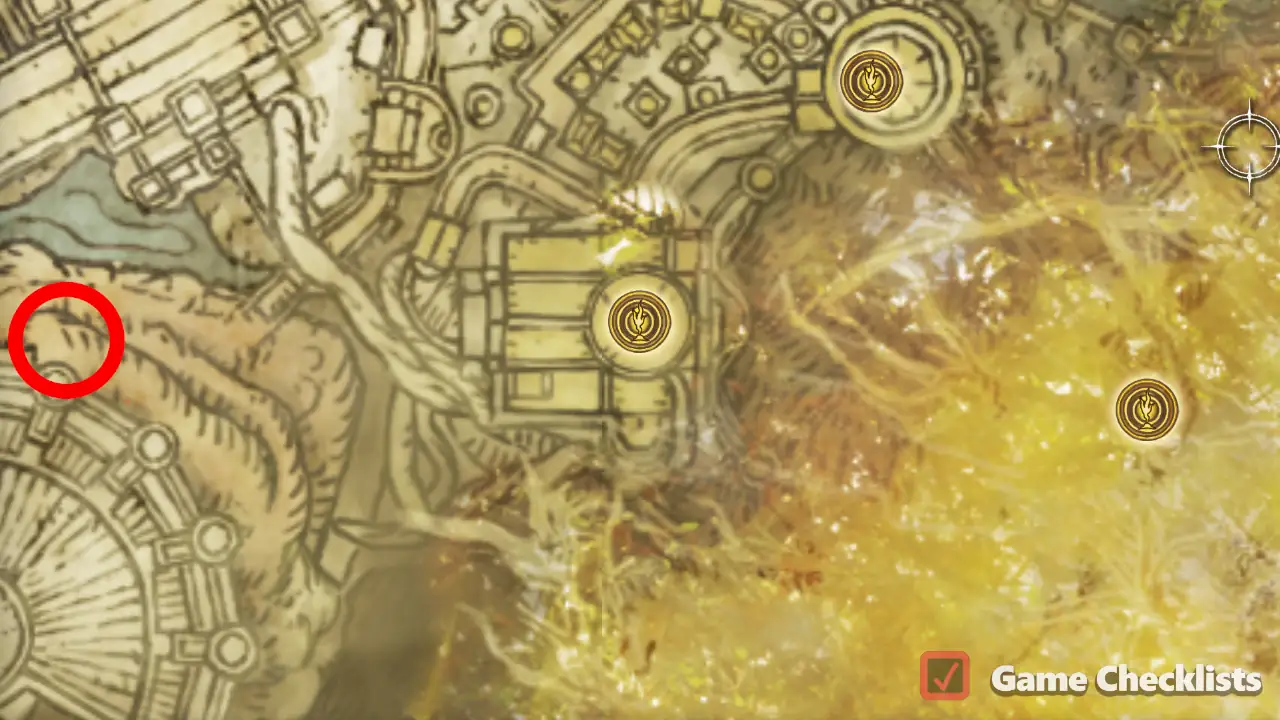 |
||
|
Defeat the Location of Assassin's Crimson Dagger:  |
||
|
Defeat the Location of Assassin's Cerulean Dagger: 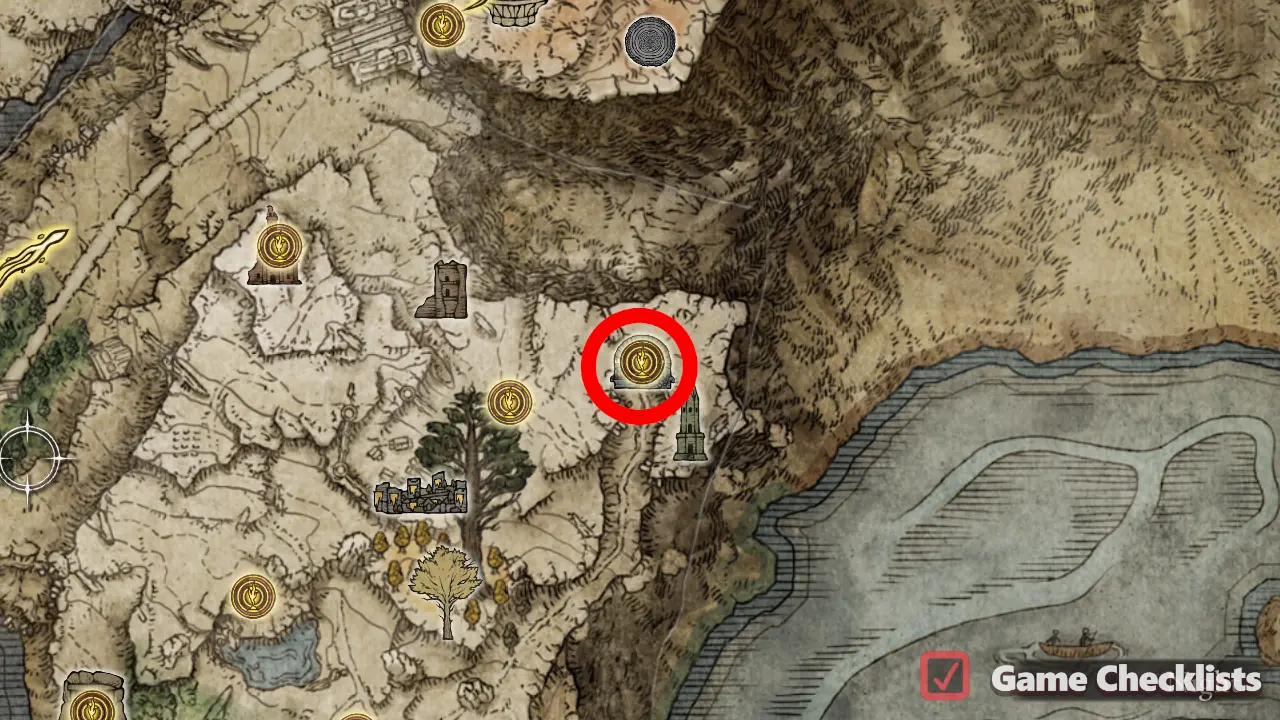 |
||
|
Defeat the Location of Winged Sword Insignia: 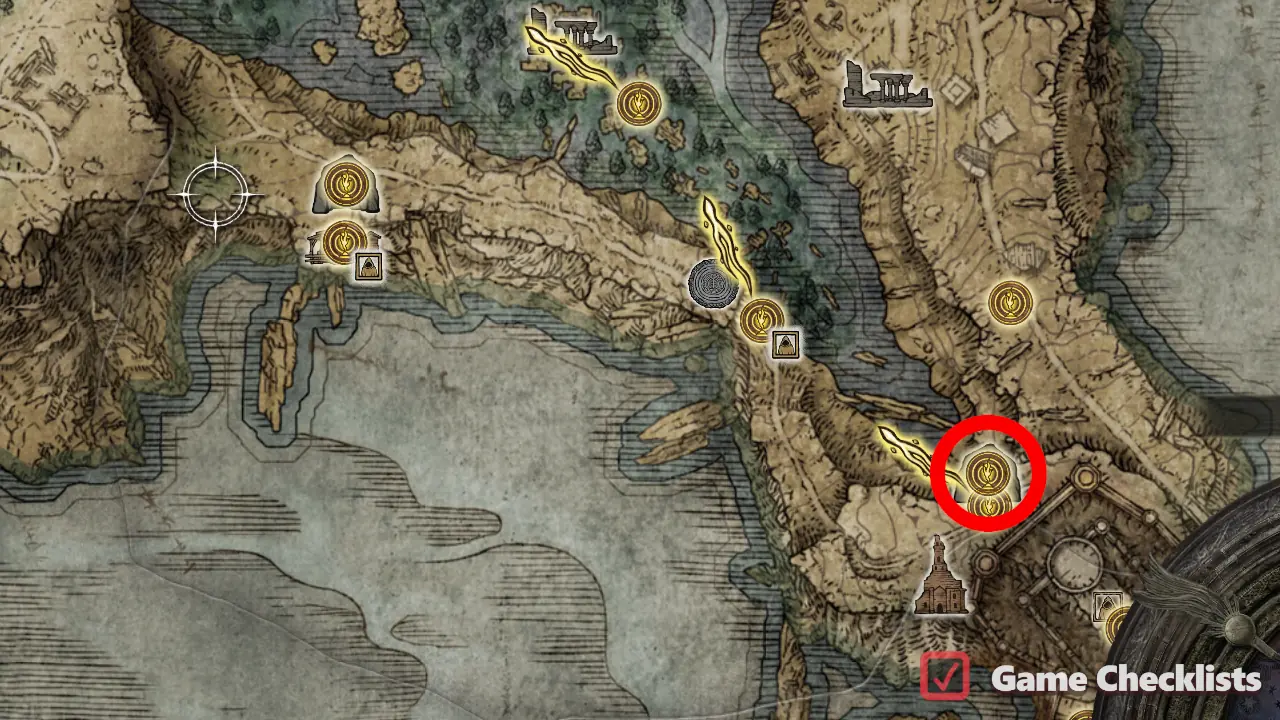 |
||
|
Missable! Complete Gowry & Location of Rotten Winged Sword Insignia: 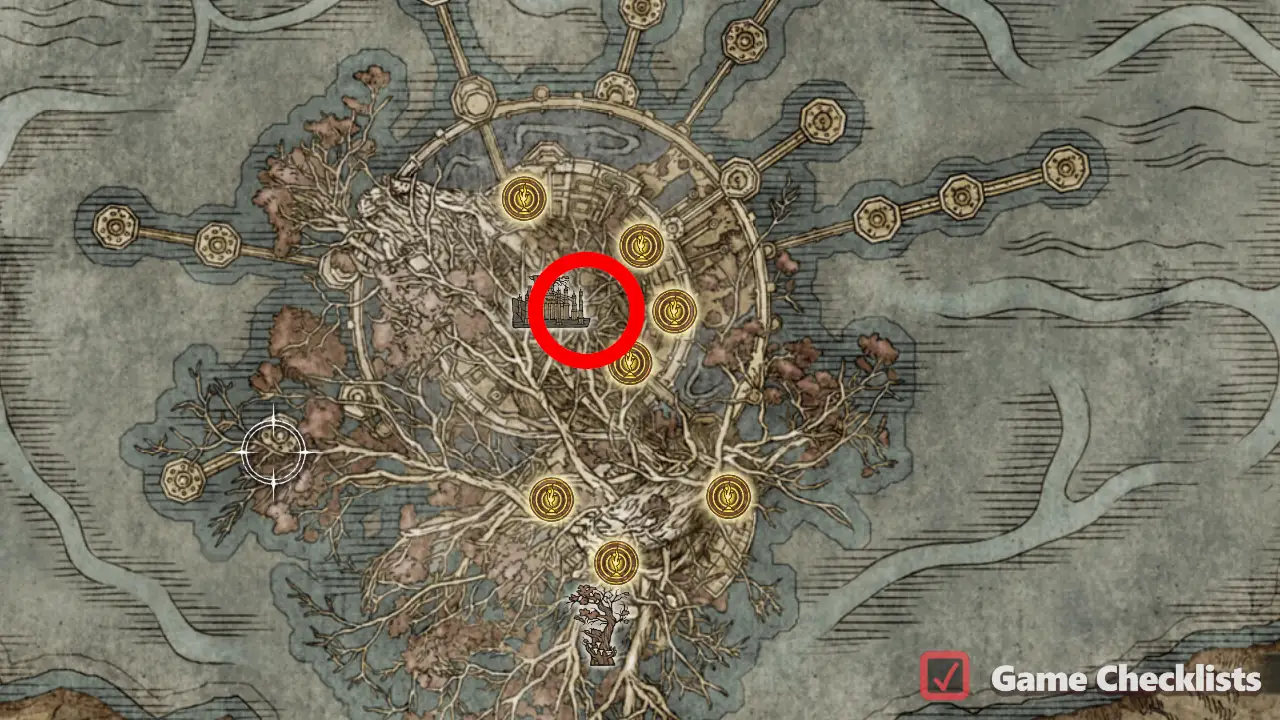 |
||
|
Missable! Complete Gowry & Location of Millicent's Prosthesis: |
||
|
Defeat the Location of Godskin Swaddling Cloth: 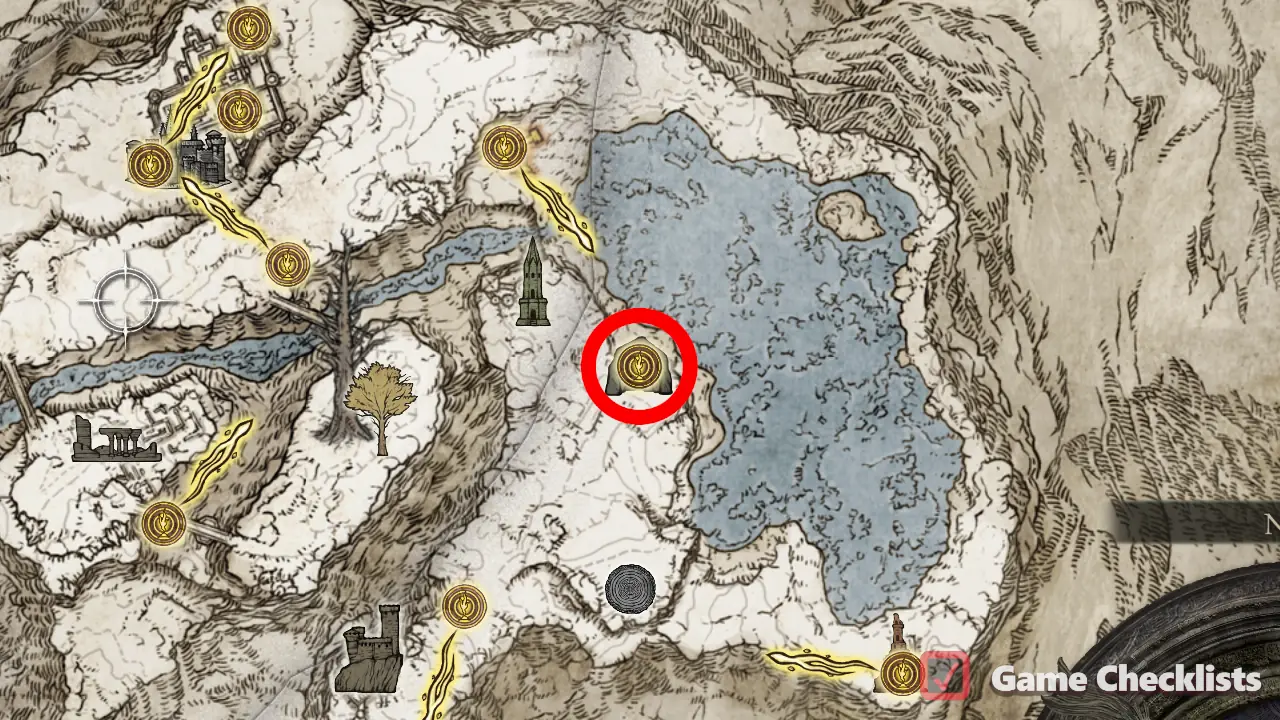 |
||
|
Defeat the Location of Kindred of Rot's Exultation:  |
||
|
Defeat the Location of Lord of Blood's Exultation: |
||
|
Defeat the Aging Untouchable enemy that is in the most eastern position on the map and the closest to Location of Aged One's Exultation: 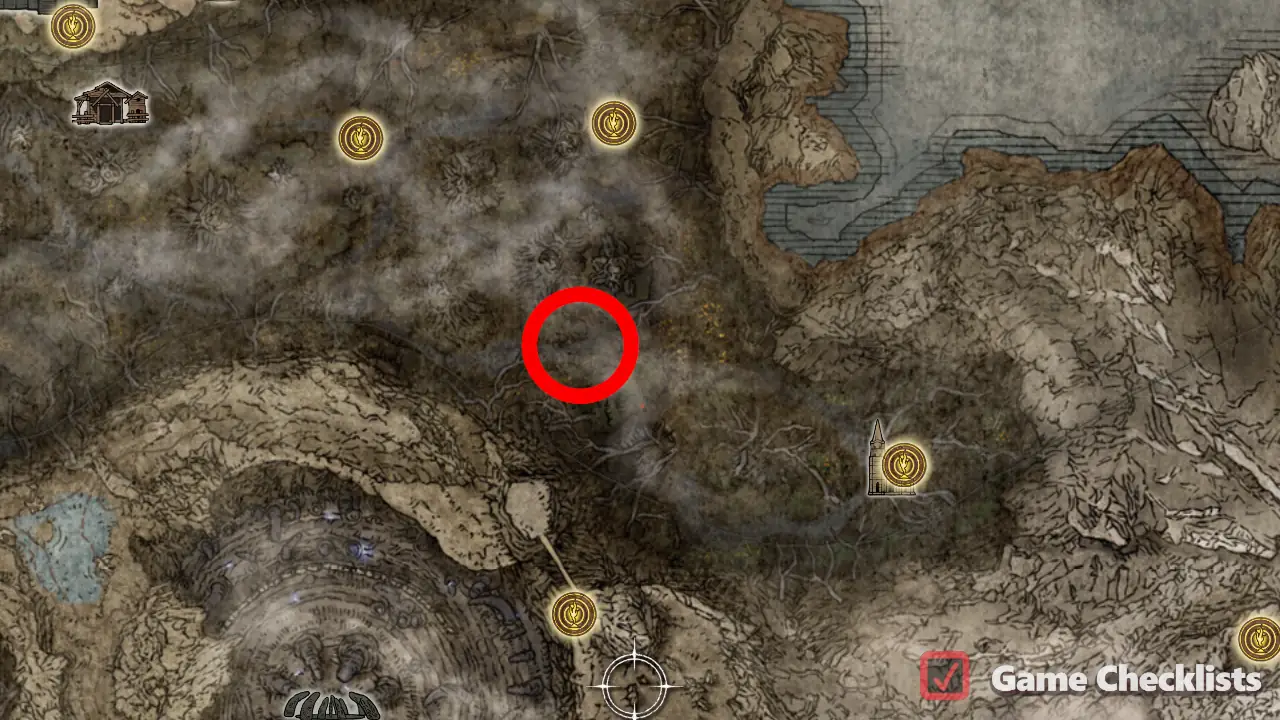 |
||
|
Progress Location of St. Trina's Smile: 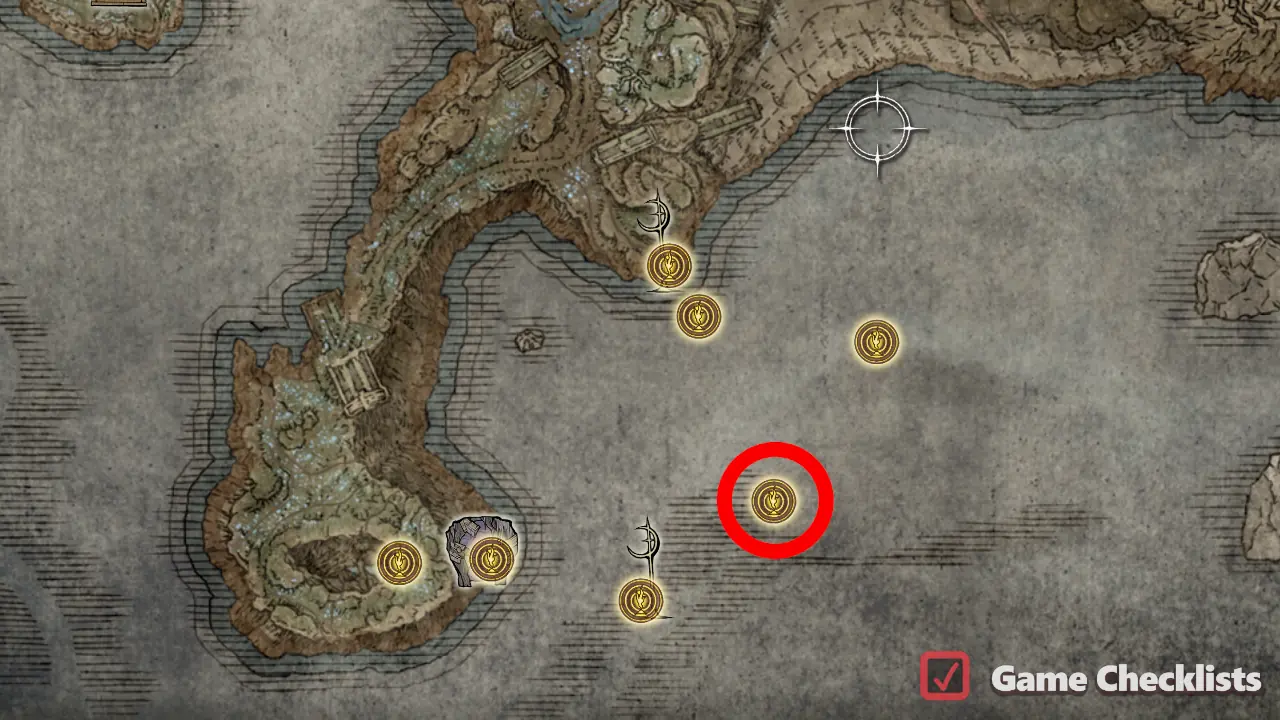 |
||
|
Inside a chest in the northeastern tower in Location of Blade of Mercy:  |
||
|
Reward from Tanith at Location of Taker's Cameo: 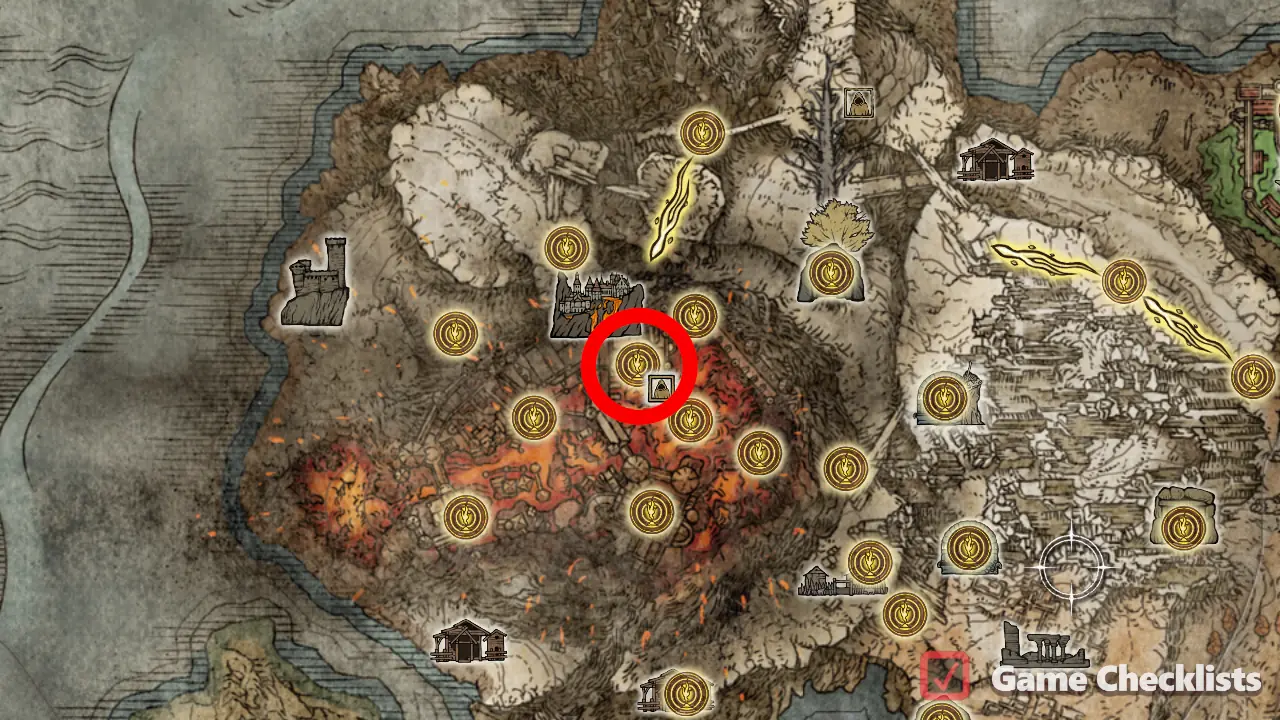 |
||
|
Missable! Sold by Finger Reader Enia for the Remembrance of the Regal Ancestor, dropped from the |
||
|
"Defeat the invading He will also appear in Church of the Crusade (northwest of Location of Crusade Insignia:  |
||
|
Near Miquella's Cross in Belurat. To reach, start at Location of Dried Bouquet: 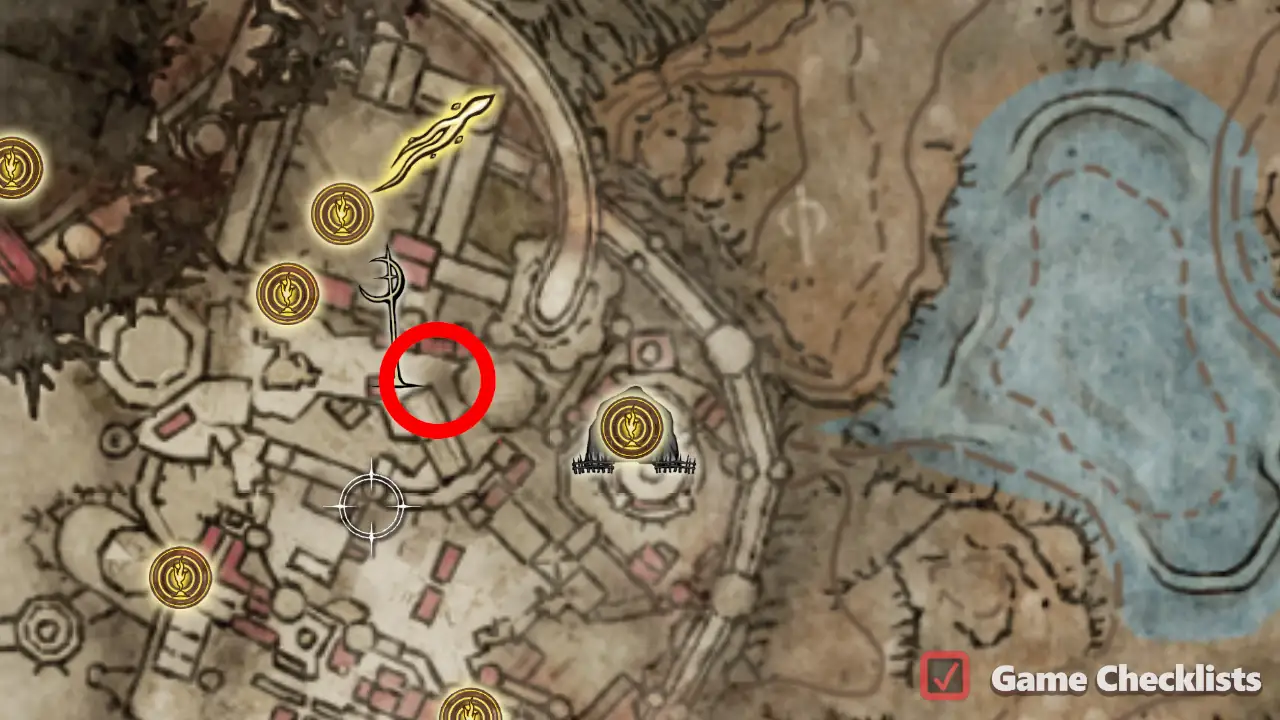 |
||
|
Defeat the Location of Gold Scarab: 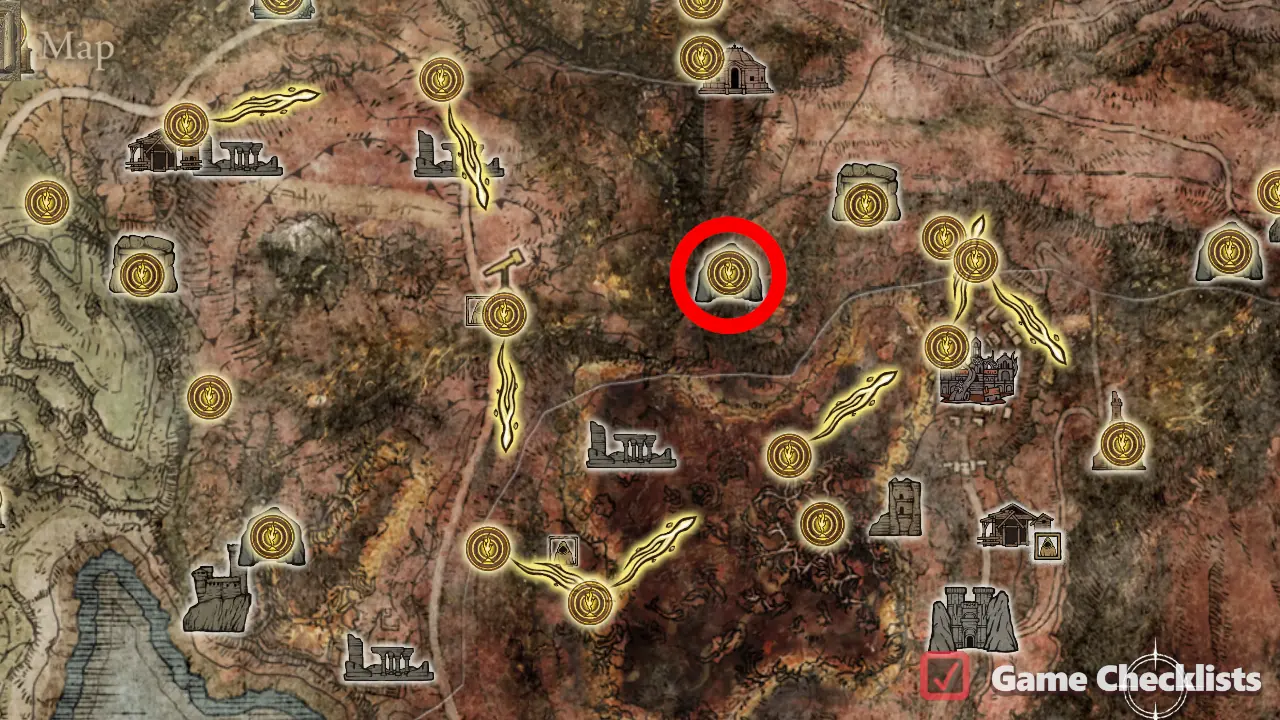 |
||
|
From the Location of Silver Scarab: |
 Fire Knight Queelign
All Stealth, Rune & Difficulty Talismans
The eighth group of Talismans, in the order as seen in Elden Ring's game inventory. Talismans with effects regarding stealth, Rune preservation or increasing difficulty.
There are 8 Talismans in All Stealth, Rune & Difficulty Talismans.
| ✓ | Talisman | Description | |
|---|---|---|---|
|
2nd assassination quest from Location of Crepus's Vial: 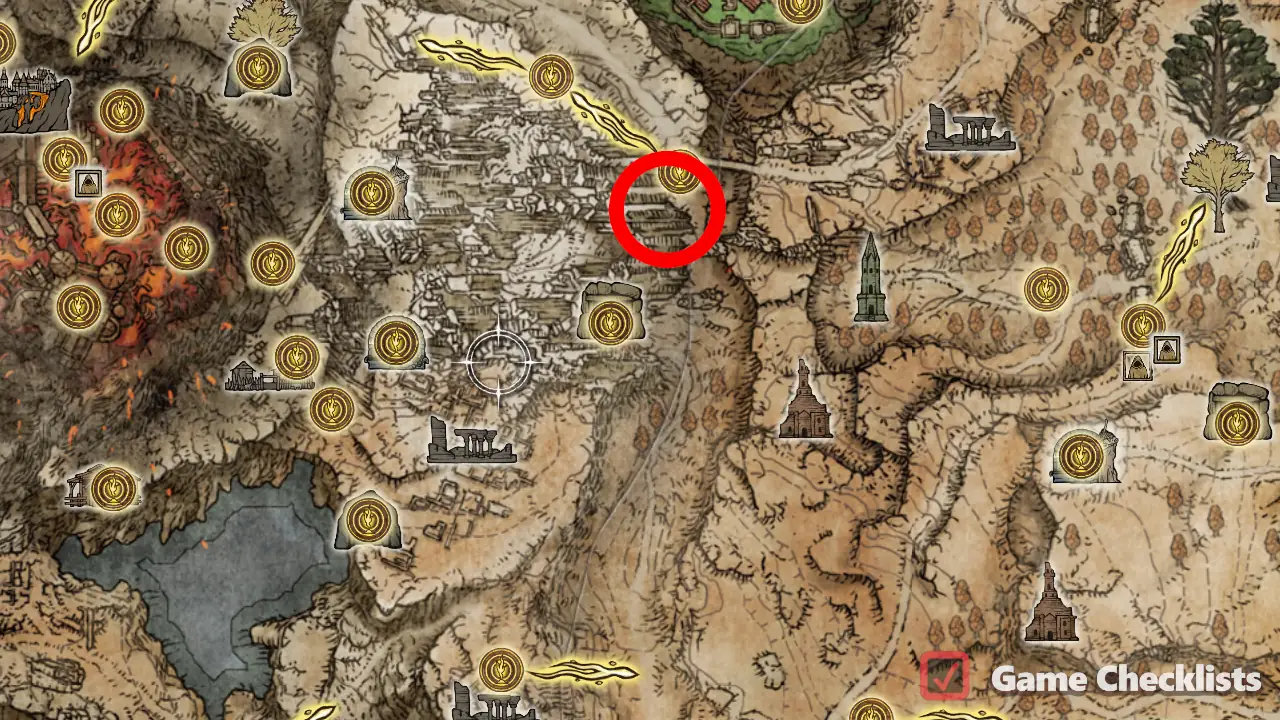 |
||
|
Defeat the Location of Concealing Veil: 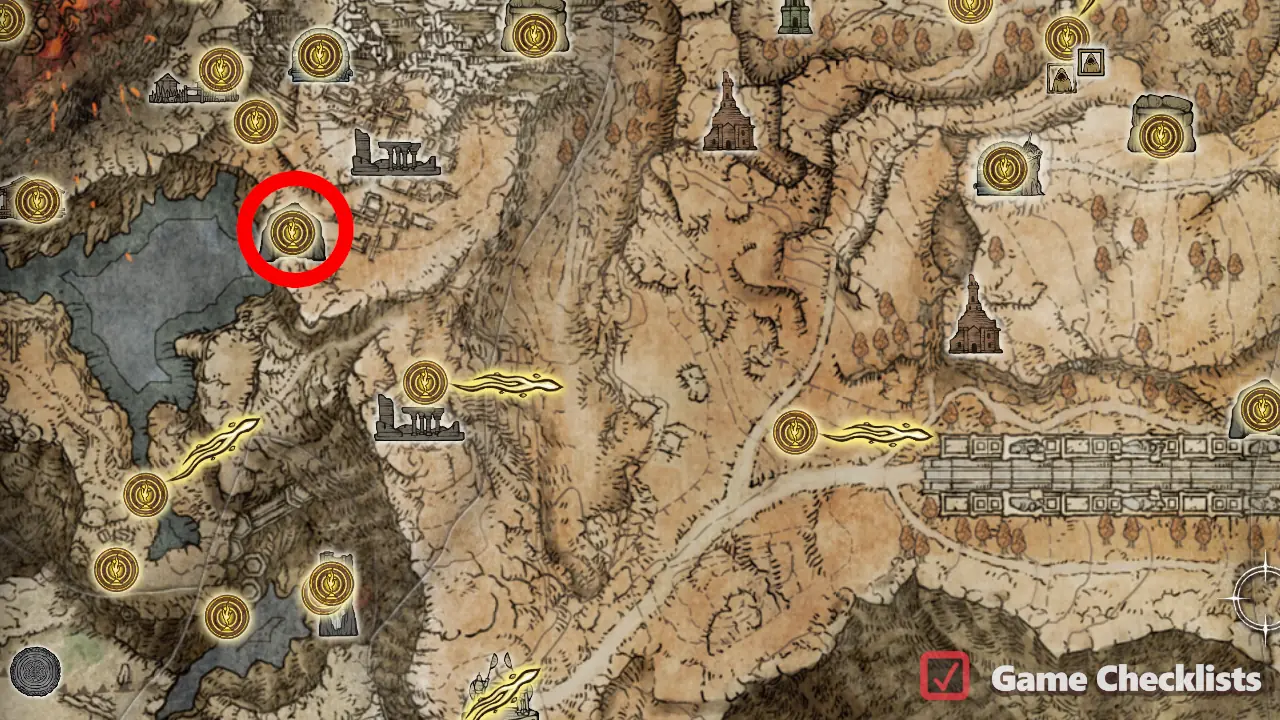 |
||
|
Go outside and take the waterwheel towards the Location of Longtail Cat Talisman:  |
||
|
Sold by Twin Maiden Husks for 5000 Runes. |
||
|
Sold by Twin Maiden Husks for 5000 Runes. |
||
|
Inside Frezied Flame Village, on a corpse. Location of Shabriri's Woe: 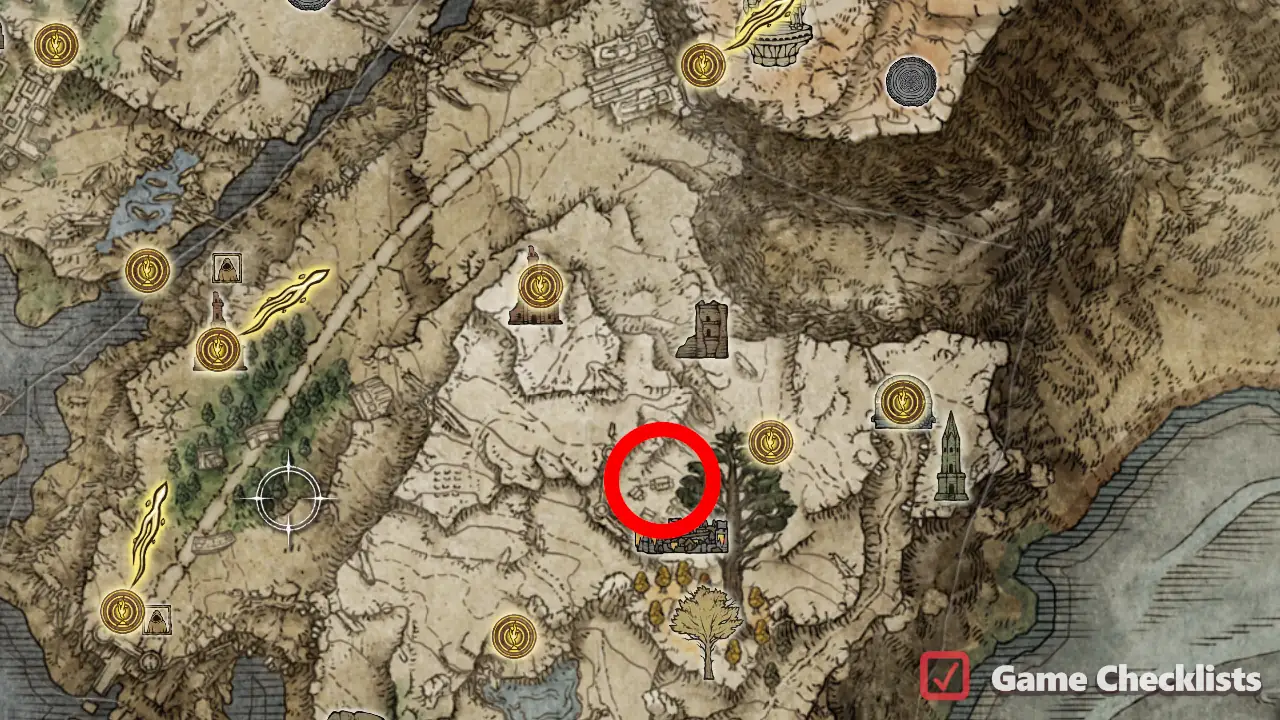 |
||
|
Complete Location of Daedicar's Woe:  |
||
|
About 20 Sacrificial Twigs are located across the map. One of the best sources is the Isolated Merchant in Location of Sacrificial Twig: 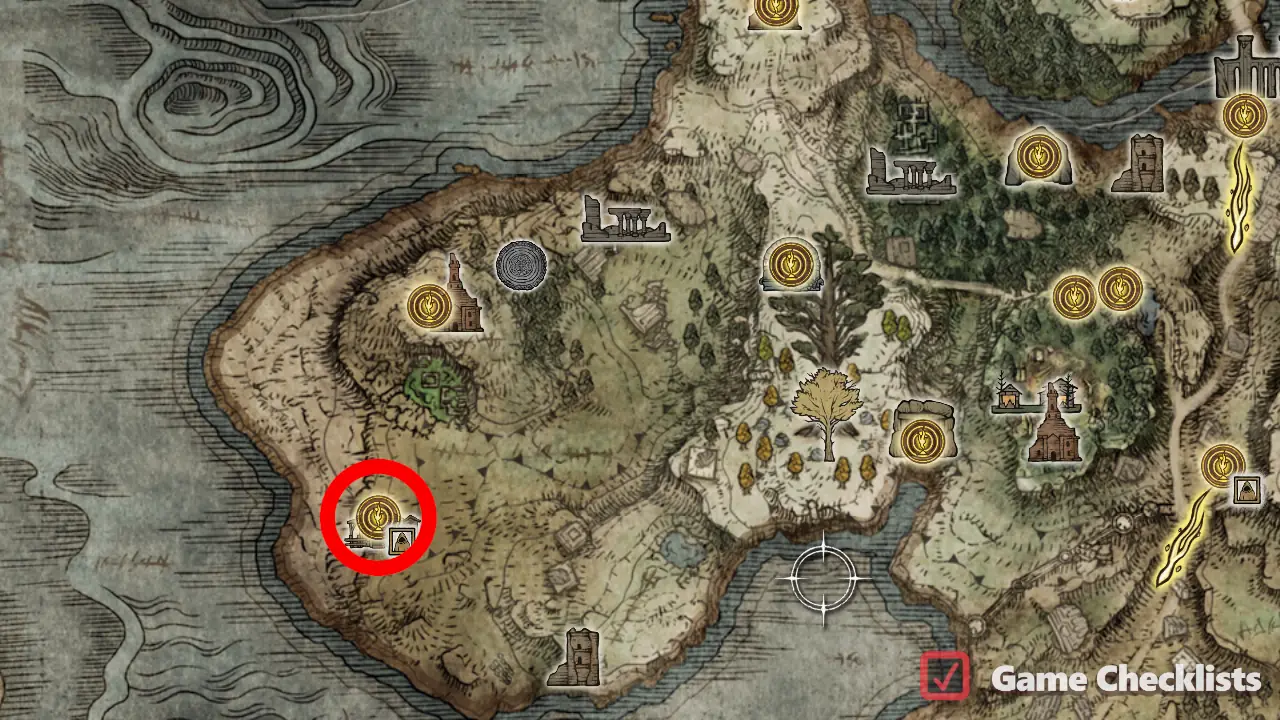 |
Frequently Asked Questions
How many Talismans are in Elden Ring?
This checklist tracks every Talisman in Elden Ring and Shadow of the Erdtree: 154 talismans in in-game inventory order across eight tables.
How do I use this Talismans checklist?
Check off each talisman as you collect it. Progress saves automatically in your browser. We strongly recommend creating a free account to back up your progress across devices and browsers.
Where can I see my whole Elden Ring progress?
After syncing with your account, open the Elden Ring progress tracker to see completion across every Elden Ring checklist in one place. Your Profile page also lists progress per game.
How are Talismans used in Elden Ring?
Talismans are passive buffs equipped in Talisman Slots on the Equipment tab. You start with one slot and can unlock three more via Talisman Pouches. You cannot equip two of the same talisman or different variants of the same talisman at once.
Are any Talismans missable?
Yes. 12 entries include missable warnings in their descriptions, including Viridian Amber Medallion +1, Hammer Talisman, Retaliatory Crossed-Tree, Lacerating Crossed-Tree, Carian Filigreed Crest, Warrior Jar Shard, and 6 more. Search this checklist for "missable" or "DO NOT" to review each case.